The view panel appears when you enter camera move mode by holding  +
+  (also +
  on the Mac) in the Perspective window. This window lets you quickly switch the Perspective window to common default or user-defined
views of the model.
on the Mac) in the Perspective window. This window lets you quickly switch the Perspective window to common default or user-defined
views of the model.
You can use the new ViewCube tool and NavBar, or the View Panel to control your view, or you can choose to use neither.
To select View Panel as the view control
+ . (also + Command on the Mac).
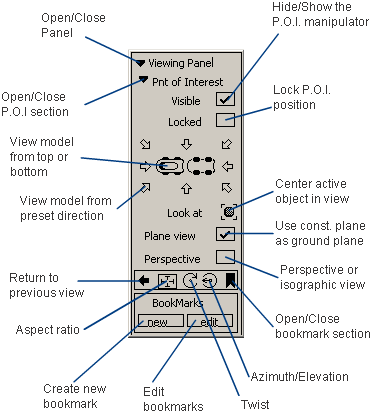
Of special interest are the following tools:
Clicking the Look at icon centers the view and zooms in on the selected objects (or all objects if nothing is picked). See also Center the view on specific objects.
Checking Plane view lets you tumble about the currently active construction plane (that is, the construction plane is used as the ground plane).
As you work on the model, you typically change the camera view back and forth between two or more areas of interest. The view panel lets you “bookmark” views of the model and return to those views by clicking the name of the bookmark.
Additionally, shading attributes (from the Diagnostic Shading panel or WindowDisplay > Hardware Shade ), and annotations (created using tools in the Paint tab) are stored in bookmarks.
When switching from one bookmark (or view) to the next, the camera is animated to take you smoothly from one view to another without getting disoriented.
The time (in seconds) taken to transition from one view to the next is controlled by the View transition time option in Preferences > General Preferences (Viewing section).
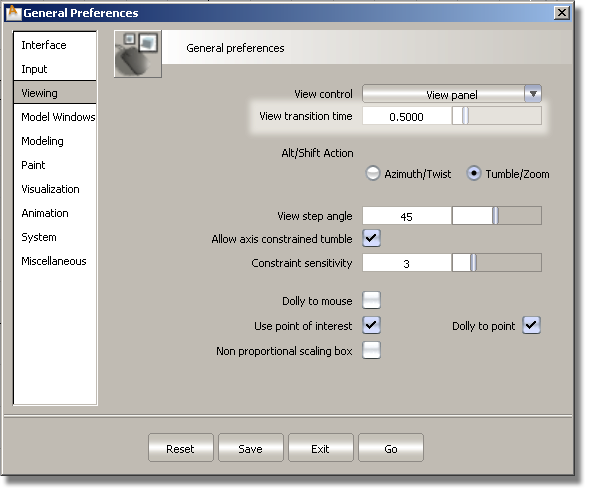
The default is 0.5 seconds. When this value is set to 0.0, the smooth animation is turned off.
See Bookmark an annotated model or more details on annotating bookmarks.
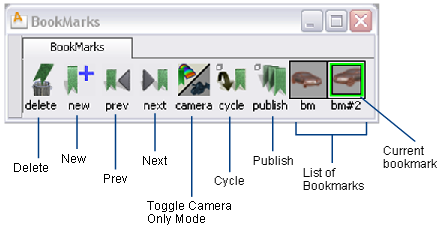
Add bookmark for the current view
+ (also + on the Mac).
In the Bookmark Lister, the new bookmark is added to the current shelf. The Viewing Panel does not have shelf separation, so all new bookmarks are added sequentially to a single list.
+ (also + on the Mac).
This opens the Bookmark Lister.
The Bookmark Lister can also be opened by choosing Windows > Bookmark Lister .
.
 + (also + on the Mac) and do any of the following in the Bookmark Lister:
 (Windows) or
  (Mac) and double-click the bookmark icon. Type a new name in the dialog box, then click OK.
 ..
..
You can also use the Page Up and Page Down keys as a quick way to show the previous or next bookmark without the need to open the Bookmark Lister.
Save one or more bookmarks as image files
A border appears around the selected bookmark(s) (green for the current one, white for the others).
A file browser window is displayed.

 (Windows) or
  (Mac).
The saved images are called <object name>_<bookmark name>.<file type>.
+ (or + on the Mac)?


 in an empty part of the