Create a bookmark of a model containing the view orientation, shading and annotations.
Bookmarks allow you to store and review annotations within a 3D model. In order to review the annotations within the context in which they were created, all information pertaining to the view and the model's shading are saved within each bookmark.
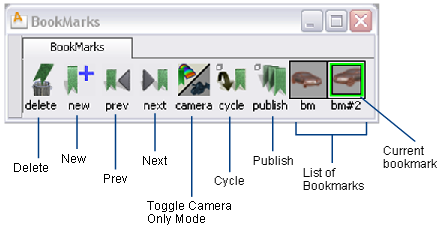
Choose Windows > Bookmark Lister to open the Bookmark Lister, which contains tools to create, edit, delete, view and publish bookmarks.
You can add shelves to the Bookmark Lister and manage them using the standard shelf interaction conventions. If you do not create any shelves, your bookmarks are placed on the default shelf called BookMarks.
Do one of the following:
This saves the current orientation, shading, and annotations of the model.
When a bookmark is created, a small thumbnail icon of the bookmarked view is added to the Bookmark Lister. By default, bookmarked views are named BM, BM#2, BM#3... (put the mouse cursor over the icon to see this).
If a bookmark is already selected (indicated by a green outline in the Bookmark Lister), new annotations will be added to that bookmark.
See also Use the view panel.
To select one or more bookmarks
 .
.
 key and select the additional bookmarks.
A highlighted white border surrounds each selected bookmark. If the current bookmark is selected, it is surrounded by a lighter green border (a mixture of green and white pixels).
 (Windows) or
  (Mac) key and double-click on the bookmark icon.
To delete one or more bookmarks
Do one of the following:
 to drag and drop them on the Delete button (trash can).
See also To select one or more bookmarks.
To change the order of bookmarks
and drag to the new position.
A red arrow indicates where the bookmark(s) will be moved. Multiple selections are positioned sequentially at the position indicated by the red arrow.
 in an empty part of the Bookmark Lister, and choose New shelf from the drop down menu.
A confirm box opens.
A new shelf with the given name appears in the Bookmark Lister.
If two shelves are given the same name, a sequential number is appended to create unique names (for example, Shelf, Shelf#2, Shelf#3 and so on).

Do one of the following:
You can also use the Page Up and Page Down keys as a quick way to show the previous or next bookmark without the need to open the Bookmark Lister.
To change the view transition time
When switching from one bookmark (or view) to the next, the camera is animated to take you smoothly from one view to another without getting disoriented.
The time (in seconds) taken to transition from one view to the next is controlled by the View transition time option in Preferences > General Preferences (Viewing section).
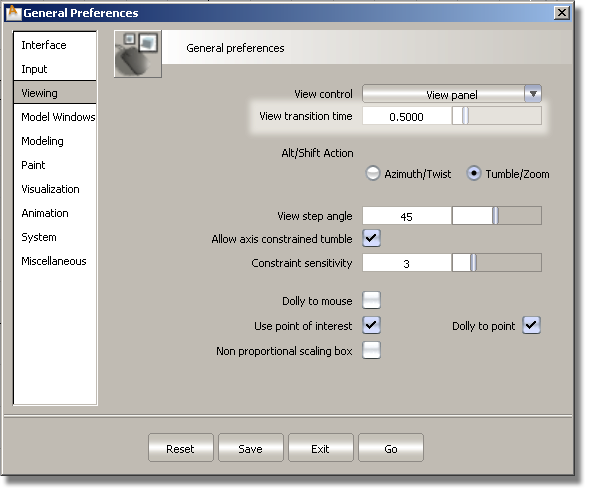
The default is 0.5 seconds. When this value is set to 0.0, the smooth animation is turned off.
Save your file in the normal way, using File > Save or File > Save As
 .
.
The bookmarks are saved in the wire file and can be retrieved back into Alias.
To save one or more bookmarks as image files
A border appears around the selected bookmark(s) (green for the current one, white for the others).
A file browser window opens.

 (Windows) or
  (Mac).
The saved images are called <object name>_<bookmark name>.<file type>.


