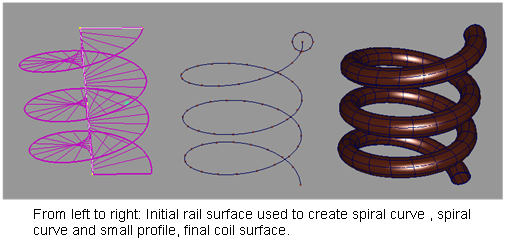
Create a surface in the shape of a spiral tube (helix) in order to model objects such as appliance cords or springs.
First you need to model a spiral curve to act as a rail. You then place a small circle or other closed curve at the beginning
of the spiral to act as the profile. Finally, you use Swept surface tools such as or to produce the coil.
Create the spiral curve
- Draw a straight line that has the height of the spiral.
- From one end of this line, create another straight line, perpendicular to it. The length of this second line should equal
the radius of the spiral.
- Choose Surfaces > Swept Surfaces > Rail Surface
 ❒.
❒.
- In the control window set both and to , and set to an angle of 360 or more. 360 degrees will produce one coil, 720 degrees will produce two coils, and so on.
- Select the second curve as the Generation Curve and the first curve as the Rail Curve to create a spiral surface.
- Choose Curve Edit > Create > Duplicate Curve
 and select the outside edge of the surface.
- Delete (or hide) the surface and keep only the curve.
Create the coil surface
- Place a small closed curve (such as a circle) centered at the beginning of the spiral, and perpendicular to it.
- Choose Surfaces > Swept Surfaces > Extrude
 (with set to ) or Surfaces > Swept Surfaces > Rail Surface (with set to and set to ).
- Select the small closed curve first, then the spiral curve.