Resize a canvas plane by cropping or expanding it. Or move it with respect to the view.
You can crop or expand a canvas plane to change its size relative to its view. You can also move a canvas plane to change its position relative to its view.
You can crop or expand the top, bottom, or side of a canvas plane to remove part of a sketch or to change the size and shape of the canvas plane. You can crop or expand a canvas plane using either the Marquee and Crop to marquee tools, or the Resize plane tool. The Resize plane tool also lets you move the canvas around while the image layers stay in place.
Cropping and expanding resize the canvas by “cutting” or “adding” material around its edges. The resolution (pixels per in/cm) does not change. The content of the image layers does not change size but gets cropped along with the canvas.
When you crop a canvas plane, the cropped regions still exist. If you later expand the canvas plane, the cropped parts of the sketch will return.
To crop or expand a canvas plane (using the Marquee and Crop to marquee tools)
 (rectangle) tool to select a rectangular region.
See Create a mask by selecting a region.
This region will be the new size of the canvas plane:
The canvas plane is either cropped (if the border of the rectangular region is within the existing canvas plane) or expanded (if the rectangular region extends beyond the edges of the existing canvas plane).
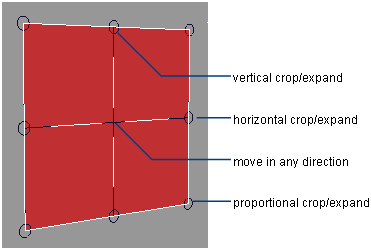
To crop, expand, or move a canvas plane (using the Resize canvas tool manipulators)
 ) or from the lister on the window’s title bar, click on the canvas you want to crop or expand.
 .
.
A manipulator appears on the canvas plane.
A confirm box appears warning that resizing cannot be undone.
The canvas is cropped, expanded, or moved along the new edges shown by the manipulator. The resolution (pixels per in/cm) does not change. The content of the image layers does not change size but gets cropped along with the canvas.
The additional space on my expanded canvas doesn’t match the color of the background?
Additional canvas space will always be transparent. To make it match the color of the existing canvas:
 .
.
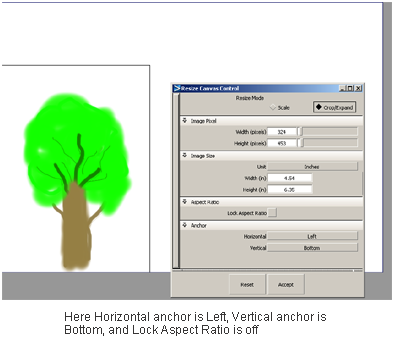
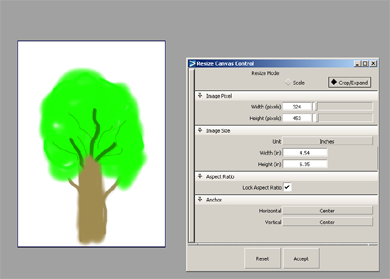
To crop or expand a canvas plane (using the Resize canvas tool control window)
The control window allows you to enter precise numeric values for the new width and height of the canvas as well as specify an anchor point.
) or from the lister on the window’s title bar, click on the canvas you want to crop/expand.
❒ to open the control window.
A black outline shows where the edges of the resized canvas will be.
A confirm box appears warning that resizing cannot be undone.
The canvas is cropped or expanded according to the values you chose in the control window. The resolution (pixels per in/cm) does not change. The content of the image layers does not change size but gets cropped along with the canvas.
The additional space on my expanded canvas doesn’t match the color of the background?
Additional canvas space will always be transparent. To make it match the color of the existing canvas:
.


