Opens the Canvas Layer Editor window and allows you to control the arrangement of image layers, mask layers and shape layers on the current canvas.
Only the layers on the currently active canvas are displayed. Drag the mouse over an icon to see a “tool tip” describing its purpose.
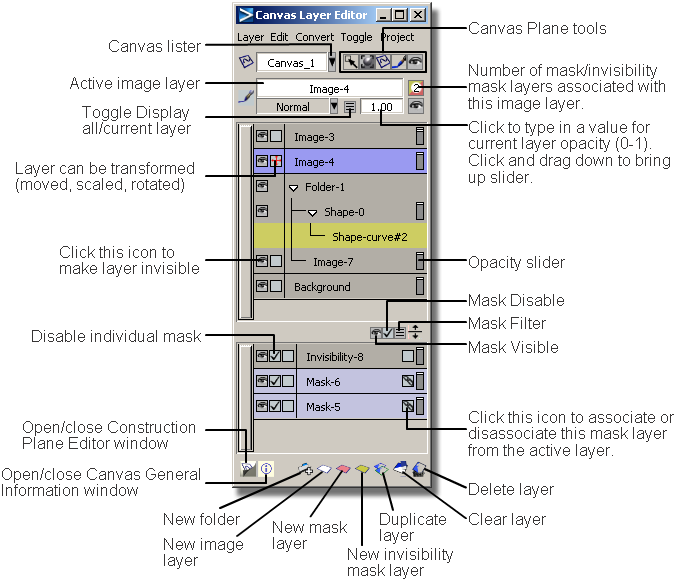
The editor shows the different types of layers on the current canvas. Image layers and Mask layers are displayed separately inside a split window. This allows you to associate one or more mask layers with any image layer, and re-use the same mask layers for different image layers.
It is also possible to create Invisibility Mask layers in the bottom section of the window. These are similar to mask layers, except that the hidden paint can be shown again.
The window has a set of menus and icons for control over the layers. Some functionality can be accessed from either a menu item or an icon.
All the functions accessible through the menus can also be associated to a hotkey through the Special:Canvas Layer Editor section of the Hotkeys editor (Preferences > Interface > Hotkeys/Menus ).
).
Construction planes and canvas planes are managed in a different editor window. (See Windows > Editors > Construction Plane editor ).
).
The content of the Canvas Layer Editor updates to show the layers on the new active canvas.
To see the properties of the active canvas
 icon at the bottom of the Canvas Layer Editor.
The Canvas General Information window opens.
icon again to close it.
Click the layer name in the Canvas Layer Editor. The active layer is the one you paint on.
To turn off the display of the layer thumbnails
The layer thumbnails are turned on by default. To turn off the thumbnails (in order to provide more space for the layer names):
 .
.
To associate image layers and mask layers
To see the relationships between image and mask layers
The associated Masks and Invisibility Masks’ names are highlighted in lavender. A small icon next to the current image layer’s name (in the top part of the window) shows how many masks are associated with it.
The affected Image layers’ names are highlighted in lavender.
To disable, hide or filter mask layers
The three toggle buttons on the separator bar between image and mask layers let you affect mask layers in the following ways:
 to disable all the masks linked with the active layer. Click it again to re-enable the masks.
 to make all the masks linked with the active layer invisible, but keep them enabled. Click it again to make the masks visible.
 to show only the mask layers linked with the active layer in the Canvas Layer Editor. Click it again to show all the mask
layers.
to show only the mask layers linked with the active layer in the Canvas Layer Editor. Click it again to show all the mask
layers.
To change the order of layers on a canvas
When a canvas plane contains more than one image layer, you can arrange the image layers in any order. For example, you can move an image layer in the Canvas Layer Editor so that it appears behind or in front of another image layer.
You can move any number of image layers, mask layers, and folders at once.
The layer appears blue.
 and
and  (Windows) or and
  (Mac) keys to add other layers or folders to the selection.
The new selected layers/folders appear in white.
 or
or  and drag the layers to the desired location.
A small pink arrow points to the location.
To organize layers into folders
To help categorize and group image layers, you can create folders in the Canvas Layer Editor. The folders are collapsible and expandable, to provide better viewing.
 at the bottom of the editor.
To copy and paste layers into another canvas
The layer appears blue.
and (Windows) or and (Mac) keys to add other layers or folders to the selection.
The new selected layers/folders appear in white.
The selected layers are pasted into the active canvas, above its original active layer, and remain selected. The names and relative positioning of the pasted layers is preserved.
To convert layers into other layer types
You can convert an image, mask, or invisibility mask layer into a different type of layer (for example convert an image layer into a mask layer) by using tools from the Convert menu.
A copy of the layer is made and converted to the proper type. The original layer is kept.
To see the content of only one layer in the view window
Instead of turning off the visibility of all layers but the one you want to see, you can isolate it more quickly with this method:
 button at the top of the Canvas Layer Editor.
Only the content of the selected layer is displayed in the view windows.
 button at the top of the Canvas Layer Editor.
| Icon | Meaning |
|---|---|
| Layer visibility in view window | |
 |
Visible |
 |
Invisible |
 |
Active layer opacity value |
 |
Layer opacity slider |
|
|
Display all layers |
|
|
Display current (active) layer only |
| Layer type | |
 |
Image (Paint) |
 |
Mask |
 |
Invisibility mask |
 |
Image (Paint) shape |
 |
Mask shape |
 |
Invisibility mask shape |
 |
Image layer has hidden paint |
 |
Text layer |
| Ability to move layer on canvas | |
 |
Layer can be transformed |
|
|
Layer cannot be transformed |
| Mask icons on divider bar (toggles) | |
 |
Show/hide all masks linked with the active layer (but keep enabled) |
 |
Enable/disable all masks linked with the active layer |
 |
Show all masks/Show only masks linked with the active layer in lister |
| Other mask icons | |
 |
This mask layer is associated with the active layer |
 |
If the check mark is off, this mask layer is disabled but retains its link to any image layer |
 |
Number of mask layers associated with the active image layer. |
| Canvas Plane icons | |
 |
See Construction Plane editor icons. |
| Tools (at bottom of editor) | |
 |
Open/Close Construction Plane Editor |
 |
Open/Close Canvas General Information window. |
 |
New folder |
 |
New image layer |
 |
New mask layer |
 |
New invisibility mask layer |
 |
Duplicate layer |
 |
Clear layer |
 |
Delete layer |
The following icons are used in the editor:
Create a new image layer by importing an existing image. If you are using the Windows browser, you also have the choice to import the image as a mask layer.
The type of browser can be changed by choosing Preferences > General Preferences and going to the System section
All these tools convert a layer into a different type of layer. A copy of the layer is made and converted to the proper type. The original is kept.
Converting a layer into its own type is equivalent to using Layer > Duplicate.


 (Windows) or
  (Mac)
(Mac)
 next to the visibility icon to remove the check mark. Click it again to re-enable the mask.
 icon turned on will be transformed.
 icon)
icon)