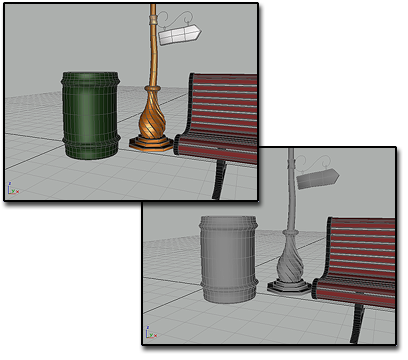
You can freeze any selection of objects in your scene. By default, frozen objects, whether wireframe or rendered, turn a dark gray. They remain visible, but can’t be selected, and therefore can’t be directly transformed or modified. Freezing lets you protect objects from accidental editing and speeds up redraws.

Above: No layers frozen
Below: Trash can and streetlight are frozen, and displayed in gray
You can choose to have frozen objects retain their usual color or texture in viewports. Use the Object Properties dialog  General panel
  Display Properties
  Show Frozen In Gray toggle.
Frozen objects are similar to hidden objects. Linked, instanced, and referenced objects behave when frozen just as they would if unfrozen. Frozen lights and cameras and any associated viewports continue to work as they normally do.
For more information, see Freeze Rollout.
You can freeze one or more selected objects. This is the usual method to put objects "on hold."
You can also freeze all objects that are not selected. This method lets you keep only the selected object active, useful in a cluttered scene, for example, where you want to be sure no other objects are affected.
To access Freeze options, select one or more objects and then do one of the following:
 Open the Display panel and then expand the Freeze rollout.
 Display Floater. This modeless dialog has the same options as the Freeze rollout. It also contains Hide options.
 Display quadrant.