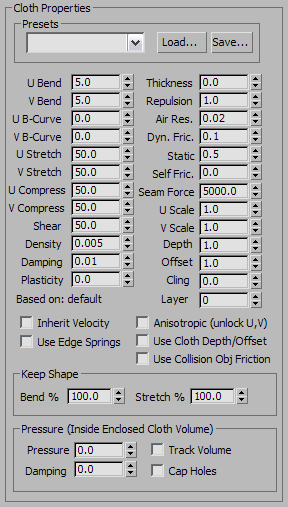
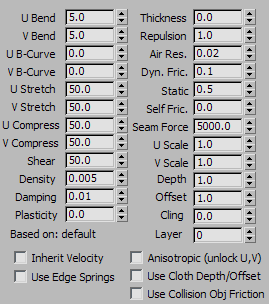
Cloth Properties control how a cloth object behaves in a Cloth simulation.
The 3ds Max interface provides a few different ways to set cloth properties. Setting these values here in the Object Properties dialog for cloth applies them to the object globally. You can also apply these values locally at either the Group sub-object level or the Panel sub-object level.
If you turn on Use Panel Properties (see Object Properties Dialog (Cloth)), 3ds Max disables the global settings in this group. Setting properties locally for panels is useful mainly when you are modeling a multi-panel garment created by the Garment Maker modifier.
You can assign two sets of properties to a single cloth object: Property 1 and Property 2. If both sets are assigned, you can then use the Property Assignment group to interpolate or animate between the sets. See also High-Level Cloth Options.


Sets the Cloth Properties parameters to the preset chosen from the drop-down list. Any presets that are built into the system or that have been previously saved and loaded will show up here.

Resistance to bending. The higher this value is set, the less the fabric will be able to bend. A cotton fabric might bend more easily than leather, so a value of 15.0 for both U and V Bend might be good for cotton, while 50.0 would work well for leather.
By default, the U Bend and V Bend parameters are locked together so that changing one sets the other to the same value. You can set different values for the two only when Anisotropic is off. We recommend that you do this only for Garment Maker objects.

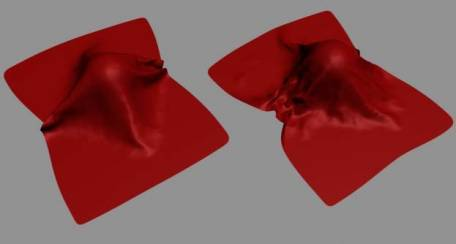
Left: U and V Bend=50, simulating a burlap material
Right: U and V Bend=2.5, simulating silk or other light fabric
Resistance to bending as the fabric folds. The default value of 0 sets the bend resistance to be constant. A setting of 1 makes the fabric very resistant to bending as the angle between triangles approaches 180 degrees. You never want two adjacent triangles to pass through each other, so you can increase this value to prevent this from happening.
By default, the U B-Curve and V B-Curve parameters are locked together so that changing one sets the other to the same value. You can set different values for the two only when Anisotropic is off. We recommend that you do this only for Garment Maker objects.
Resistance to stretching. The default value of 50.0 is a reasonable value for most types of cloth. A larger value will be stiffer, while a smaller one will be stretchy like rubber.
By default, the U Stretch and V Stretch parameters are locked together so that changing one sets the other to the same value. You can set different values for the two only when Anisotropic is off. We recommend that you do this only for Garment Maker objects.
Resistance to compression. Although these values default to 50.0, like their counterpart Stretch values, assigning values lower than the Stretch values can give good results, because when cloth is compressed along the length of its fibers, it tends to buckle rather than shrink.
By default, the U Compress and V Compress parameters are locked together so that changing one sets the other to the same value. You can set different values for the two only when Anisotropic is off. We recommend that you do this only for Garment Maker objects.
Resistance to shearing. Higher values result in stiffer cloth fabrics. Shear defines how much the individual triangles can deform. If you were to lay the edges of the triangle out in a straight line, this value would represent how long this line can stretch. With a high value, this length will be only the sum of the length of all of the sides at rest. A low value allows this length to be greater then that of all of the triangle sides at rest. This length of stretched sides is not on a one-to-one basis. One side of the polygon can stretch more then another, as long as the total shear value is not exceeded.
The larger this value, is the more sluggishly the fabric will react. With a lower value, the fabric will behave with more spring. Cloth with more damping will come to rest sooner then cloth with less damping. High damping results in cloth that behaves as though it is moving through oil. Excessive damping can cause simulation instabilities.
The tendency of the cloth to keep its current deformation (that is, the bend angles).
This is different from Keep Shape, which determines the extent to which the cloth tends to keep its original deformation (or the one defined by the Target State). If you set Plasticity to 100.0, the cloth will not attempt to change the angles between triangles. If you want stiffer cloth, but you don't want the cloth to “balloon” up, increase the Plasticity value.
Defines the virtual thickness of a fabric for the purpose of detecting cloth-to-cloth collisions. This value is irrelevant if cloth-to-cloth collisions are disabled. Larger values keep the cloth separated by greater distances. Be careful not to use too large or small values in this field. Very large values will interfere with the natural behavior of the cloth. Very small values will cause the simulator to take too long to calculate. This distance is measured in cm (centimeters) and should be smaller than the size of the triangles that make up the cloth object. A setting of 0.0 will let Cloth automatically assign a reasonable value for thickness.

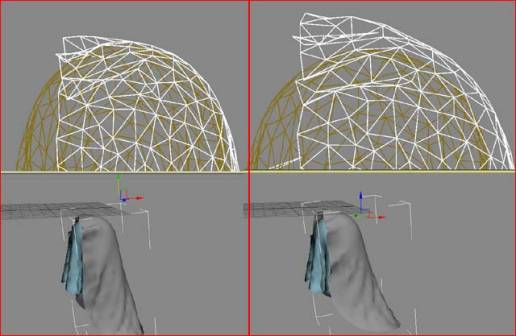
Left: The top piece of cloth with a Thickness of 0
Right: Thickness of 9
The amount of force used to repel other cloth objects. This value is irrelevant if cloth-to-cloth collisions are disabled. The simulator will apply a repulsion force scaled by this value to keep the cloth from coming in contact with other cloth objects. Increase this value if there are a lot of collisions between different parts of cloth, or if the cloth is tending to interpenetrate.
Controls how much to shrink or expand the cloth along the U direction (as defined by Garment Maker). For non-Garment Maker meshes, this applies a uniform scaling to the cloth along both axes, and the V Scale parameter is ignored. A value of less than 1 will shrink the fabric at simulation time, while a value of more than 1 will stretch it.
Collision depth for the cloth object. If a portion of cloth reaches this depth inside a collision object, then the simulation will no longer try to push the cloth out of the mesh. This value is measured in 3ds Max units.
To specify a Depth value specific to the cloth object, use this setting and be sure to turn on Use Cloth Depth/Offset.
The distance maintained between the cloth object and the collision object. A very low value can cause the collision mesh to protrude from under the cloth. A very high value causes the fabric to appear to be floating above the collision object. This value is measured in 3ds Max units.
To specify an Offset value specific to the cloth object, use this setting and be sure to turn on Use Cloth Depth/Offset.
Indicates the correct “order” of cloth pieces that might come in contact with each other. Range=–100 to 100. Default=0.
If your garments and/or panels are all correctly oriented to begin with, then cloth-to-cloth collision detection should keep items from interpenetrating. However, the initial state of a garment or panel might have some interpenetration that cannot be resolved. For example, suppose you make a jacket with Garment Maker where the front right panel is supposed to sit on top of the front left panel. When you sew together the garment (generally with self-collision off), the front panels will interpenetrate, so to make sure that the right panel sits outside the left panel, you might have to use constraints or Live Drag. Using the Layers option on the panels can help here.
Here is the logic of layers: When two pieces of cloth (A and B) are in collision-detection range, their layers (layerA and layerB) are compared and the following rules are applied:
The sign of the Layer value indicates what the "outside" of that piece of cloth is. A positive sign means "The side that the normals face is the outside".
When on, the cloth inherits the velocity of the mesh at the start of the simulation. This can be useful if you are generating a simulation in stages: generating one simulation, and then generating another that begins where the first one ended. Turning on Inherit Velocity can help create a smooth transition between the two simulations. Default=off.
When on, you can set different U and V values for the Bend, B-Curve, and Stretch parameters. The U and V directions are defined by Garment Maker and do not apply to non-Garment Maker meshes, for which setting different U/V values might result in unexpected behavior. Default=off.

These settings preserves the shape of the mesh based on the values of Bend % and Stretch %. In normal operation, when Cloth creates a simulation, it tries to "flatten out" the cloth. To enable these settings, turn on Use Target State.
Modulates the target bend angles to a value between 0.0 and the angles defined by the target state. A negative value inverts the angles. Range=–100.0 to 100.0. Default=100.0.
Modulates the target stretch angles to a value between 0.0 and the angles defined by the target state. Range=0.0 to 100.0. Default=100.0.