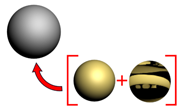
Rendering to texture, or "texture baking,” allows you to create texture maps based on an object's appearance in the rendered scene. The textures are then “baked” into the object: that is, they become part of the object via mapping, and can be used to display the textured object rapidly on Direct3D devices such as graphics display cards or game engines.
You can render to textures using the mental ray renderer

Banana object in a lighted room
 Select the objects whose textures you want to bake.
Banana object selected
 Render To Texture.
In this dialog, you can also choose various display options for showing the baked texture in shaded viewports.
After you click Render in the Render To Texture dialog, a number of things happen. (This is a typical set of events; the dialog gives you a lot of control over how texture baking actually occurs.)

Lighting map of the banana
By default, the texture type is Targa, and the element maps are placed in the \images subfolder of the folder where you installed 3ds Max.
The new textures are “flat”: In other words, they are organized according to groups of object faces.
This modifier manages the mapping of the flattened texture to faces of the object, and lets you adjust that mapping if necessary.

Flattened texture-mapping coordinates for the banana
The Shell material lets you access both materials and adjust their settings, if necessary. It also lets you choose which material to view, the original material or the texture-baked material, in shaded viewports or in renderings.

New shell material contains the banana's original material (below left) and the baked texture (below right).

Rendered light map applied to the banana

With the light map, banana appears lit even when lights are turned off.
That is texture baking in a nutshell.
For best results, Logarithmic exposure control is recommended for Render To Texture.
If Linear or Automatic exposure controls are used, each object will have different lighting levels, generating a different histogram. Each object renders as if it had a different light level and in some cases, you may not get a rendering at all. This happens because Linear and Automatic exposure controls are view dependent.
Logarithmic Exposure Control is not view dependent, and will reproduce the image correctly. See the Exposure Controls topic for more information about Linear, Automatic and Logarithmic exposure controls.
When you render to texture or “bake” a texture, you choose one or more elements to render. These elements save aspects of the rendered scene: its geometry, lighting, shadows, and so on. Some texture elements can display in shaded viewports; others require a DirectX viewport shader to view in 3ds Max.
When you bake textures (render to texture), you have more control for how the baked texture displays in shaded viewports. You set these in the Output rollout of the Render To Texture dialog. Using the Target Map Slot assignments, you can specify in detail which maps will be rendered to which slots of the existing material.
Normal bump mapping is a way of adding high-resolution detail to low-polygon objects. It is especially useful for real-time display devices such as game engines, and it can also be used in rendered scenes and animations.
Because of the variety of geometry and different situations that can arise, normal bump maps sometimes give unexpected results. Usually there is a workaround for the problem, or more than one. This topic describes some situations that can arise, and ways to correct them.
Rendering to texture, or “texture baking,” is controlled by this dialog. Most of this dialog's controls are contained in its rollouts.