The Lens Effects Flare dialog lets you add lens flare effects as a post process to rendering. Flares are usually applied to lights in your scene. The lens flare will then be generated around that object. You can control all aspects of the lens flare in the Lens Effects Flare dialog.
To save your flare settings, do one of the following:
You can save all of your lens flare settings to a file, so you can reload them any time. Lens Effects Flare files are saved to an LZF file (.lzf).
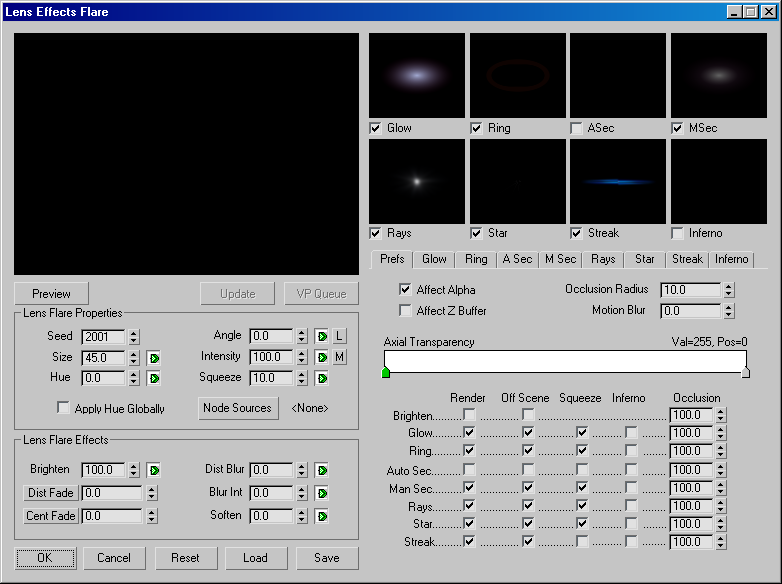
The large black window in the left corner is the main preview window. To the right of this window are smaller preview windows for each part of the flare. You can generate continual previews by clicking the Preview button under the main preview window.
There are nine Lens Effects Flare preview windows. The main preview window in the upper left corner of the Lens Effects dialog shows you the complete scene. The eight smaller preview windows in the upper right corner show the individual parts of the lens flare. Each small preview window has a check box below the window to display the flare effect.
You might notice that an individual part of the lens flare effect might not appear as bright in the smaller preview windows, compared to the main preview. This is because the brightness of a lens flare in the main preview is a result of combining the brightness of multiple effects, the total brightness being greater than a single part.
All of the preview windows are multi-threaded to increase redraw speed and take advantage of multi-processor systems. When you make an adjustment to a lens flare property and the preview window is active, the preview updates automatically. A white line at the bottom of the main preview window indicates that it is updating a change made within the lens flare dialog.
When you click the Preview button, the window displays your flare in the upper left corner if your flare has automatic or manual secondary elements. If your flare does not contain these elements, the flare is centered in the preview window. If the VP Queue button is not on, the preview displays a generic flare to which you can make adjustments. Each time you change a setting, the preview automatically updates. A white line appears at the bottom of the preview window to indicate the preview is updating.
Redraws the entire Main Preview window, as well as the smaller windows each time you click this button. This function is critical when you need to view changes you have made in the Video Post queue, such as moving the Time Slider to a different frame, changing your geometry or a light, or changing another filter that precedes the current one in the Video Post queue. The VP Queue button must be on to preview the contents of the Video Post queue. In this case, clicking the Update button causes a small dialog to appear, with an indicator showing the progress of the update.
Displays the contents of the Video Post queue in the main preview window. The Preview button must also be turned on. Rather than having to test render every time you want to see the result of the effect in the scene, VP Queue displays a final composite, combining the effect you are editing with the contents of the Video Post queue.
The view in the main preview window also depends upon which lens flare options you have set in the Preferences panel.
Specifies global settings for the flare, such as the source for the flare(s), the size, seed number, rotation, and so on.
Gives the random number generator in Lens Effects a different starting point, which creates slightly different lens flares without changing any settings. Using Seed guarantees a different lens flare, even if the differences are very small. For example, if you set up a ray effect for your lens flare, you will get slightly different rays in the lens flare if you adjust the seed value.
Affects the size of the overall lens flare. This value is a percentage of the size of the rendered frame. Default = 45.
Other parts of the lens flare, such as glow, ring, and so on, also have size adjustments, but this size setting affects the entire lens flare, including secondary flares. Adjusting individual sizes does not affect this size variable, or vice versa. This parameter can be animated. Animating the Size parameter causes flares to grow or diminish in size over the course of your animation.
Affects the amount that the flare rotates from its default position, as the position of the flare changes relative to the camera. This parameter can be animated. The lock button to the right of the Auto Key button locks the secondary flares so they do rotate. When the button is disabled, the secondary flares will not rotate.
Animating the Angle parameter does not animate the manual and automatic secondary flares unless you turn on the L button. The default behavior mimics a camera, in which the aperture does not rotate.
Rays, stars, and streaks don't animate either unless you turn on their individual Auto Rotate toggles.
Squeezes the size of the lens flare, either horizontally or vertically to compensate for different frame aspect ratios. You can set Squeeze from 100 to -100. Positive values stretch the flare horizontally, and negative values stretch it vertically. The value is a percentage of the size of the flare. This parameter can be animated.
For example, if you convert a film for use on TV, applying Squeeze would cause the lens flare to look correct on the smaller screen, and not thin and tall, although a wide-screen 35-MM film image is much wider than a regular TV.
Although Squeeze is a global setting, you can apply this effect to selected portions of your flare through the Preferences panel so that only the flare elements you want are distorted. The Squeeze spinner value is given as a percentage of the size of the flare.
Lets you select the source object for the lens flare effect. The source of the lens flare may be any object in the scene, but is generally a light, such as a target spot light, or an omni light. Clicking this button displays the Select Flare Objects dialog. You must select a source for the flare to key off.
Controls specific effects for the flare, such as fades, brightness, softening, and so on.
Lets you set an overall brightness that affects the whole image. When a bright effect, such as a lens flare, appears in an image, the whole image should appear brighter. This effect is available only when the Brighten option is enabled under the Render section of the Preferences panel. This parameter can be animated. Animating the Brighten spinner is an easy way to create flares that "flash" the scene as they appear.
Causes the effect of the lens flare to fade with its distance from the camera. This option is used only when the Dist Fade button is turned on. The values are in 3ds Max world units. This option is used when you want to create the effect of flares disappearing at a certain point away from the camera.
Let you create and control the lens flare. Each of the nine tabs controls a specific aspect of the lens flare.
A flare is composed of eight basic parts. Each part of a flare is controlled on its own panel in the Lens Effects Flare interface. Each part of the lens flare can be individually activated and deactivated to create different effects.
Prefs: This page lets you control which parts of a lens flare are active and how they effect the overall image.
Glow: A general glow centered around the source object of the flare. You can control the color, size, shape, and other aspects of the glow.
Ring: A circular color band that surrounds the center of the source object. You can control the color, size, shape, and other aspects of the ring.
A Sec: Auto Secondary Flares. The small circles you would normally see coming out from the source of the lens flare. As the camera position changes relative to the source object, the secondary flares move. The secondary flares are automatically generated when this option is active.
M Sec: Manual Secondary Flares. Additional secondary flares added to the lens flare effect. They appear in the same axis as the automatic secondary flares and look very similar.
Rays: Bright lines that radiate out from the center of the source object, providing the illusion of extreme brightness for the object.
Star: Bright lines that radiate out from the center of the source object, generally composed of 6 or more spokes, (instead of hundreds, like a ray). Stars are generally thicker and extend out farther from the center of the source object than rays.
Streak: Wide horizontal bands that run through the center of the source object.
Inferno: Lets you add special effects, such as explosions, to your flare effect.
In the Prefs panel, you can control whether or not specific parts of the lens flare, such as the rays or the star are rendered by turning them on or off. You can also control the axial transparency of the lens flare.
The glow of a lens flare is centered around the source object of the flare. The parameters on the Glow panel let you control each aspect of the glow.
The ring is a circular color band that surrounds the center of the source object. You set ring options on the Ring panel of the Lens Effects Flare dialog.
Secondary flares are the small circles you would normally see coming out from the source of the lens flare along an axis relative to the camera position. These are caused by light refracting off the different lens elements in the camera. As the camera position changes relative to the source object, the secondary flares move. These secondary flares are automatically generated when this option is selected in the Preferences section of the dialog.
Manual secondary flares are additional secondary flares that are individually added to the lens flare. These can be used in addition to, or in place of automatic secondary flares.
Rays are bright single-pixel lines that radiate from the center of the source object, providing the illusion of extreme brightness for the object. Rays let you emulate scratches in the lens elements of a camera.
A Star is larger than a ray effect and is composed of six or more spokes, instead of hundreds like a ray. Stars are thicker and extend out farther from the center of the source object than rays. You control the settings for stars on the Star panel of the Lens Effects Flare dialog.
A streak is a wide horizontal band that runs through the center of the source object. In real camera work, it is produced when using anamorphic lenses to film a scene. You set streak options on the Streak panel of the Lens Effects Flare dialog.
Infernos let you use lens flare to create explosions, fire, and smoke effects and add a bit of fractal noise to any part of the lens flare. This noise comes in three types: Gaseous, Electric, and Fiery.


 (Add Image Filter Event)