In this portion of the tutorial you learn to improve the skinning by adjusting the Weight setting for vertices with respect to rig bones, thus determining how the rig animation affects the character mesh. You start with the lower half of the character, beginning with the feet.
 (Open File), navigate to
the \character_animation\skinning\ folder,
and open the file configuring_skin.max.
(Open File), navigate to
the \character_animation\skinning\ folder,
and open the file configuring_skin.max.
This scene contains the Emma character skinned and animated, with the correct links already in place and the rig hidden.
 play the animation and check
for problem areas. For example, around frame 70 the knees become narrower,
and thus look unnatural. Even more blatant is the distortion of the
shoulder around frame 210.
play the animation and check
for problem areas. For example, around frame 70 the knees become narrower,
and thus look unnatural. Even more blatant is the distortion of the
shoulder around frame 210.
 (Select Object) is active
. Select the Emma object and go to the Modify
panel. On the Parameters rollout, click Edit Envelopes.
(Select Object) is active
. Select the Emma object and go to the Modify
panel. On the Parameters rollout, click Edit Envelopes.
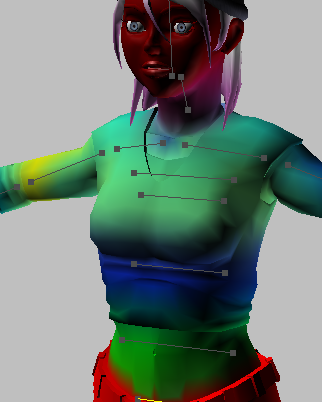
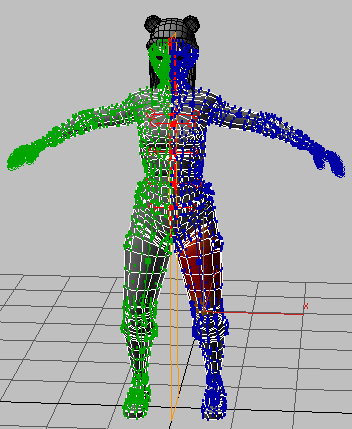
The character mesh turns gray except for a color gradient around the pelvis region. The gradient shows the weighting of the skin vertices assigned to the pelvis. By default, EmmaRigPelvis is the first entry in the Bones list on the Parameters rollout, so its values are the first to be displayed when you turn on Edit Envelopes.
The term “weighting” will be explained shortly.
Drag the left edge of the command panel to the left to expand it to multiple columns.
Bones appear as straight lines with vertices at the ends.
If, however, a vertex is, say, equidistant from two bones but far from any others, Skin assigns both bones to the vertex and gives each a Weight value of 0.5, or 50%, for that vertex. In such a case, the motion of both bones contributes equally to that of the vertex. If only one of the bones moves, the vertex moves half that distance. This is how the Skin modifier accommodates for the motion of a character mesh around bending joints such as knees and shoulders.
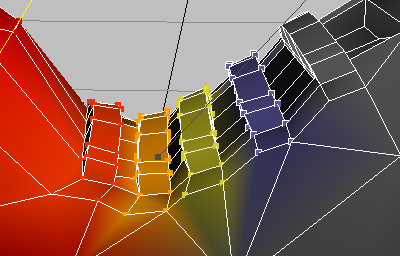
The Weight values for a highlighted bone appear by default on the mesh as a gradient, with red representing higher weights, decreasing to orange, yellow, green, and then blue for the lowest values. Vertices use the same color scheme, and since you’ll be adjusting weights at the vertex level, it’s usually best to have the viewport set to Smooth + Highlights + Edged Faces display mode (toggle with F4) or Wireframe mode (toggle with F3).
Incidentally, the Skin modifier determines which vertices are affected by a bone or bones by creating an “envelope” around each bone, which is a capsule-shaped 3D volume that you can edit interactively to adjust the vertex weighting at a high level. However, you have better control by adjusting Weight values for individual vertices and groups of vertices. This is a more-common practice in professional environments such as game-development studios, so it’s the one this tutorial focuses on. This method is a bit more painstaking, but can produce optimal results reasonably quickly.
Make no mistake, however: Skinning a character is a detail-oriented task, and requires lots of experimentation and trial-and-error, so it benefits from a liberal supply of patience. This aim of this tutorial is to demonstrate the overall process, but it’s impractical to describe every step in detail in such a context. In other words, we can’t show you exactly what to do every step of the way, but instead provide guidance and examples; the rest is up to you.
We won’t keep reminding you, but it’s important to remember when going through a complex method such as skinning a character to save your work incrementally as you go so you can easily return to a previous version if things start to go wrong.
Examine some Skin modifier options:
You edit a vertex’s weight by changing its Weight value with respect to a particular bone. In order to do that, the vertex must be assigned to two or more bones, because Weight is a relative value. For a given vertex, if its Weight value with respect to bone A is, for example, 0.6, and its Weight value with respect to bone B is 0.4, then bone A’s motion has half again as much influence over the vertex’s motion than does that of bone B. The total of Weight values for each vertex must always equal 1.0. So, when skinning a character using this method, you need to know which bone or bones a vertex is assigned to and the Weight values for all vertex-bone assignments.
For example, in this tutorial you’ll start with the left leg, working upward from the foot bone, and then mirror (copy and flip) the vertices’ settings to their counterparts on the right leg. You can always go back later and tweak the weights anywhere, but you work most efficiently by concentrating on a specific area at any given time.
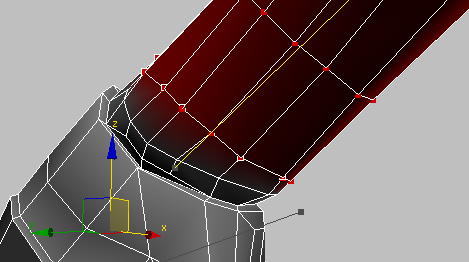
With the forearm bone selected and Show No Envelopes off, the capsule-shaped inner and outer envelopes appear in the viewport.
As a very brief explanation, each envelope comprises two concentric capsule-shaped volumes; vertices within the inner volume are fully affected by that bone, and then the weighting falls off increasingly for vertices that lie outside the inner volume and inside the outer volume. Select some of the different bones to see their envelopes, and then turn Show No Envelopes back on again.
Using envelopes is a fairly crude, high-level method of setting vertex weights in Skin, and is suitable mainly for saving time when skinning fairly simple bone-and-mesh setups.
With Color All Weights on, weighting is visible for the entire mesh, not just the selected bone.
That’s not what we want for this tutorial, so turn it back off.
 Envelopes, you can no
longer see the bone representations superimposed on the mesh, so
keep that one on.
Envelopes, you can no
longer see the bone representations superimposed on the mesh, so
keep that one on. 
Disabling envelope display makes it impossible to select a bone in the viewport.
Begin adjusting vertex weights:
Vertices.
This setting is off by default, but it needs to be on for adjusting vertex weights, so always turn it on before starting a skinning session using the method described in this tutorial.
The “stretching” animation begins with the feet and moves up the body, so you’ll follow the same progression in adjusting the skinning.
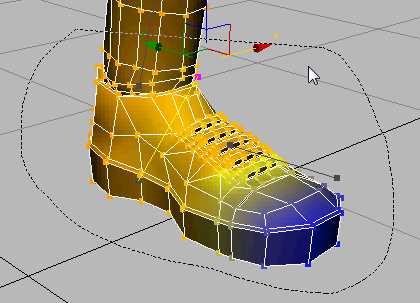
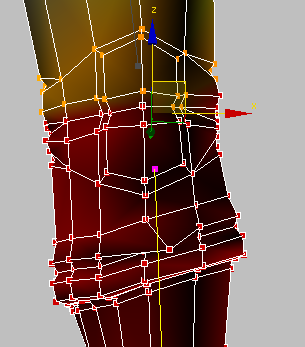
 Zoom in on the calves and
feet, and make sure the display is set to Smooth + Highlights +
Edged Faces, as shown in the following illustration.
Zoom in on the calves and
feet, and make sure the display is set to Smooth + Highlights +
Edged Faces, as shown in the following illustration.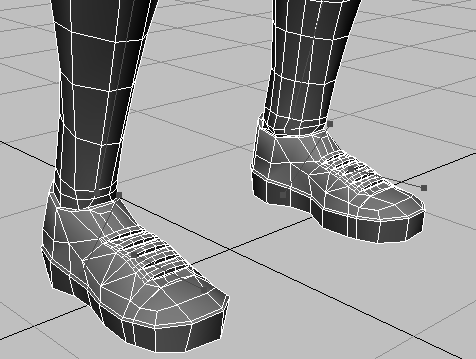
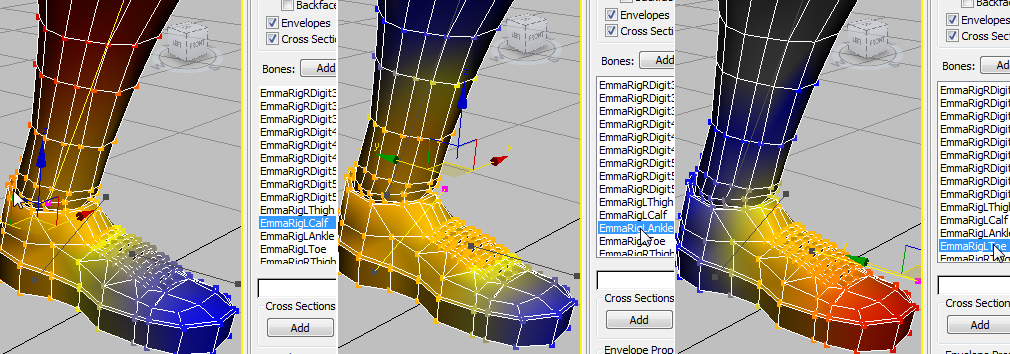
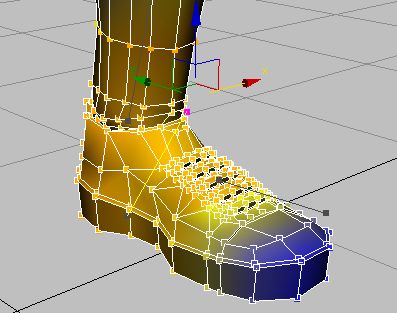
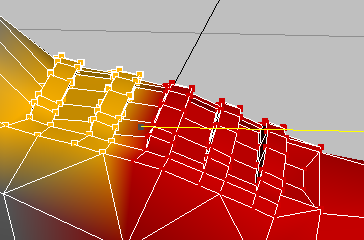
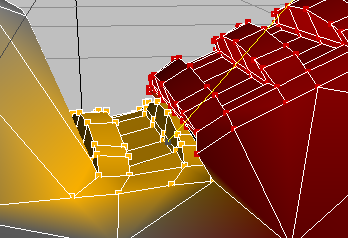
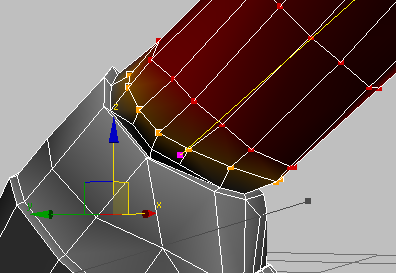
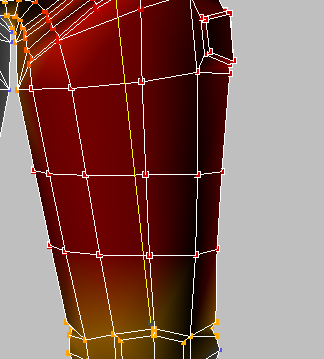
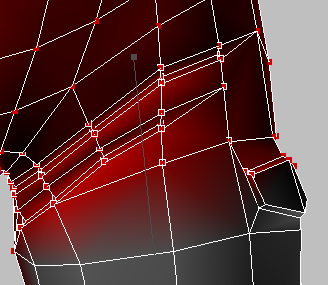
From left to right: calf, ankle, and toe bone selected.
End with EmmaRigLAnkle selected. The shading (orange, yellow, and blue) indicates that most of the vertices’ weights for this bone are less than 0.5, which is undesirable.
This is the best tool for region-selecting a contiguous group of vertices with an arbitrary outline.
Because the Backface
Cull Vertices switch is off, this also selects most of the vertices
facing away from you. Depending on the view angle and where you
drag the region, a few vertices might not be selected. To make sure
all foot and ankle vertices are selected,  orbit around the model to
double-check. Add any vertices you missed to the selection, and
remove any vertices that shouldn’t be selected.
orbit around the model to
double-check. Add any vertices you missed to the selection, and
remove any vertices that shouldn’t be selected.
To undo the orbit, press Shift+Z.
Absolute Effect is the absolute weight setting.
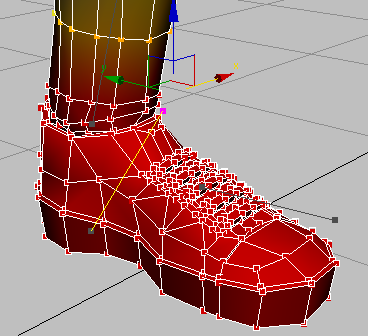
The entire foot turns red, as a visual result of the weight setting change. This way you know that no other bones can influence these vertices.
You can confirm that the toe animation no longer affects the foot mesh by scrubbing the animation. You’ll fix that next.
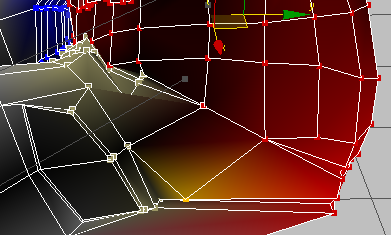
The foot is gray, indicating no weighting for this bone, but some blue coloring is evident in the shin, indicating influence that the toe should not have over this area.
This removes any remaining leg vertices from the influence of the toe bone.
Next you’re restore the vertices at the front of the foot to the influence of the toe bone.
orbit around the model to
make sure the selection is correct. To undo the orbit after the selection
is correct, press Shift+Z.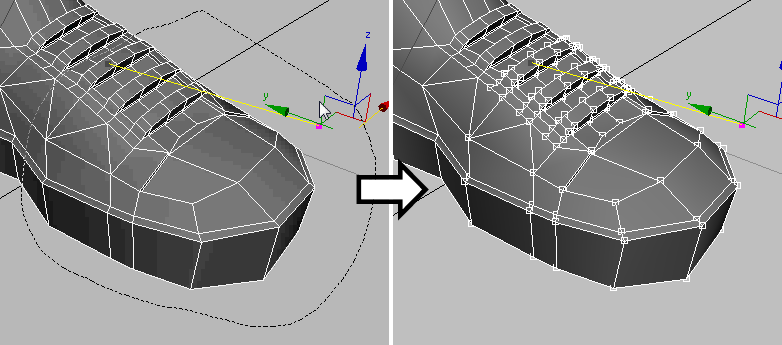
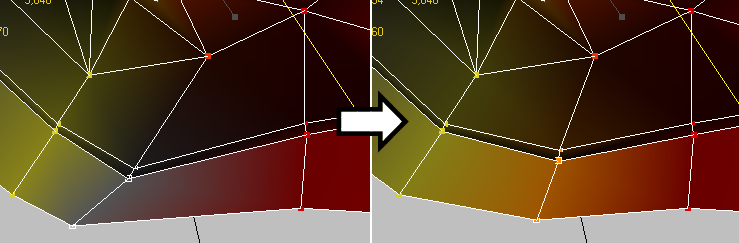
The selected vertices and surrounding mesh turn red. Now, when you scrub the animation, the break between the weighted and unweighted vertices for the toe bone is readily apparent, as compared to the right foot. At the greatest amount of bend, around frame 10, the fourth lace (unweighted) sits directly below the third lace. If you select the ankle bone, you can see that there’s no transition between the weighting at the front and the rear of the foot.
The way to resolve this is to create a transition mid-foot by weighting those vertices between the two bones.
 Return to frame 0 and then
select the vertices for the two uppermost laces.
Return to frame 0 and then
select the vertices for the two uppermost laces.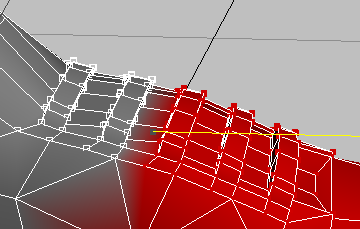
When you scrub now, the transition looks better. However, the uppermost lace is too low.
As you do, you see the lace move upward due to the increasing influence from the ankle bone. Stop around 0.6 or 0.7.
There’s a fairly sharp bend at the bottom of the foot, but there’s not much you can do about it because of the relatively low resolution of the character mesh. Even if the budget allowed for more polygons in the mesh, they would probably go into the face, which has higher priority, so this type of distortion is usually tolerated in commercial applications such as games.
Zoom out and select the
ankle bone, EmmaRigLAnkle. Check the animation
that it affects, approximately from frame 30 to 50.
It looks all right, but the ankle influence goes fairly far up the calf, which is incorrect.
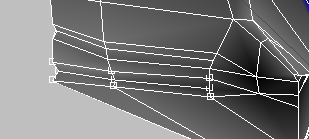
Wireframe display makes it easier to see the selected vertices, which are outlined in white.
This removes the calf vertices from the ankle bone’s influence.
This loop is now weighted half for the calf bone and half for the ankle bone.
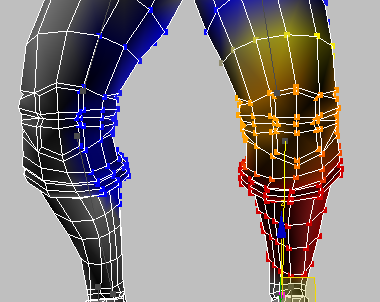
Some vertices on the right leg are influenced by the left calf bone, which you can easily correct for.
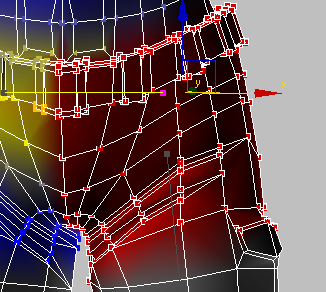
Similarly, the calf has a bit too much influence over the thigh vertices of the left leg, which is part of the cause of the loss of volume in the knee when it bends. You’ll deal with this in a bit, but first take a look at the thigh.
Great precision isn’t necessary here; the main thing is to remove the right-side vertices from the influence of the left-side bone.
In this section you’ll continue to block out the leg weighting, using the convenient, powerful Weight Tool dialog.
Given a selection of vertices with the same bone and weight assignments, Weight Tool lists all bones that affect the vertices along with the corresponding Weight values. It also lets you edit the Weight value for the current vertex selection and bone assignment, setting either an absolute Weight value or adjusting the weights of the vertices relative to their current values. In addition, Weight Tool provides controls for copying and pasting Weight values and controls such as Ring and Loop for modifying the vertex selection.
 (Weight Tool).
The Weight Tool dialog opens. Drag it to a convenient, out-of-the-way location. You can keep it open as you work.
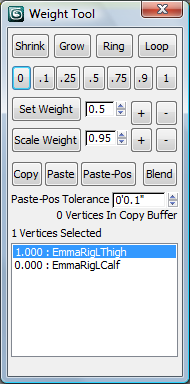
The list shows the selected vertex’s bone assignments and the Weight value for each assignment. Note that the Weight values always add up to 1.0. If, for example, you change the Weight value for a particular bone for a vertex that’s influenced by three different bones, 3ds Max changes the values for the other two bones in the opposite direction, in proportion to their current values.
Note also that the Set Weight value doesn’t change; this is a write-only field.
This sets the Weight
value for all selected vertices to 1.0 with respect to the calf
bone. Note that the weights for the other two bones in the list
are now 0. You can get rid of 0 weights in the entire mesh by clicking
Advanced Parameters rollout Remove
Zero Weights, but thats not necessary at the moment.
This goes toward the general philosophy that you work more efficiently by keeping things as clean as possible as you go, rather than going back and trying to optimize them later. It’s analogous to the modeling practices of paying attention to edge flow and making as many polygons as possible quadrilateral, avoiding triangles or n-gons.
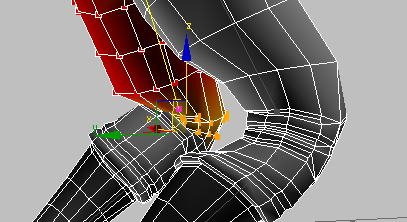
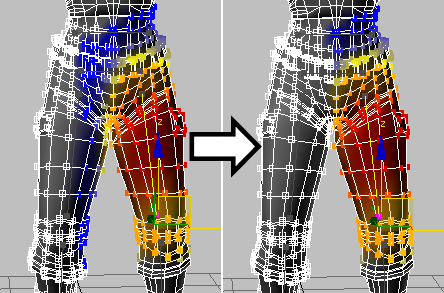
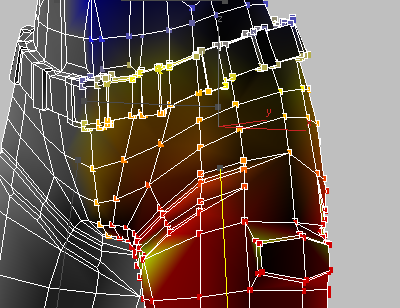
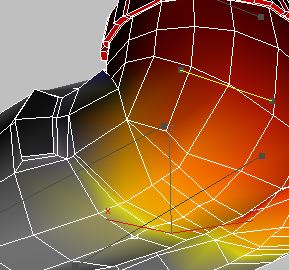
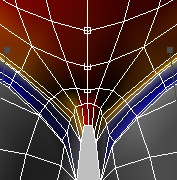
This is a good before-and-after view. The right knee is “before,” showing marked volume distortion, while the left knee, after blocking out the thigh and calf weights, looks more realistic.
However, if you look closely at the back of the left knee when the leg is bent, it’s apparent that a good deal of fine-tuning remains to be done. This requires a lot of tweaking, experimentation, and examining the results, and, again, it’s not practical to give every detail of the process here. We will, however, give you an example to start you off.
If you’d like to take a look at the completed, fully skinned model, open the included file configuring_skin_finished.max. In that file you can example the weighting for all vertices that we came up with through extended trial and error.
In general, what we ended up doing was weighting the vertices in the lower half of the knee mainly to the calf, and, starting halfway up the knee, giving gradually more weight to the thigh. Some manual tweaking was required to accommodate for the “wrinkle” vertices at the back of the knee.
After you finish skinning the left leg, it’s time to move up to the pelvis.
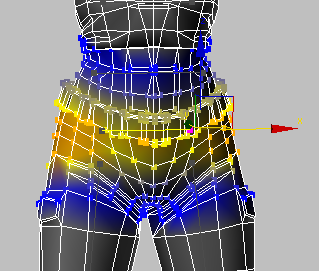
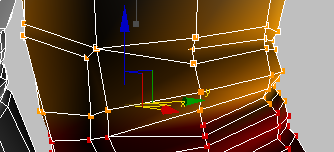
Following the practice of blocking out the weighting, the fact that no red is visible is not a good sign.
The schism between the weighting of the pelvis and thigh is glaringly obvious. Fortunately, fixing this is relatively easy.
Complete the leg and mirror the weights:
In this section you’ll correct the weighting on the vertices in the character’s rear end, and then quickly fix the weighting on the right side by mirroring the vertex weights from the left side.
The first thing to fix is some unwanted influence of the first spine bone on some pelvic vertices.
The bone also influences vertices on the right side, but because you’ll mirror all the vertex weights from the left side to the right, that’s not a concern.
Select the nine vertices on the character’s lower backside.
Currently these vertices are weighted only for the pelvis bone, so you need to add weighting for the thigh bone.
As before, when in doubt, refer to the finished scene, configuring_skin_finished.max, for specific guidance.
The bones and vertices now use color coding: blue for the left side and green for the right. Centered items, which cannot be mirrored, are colored red.
A few notes about the Mirror Mode settings:
The default value is 0’0.5”, but in our scene we were able to reduce this to 0’0.19”, which potentially allows for greater accuracy in mirroring weights. Your results might vary slightly.
To do the actual mirroring, you use the five buttons under the Mirror Mode button. From left to right, they mirror selected vertices only, all bones from either side to the other, and all vertices from either side to the other. For this tutorial, you’ll use Paste Blue To Green Verts, the button outlined in red in the following illustration:
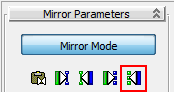
 (Paste Blue To Green Verts).
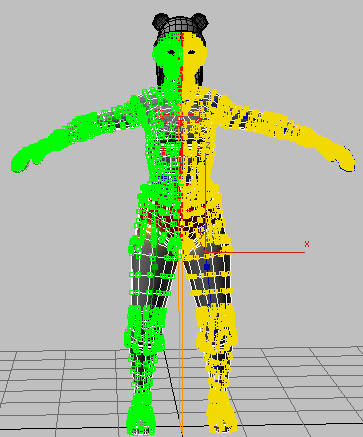
All of the weighting you’ve done for each vertex on the left side of the character has now been copied to the vertices’ counterparts on the right side, instantly correcting the skinning throughout that side. The left-side vertices, previously blue, are now yellow to indicate that they’ve been mirrored:
The animation looks mostly good on both sides of the character’s lower half. However, there’s a slight problem around frame 80, when the leg bends back, where the crease between the leg and buttock is a bit too deep.
When you’re satisfied with the results, mirror the vertices to the other side.
Another important consideration is the center line of vertices around the pelvis, which are currently weighted 100% for the pelvis. In reality, these areas would be pulled around by the movement of the legs, so they need to be weighted accordingly.
That way you give equal weight to both thigh bones, maintaining that balance as you then bring the pelvis into the equation.


 (Zoom Extents Selected).
For example, if you inadvertently selected vertices on the other
side of the character, the resulting view will be wider than expected.
(Zoom Extents Selected).
For example, if you inadvertently selected vertices on the other
side of the character, the resulting view will be wider than expected.
 (application button), choose
Save As, and save the scene as MyEmma4.max.
(application button), choose
Save As, and save the scene as MyEmma4.max.