Here are some useful tips to make working with rigid bodies easier and help prevent problems.
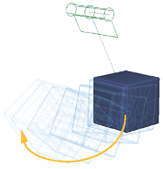
Animation ghosting, also known as onion-skinning, lets you display a series of snapshots of animated objects at frames behind and/or ahead of the current frame. If you set the ghosting to show the frames after the current frame, you can preview the simulation result that will happen when you change the object's rigid body properties or its initial state — without having to run the simulation. This can be a real time saver when testing out different scenarios!
|
|
For more information, see Ghosting Animated Objects [Animation].
If you want to create many rigid bodies in a scene, you can save time by creating one rigid body and then making clones of it. Each clone get its own copy of the master's rigid body properties, which you can then set individually as you like.
To save calculation time, you should consider whether all rigid bodies need to be active at all times. For example, if you want to make a brick wall composed of 1000 bricks being hit with a wrecking ball, there is no need to simulate the wall standing there doing nothing before it is hit. You could make all the bricks passive until the frame before the wrecking ball hits, then make them active for the remaining frames.
Clever use of animating the Passive and Mute options can speed up complex simulations enormously. See Active or Passive? for information.
Collisions don't work well with very thin objects. Grids are generally not a good idea to use: it's better to use a flattened cube that has some thickness, such as for creating a ground plane or table.
Rigid body collisions are single-faced. To make them double-faced, duplicate the rigid body geometry and inverse it.
For best results, you should set up the rigid bodies so that their geometries don't interpenetrate at the first frame (initial state) of the simulation. Slight interpenetration might be fine, by more significant amounts can cause instability as Softimage tries to resolve the interpenetration.
To avoid interpenetration, separate the rigid bodies slightly, then run the simulation. As things settle, save the rest state as the new initial state for all the rigid bodies.
Try to use simple collision bounding shapes (boxes, spheres, etc.) as the geometry type when possible because they are the fastest and most stable. Convex hulls are the next fastest and stable, followed by Actual Shape geometry. See Selecting a Collision Geometry Type for information.
If you're using Actual Shape collisions, see Actual Shape - PhysX for more information and tips.
Watch out for too much energy in the spin after a collision. Try lowering the values for the rigid bodies' Velocity - Limit Angular and Linear Limit if they do — see Setting Limits on the Rigid Body's Velocity and Acceleration.
The values for all rigid bodies' Friction and Elasticity parameters are multiplied by each other. To keep the relationship simple, it's usually best to set the values for only one collision object at a time and test out the results.
Remember that using Elasticity values above 1 makes the object actually return more energy at each collision. As well, using high values for elasticity can make a simulation less stable.
Keep the Elasticity value of colliding objects low if they are going to be bouncing around inside an enclosed space such as a box or room.
Rigid body systems that are separated physically in space are evaluated independently of each other: use this technique to create stable rigid body systems.
In general, if your simulation is jumpy, the joints are too soft, or you get too much interpenetration, you should first increase the values for the Substeps (see Setting the Accuracy of Rigid Body Simulations). However, increasing them beyond around 100 will probably not be necessary unless you have high-speed actual shape objects colliding. If your simulation is still unsuccessful with 100 substeps, there may be another problem you need to solve.
To help stabilize a collision, adjust the Adaptive Level values for Adaptive Collisions (see Setting the Accuracy of Collisions for PhysX).
However, if you're using bounding shapes for the collision geometry, turn off the Adaptive Collisions option. Bounding-shape collisions do not usually need the added accuracy of adaptive levels, and this higher accuracy costs you speed (more substeps = more time). Adaptive levels are generally more useful with Actual Shape collision geometry.
If your simulation is a bit jiggly or unstable, check in the explorer that you don't have any hidden rigid bodies or rigid body constraint objects. As with other hidden objects in Softimage, hidden rigid body and constraint objects are merely invisible, but still participate in the rigid body simulation.
Make sure to mute the hidden objects if you want to keep them, but don't want them to participate in the simulation.
If you're creating rigid bodies to be exported to games engines, check out the parameters on the Advanced page in the PhysX Dynamics Operator property editor — see PhysX Dynamics Operator Property Editor [Properties Reference].
 Except where otherwise noted, this work is licensed under a Creative Commons Attribution-NonCommercial-ShareAlike 3.0 Unported License


