| Hardware Display | Surface, Surface Trim, Displacement | Polygon Mesh | Hair
Geometry Approximation is a multi-purpose property that controls various display, modeling, and rendering properties.
To apply or edit this property, see Applying and Editing Geometry Approximation [Scene Elements].
Hardware Display
These settings do not affect the geometry or rendering of objects; they are used for display purposes only. In particular,
objects on paths will follow the curve as mathematically defined, not as displayed by the path line.
In all cases, the step value determines how many straight segments to use to approximate the exact shape of each NURBS segment.
The higher the step value, the closer the approximation and you get smoother results. However, the trade-off is a longer processing
time.
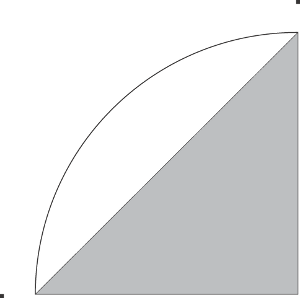
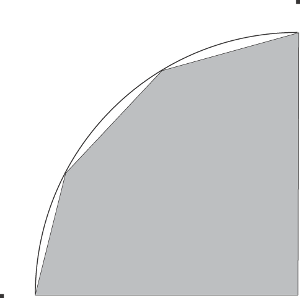
Setting the number of steps between knots on a surface — Steps = 3 (A) versus Steps = 1 (B).
Parametric - Steps
|
|
Defines the number of steps to draw between knots in U and V for surfaces. This type of approximation uses non-adaptive sampling
between parametric intervals.
|
|
|
Defines the number of steps between knots in U for drawing curves.
|
|
|
Defines the number of steps between knots in U for drawing surface curves like isolines, boundaries, trims, and projected
surface curves.
|
Surface, Surface Trim, Displacement
The settings on the Surface, Surface Trim, and Displacement tabs are similar.
-
controls how NURBS surfaces are rendered.
-
controls how the trimmed edges of NURBS surfaces are rendered.
-
controls how displacement maps are rendered, if you are using them. It affects both NURBS surfaces and polygon meshes. For
information about displacement maps, see Displacement Maps [Texturing]. Displacement approximation is also influenced by the Surface approximation values on NURBS surfaces.
You first choose an approximation method, and then adjust the Refinement Settings as necessary. The Refinement Settings are
different for each appromixation method. The Length/Distance/Angle and Fine methods also let you set Subdivision Limit - Recursive Steps. Additionally, the Displacement tab lets you set the maximum displacement.
|
|
Useful if you have a largely flat-based surface as well as some displacement. This method operates in UV space. See Surface, Surface Trim, Displacement.
Combines three methods. It operates in camera space or raster space.
-
— Especially useful when combined with view dependency because it lets you control the approximate number of triangles per
pixel.
-
— Used on objects that have a gentle curve, since they don't usually have two neighboring triangles with a large normal distance.
-
— Used on objects that have localized areas with high curvature, such as a cube with rounded edges.
See LDA (Length/Distance/Angle) Approximation.
— Used on objects that require very detailed approximation. This type of approximation is well-suited to displacement mapping.
It operates in camera space or raster space. See Fine Approximation.
|
|
|
Specifies the maximum displacement value. This value must be set correctly for displacement maps to work properly. If the
displacement value is higher than the Max Displacement value, displacement will be clipped. For example, if you have applied
a displacement map to an object using a displacement value of 3, but Max Displ. Is set to 2, the displacement will be clipped
to 2.
This parameter is available on the Displacement tab only.
|
Parametric Approximation
The Parametric method of surface approximation defines the U and V steps of the selected object as seen by the geometry. This
type of approximation uses non–adaptive sampling between parametric intervals.
The surface on the left uses a Step Value of 1, while the surface on the right uses a Step Value of 3. Notice how using more
steps determines how smooth an object's surface looks.
Changing these values changes the number of steps in the object's surface. These parameters remain the same throughout the
animation, and if the camera gets very close to the object the steps might be seen.
Refinement Settings for Parametric
|
|
Changing these values changes the number of steps in the object's surface or surface trim. These parameters remain the same
throughout the animation, and if the camera gets very close to the object the steps might be seen.
|
NoteThe Displacement tab uses a single Step parameter that is used for both the U and V directions.
LDA (Length/Distance/Angle) Approximation
The LDA approximation method is a curvature-dependent approximation based on subdivisions by length, distance, and angle.
This type of approximation uses adaptive sampling between parametric intervals.
Refinement Settings for Length/Distance/Angle
|
|
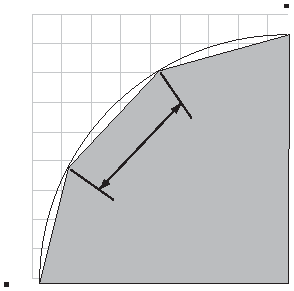
Subdivides the surface or curve so that no edge length of the tessellation (object coordinates) exceeds the parameter. Length is given as a distance in camera space or as a fraction of a pixel diagonal in raster space (View Dependent).
Small values such as 1 are recommended.
|
|
|
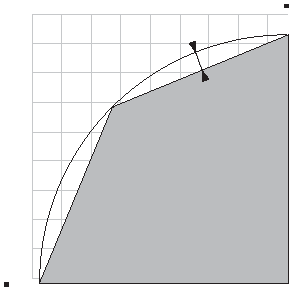
Specifies the maximum distance between the tessellation and the actual curve or surface. The value is a distance in camera
space, or a fraction of a pixel diagonal in raster space (View Dependent). As a starting point, a small distance such as 0.1
is recommended.
|
|
|
Specifies the maximum angle in degrees between:
-
Normals of adjacent tiles of a polygon or its displacement.
-
Normals of the tessellation of a surface or its displacement.
-
Tangents of adjacent segments of the curve approximation.
Large angles such as 45 degrees are recommended. 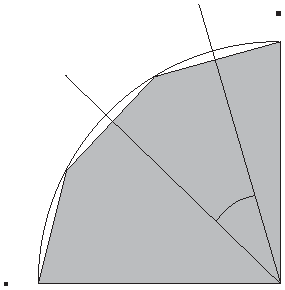
|
|
|
Tessellation continues until the Length, Distance and Angle requirements have all been met.
Tessellation stops when any of the Length, Distance, or Angle requirement has been met.
|
|
|
Switches measurements from object space (off) to raster space (on). For example, an ocean object with displacement-mapped waves would benefit from View Dependent since the object is finely tessellated
near the camera but not far from it.
|
Fine Approximation
The Fine approximation method is a curvature-dependent approximation based on subdivisions by length. It uses a subset of
the other approximation types' parameters. Rather than using the minimum possible number of triangles to achieve the desired
quality of approximation, Fine approximation can use a large number of triangles to create extremely detailed approximation,
without consuming excessive amounts of memory.
It does so by splitting approximated objects in to smaller "sets" that are tessellated individually, and thus do not have
the same memory requirements as the entire object.
Refinement Settings for Fine
|
|
Subdivides the surface or curve so that no edge length of the a tessellated triangle exceeds this value. When is disabled, is calculated in object space, and edges that exceed the value in Softimage units are subdivided until all edges are shorter than the value, or until the Max subdivision level (specified in the Subdivision Limit parameters) is reached.
When is enabled, is calculated in raster space, and edges that exceed the value, as a fraction of a pixel diagonal, are subdivided until all edges are shorter than the value, or until the Max subdivision level (specified in the Subdivision Limit parameters) is reached.
|
|
|
Switches measurements from object space (off) to raster space (on). For example, an ocean object with displacement-mapped waves would benefit from View Dependent since the object is finely tessellated
near the camera but not far from it.
|
|
|
Controls whether triangles generated by fine approximation use interpolated or geometric normals. When the Sharpness value is set to 0, triangles generated by fine approximation use interpolated normals, producing a smooth,
rounded look.
When the Sharpness value is set to 100, triangles generated by fine approximation use geometric normals, producing a crisp,
faceted look.
Setting Sharpness to values between 0 and 100 interpolated between the completely smooth look that you get when Sharpness
is set to 0 and the completely faceted look you get when it's set to 100. For example, a value of 50 results in a half-smooth/half-faceted
look.
 Sharpness 0% 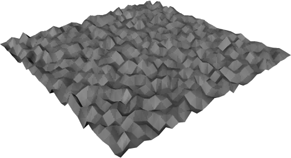 Sharpness 50%  Sharpness 100%
|
Subdivision Limit - Recursive Steps
To prevent massive amounts of subdividing, a limit can be assigned. These parameters are available for the Length/Distance/Angle
and Fine methods.
|
|
Specifies the minimal triangulation (or recursion levels of adaptive subdivision).
|
|
|
Edges are further subdivided until they satisfy the given criterion or the subdivision level is reached.
|
Polygon Mesh
Controls how polygon mesh objects are displayed and rendered.
Discontinuity
Controls the continuity of the shading between polygons. For more details, see Controlling Discontinuity Using Geometry Approximation [Modeling].
|
|
Creates a discontinuity in the shading as if there is a sharp edge between two polygons if their dihedral angle (the angle
between their normals) is greater than the Discontinuity Angle. Otherwise, normals are averaged to give an illusion of smoothness.
|
|
|
Specifies the angle above which edges are sharp when Automatic Discontinuity is on. For a completely faceted polygon mesh
object, set this value to 0.
|
Subdivision
Controls the geometry subdivision level for display and rendering. For more details, see Subdivision Levels [Modeling].
|
|
The number of times to subdivide the surface iteratively for display in the 3D views.
|
|
|
The number of times to subdivide the surface iteratively when rendering. Each iteration increases the number of polygons, which can result in very dense and heavy geometry.
|
|
|
Controls the balance between accuracy and speed when drawing polygons in the OpenGL display modes such as Hidden Line, Constant,
Shaded and Textured.
-
is the most accurate and always recalculates triangulation. Playback and interaction are slowest in this mode.
-
does not recompute triangulation of polygons while you are working, and waits for you to pause before retriangulating. The
display updates faster as you modify objects, but you may see some artifacts in the OpenGL views, for example, when a polygon
becomes concave while manipulating points. Triangulation is still recomputed when required during playback.
-
does not recompute triangulation of polygons while you are working nor while animation is playing back. Again, this mode
is faster but you may see some artifacts in the OpenGL views.
-
never retriangulates unless you modify the topology, for example, by adding or removing points. This mode is the fastest
but potentially creates the most artifacts in the OpenGL views.
Lack of retriangulation can produce artifacts while moving points.
|
|
|
Controls how the normals at each point are calculated when rendering:
-
When on, Softimage uses the average of the adjacent polygon angles, weighted according to the angle of the corresponding polygon
at the point. The result is more accurate in some situations but takes longer to calculate.
-
When off, Softimage uses the unweighted average of the adjacent polygon normals. This option is substantially faster. Although
it is less accurate, the result may not be noticeable in most situations.
|
Hair
These parameters determine the subdivision approximation for viewing or rendering hair with the Hair Renderer shader or other
Softimage shaders.
Subdivisions
|
|
Generates a general Bezier curve for the hair. You can specify the degree of curve approximation.
-
creates a linear curve approximation (straight segments). If you select this option, the OGL Level and Render Level options
are unavailable because you cannot approximate straight lines with more lines.
-
creates a quadratic curve approximation (smooth). This option doesn't guarantee a continuous curve throughout the entire
length of the hair. If the original line segments are at too steep of an angle, there may be a cusp where they meet.
If you select this option, additional points required to construct the curves are generated. This results in one extra control
point for each generated hair point, less one.
-
creates a cubic curve approximation (smoothest), guaranteeing continuity between hair segments. If you select this option,
additional points required to construct the curves are generated. This results in two new control points.
|
|
|
The subdivision level for approximating the curves when viewing hair in the OpenGL views in the viewports. This parameter generates 2 Level line segments for approximation. For example, if this value is 0, the curves are approximated by 1 line segment; for a value
of 1, by 2 segments; for a value of 2, by 4 segments, etc.
The slider displays a range of 0 to 4, but you can enter a value up to 7 in the text box.
|
|
|
The subdivision level for approximating the curves when rendering hair (in the render region or to file). This parameter generates 2 Level line segments for approximation. For example, if this value is 0, the curves are approximated by 1 line segment; for a value
of 1, by 2 segments; for a value of 2, by 4 segments, etc.
The slider displays a range of 0 to 4, but you can enter a value up to 7 in the text box.
|

 Except where otherwise noted, this work is licensed under a Creative Commons Attribution-NonCommercial-ShareAlike 3.0 Unported License