When you're animating a skeleton, you may need to use both FK (bone orientation) and IK (effector position) animation methods on the same chain. For example, arms bend at the elbow like hinges when you use IK, but to get a proper swing from the shoulder, you need to use FK.
In Softimage, there are two main ways in which you can have both IK and FK:
Build two skeletons or rigs: one animated with IK, the other with FK. Store one action for the FK animation and one for the IK animation, then load them on separate tracks in the animation mixer.
By weighting one against the other, you can decide how much influence at any time FK or IK has for controlling the character. See Character Rigging for general information on setting up rigs.
Blend between FK and IK using the FK/IK Blend slider, as described in this section.
This is the simplest way of blending between IK and FK animation. This slider controls the influence that IK and FK both have on a chain, blending smoothly the results of bone rotation and effector translation to give you the best of both worlds.
You can use FK/IK blending for:
Animating with rotations to get a good "whip" effect (FK), and then blending in specific grabbing/punching/kicking (goal-oriented IK) movements.
Mixing goal-oriented movements against motion capture. The motion doesn't maintain the "jitter" of the underlying animation because that's what it is intended to do: precisely reach a point in space.
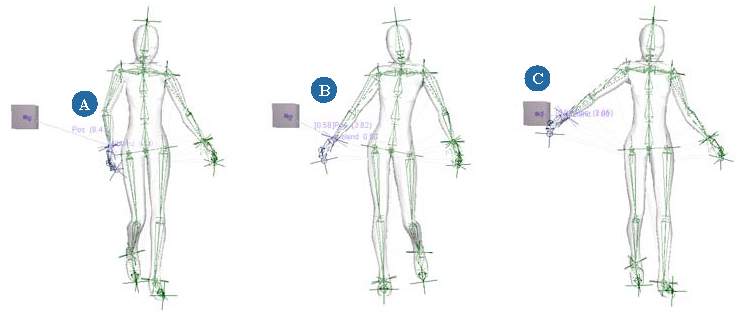
The FK is calculated and the bone orientations (preferred angles) from that solution (A) are used to calculate the IK to give a solution (B). The Blend FK/IK parameter then interpolates between solutions A and B in quaternion space to come up with a new set of bone orientations.
Keep in mind that if you pass through a critical zone with the FK, then the chain is likely to flip (not necessarily related to the blending).
Up-vector constraints are taken into account for the IK component of the solution that is blended.
Animate the chain in FK (key the bone's rotation parameters), as well as in IK (key the effector's position parameters or use a position constraint, for example).
Open the chain's Kinematic Chain property editor (select any chain element and press Ctrl+R).
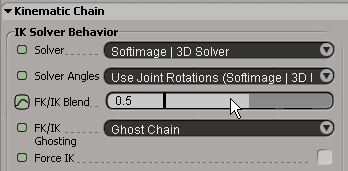
Drag the FK/IK Blend slider to set the value you want between FK (0) and IK (1). A value of 0 is 100% FK, while 1 is 100% IK.
As you move the slider back and forth, you can see the smooth interpolation between the IK position and the FK-driven chain. You can then decide where you want the blend to start and finish by setting keys for this parameter.
Set keys for the FK/IK Blend slider's values at the appropriate frames where you want the blend to start and finish.
If you want to plot the blended FK/IK animation on a chain, you need to do the following:
Mark the correct parameters to get the correct results:
Choose Tools  Plot Marked Parameters from the Animate toolbar.
See Plotting (Baking) Animation [Animation] for more information.
FK/IK blending works in conjunction with constraint blending, allowing you to blend the FK/IK against multiple constraints. These constraints could be blended themselves, so you can create fairly complex behaviors.
On the effector, you can combine FK/IK blending with constraints that are also blended.
You cannot use FK/IK blending if you use constraints to control a bone's orientation with other objects: the bone's orientation must be directly controlled with either fcurves or expressions. You can work around this by rigging with expressions from an object.
See Blending Constraints [Animation] for more information.
If you are using motion capture data, it is almost always in FK because FK records the full motion of the bones. Instead of combining the worlds of IK and FK with a special blending rig (one rig for IK, one for FK, and a blend set of controls to a third target rig), you can use the FK/IK Blend slider, saving you a lot of time and effort.
You load the motion capture data either directly driving the bone rotations or as an action source in the animation mixer where you can manipulate it. Then you can move and key the effectors (or whatever drives the chain in IK). Usually, you want to key the blend to make a smooth transition from 100% FK to the IK correction, and back again.
This example shows how you can author new IK on top of FK, which is a fairly common case, but you can also do the reverse: take existing IK animation and create new FK moves to blend against. However, with this method, remember that you need to set FK poses at the start and end of where you want to blend the FK in and out from the IK to avoid any pops.
Load a standard character and make a simple FK animation on the character's arm (see Getting Started with Ready-made Characters for these).
Change the position of the hand effector at some point: position-constrain the effector to a target, and then alter the FK/IK Blend value (on the chain's Kinematic Chain page) to see it blend between IK (constrained) to the FK (full motion from the preset clip).
Key the FK/IK Blend value at 0 (full FK) where you want to start the transition to IK, then key it at 1 (full IK) where you want to end the transition.
In this way, you are using IK to alter the effect of an existing FK motion, and blending to avoid any snaps. Similarly, you can key the transition back from IK to FK.
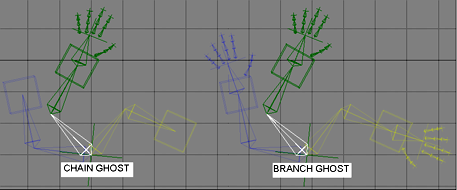
To help you see the how the chain is blending between its IK and FK states, you can use ghosting. Ghosts are shown for the full FK and full IK positions of the chains.
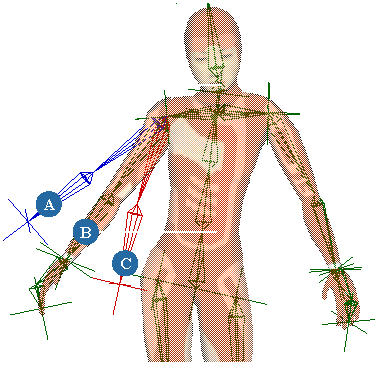
For more information on animation ghosting in general, see Ghosting Animated Objects [Animation].
Select the chain that has FK/IK blending on it and open its Kinematic Chain property editor (press Ctrl+R).
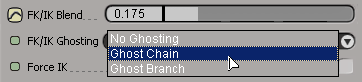
Select a ghost display type from the FK/IK Ghosting list:
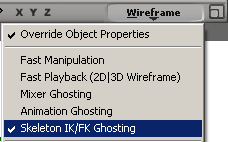
Choose the Skeleton FK/IK Ghosting command in the Display Mode menu in any 3D view.
Choose Display Options in the Display Mode menu to open the Camera Display property editor. Then click the Ghosting tab and select Enable Skeleton FK/IK Ghosting.
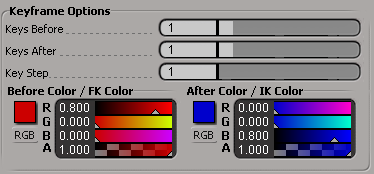
On the Ghosting page in the Camera Display property editor, set the ghost colors using the Before Color / FK Color and After Color / IK Color controls in the Keyframe Options group.
 Except where otherwise noted, this work is licensed under a Creative Commons Attribution-NonCommercial-ShareAlike 3.0 Unported License