As with any other object in Softimage, the rendering of hair is affected by the lighting in a scene. However, there are a few special lighting issues to consider with hair.
While the type of light doesn't matter with hair, the number of lights does. It's best to have as few lights as possible on the hair. If you have a number of lights in the scene but you don't want to use them all on hair, make the lights that you don't want the hair to consider exclusive of the hair.
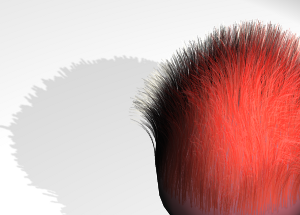
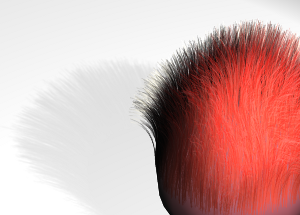
A hair whose tip is pointing toward a light will receive less light than a hair whose strand is perpendicular to the light (more surface area of the hair facing the light). You'll notice this when you first apply hair on any round shape: the hairs don't have much surface area on which the light can land. If you comb this hair up or down, you'll see that the light falls mainly on the hair's center.
Likewise, hairs that are perpendicular to the light (usually longer hairs) receive the most light contribution because of the large amount of surface area facing the light.
To help render the hair appropriately, you can choose between two different Shading Models on the Render Settings page in the Hair Shading shader's property editor: one optimized for short hair and one for long hair. You can also control the amount of blending between the artificial normal and the actual underlying geometry of the hair object.
For more information on these Shading Models, see Render Settings.
If you have final gathering set in your scene, you can also have it affect hair. To determine final gathering's effect on hair, set the Final Gathering - Color value on the Indirect Illumination page in the Hair Shading shader's property editor.
This value controls the color and intensity (strength) of the final gathering effect over the hair's surface. The color that is received on the hair from final gathering is multiplied by the color value you set here and then added on top. Be aware when you're setting this value that hair is very sensitive to final gathering because it's like thousands of tiny objects blasting color at each other in a short distance.
If you keep this Color value low for the hair, you can then associate an inclusive light for only the hair for shadows. This light should be quite dark so that it doesn't change the final gathering look. You can then exaggerate the specular of the hair so that it shines more from the dark light. You may also need to use negative umbra values to get dark enough shadows because of the dark light.
Also, if you connect a texture map to this parameter (see Creating a Surface for Texturing Curve-Based Hair), you can reveal a final gathering on a specific location on the hair.
For information in general about final gathering, see Final Gathering.
You can have hair cast shadows on other objects in the scene. In addition, the transparency values set for the hair are taken into consideration when shadows are calculated.
As with anything else in Softimage, casting shadows with hair depends on the number and types of lights you're using. Make sure you have shadows activated for the lights you want to use.
Set the light's Umbra values to over 0.2 to give the best results.
Using segment shadows can help reduce render times as well as improve the quality of the shadows.
You can have the hair cast shadows with light sources inside the hair's bounding volume; however, if the eye ray hits a non-hair object before it hits hair, no hairs are displayed or shadows created for that segment.
For information on shadows in general, see Shadows.
Shadow-mapped shadows usually provide the best performance for hair. The mental ray renderer uses the actual raw geometry from Softimage to create the depth maps for shadow mapping: the shaders are not considered in this calculation.
When you're creating the shadow maps, be sure to eliminate all unnecessary objects from the shadow calculations. This can speed up the calculation process considerably.
As well, shadow map size can be important, especially when there's lots of detail involved. Spotlights often work well with shadow maps to help keep the coverage low and the sampling and size down.
To eliminate flickering, you can increase the shadow map's sampling which, of course, increases the render time correspondingly. To reduce the rendering time, you can render the shadow map element in a separate pass with a lower sampling resolution, then blur that and composite it with the hair pass.
For information, see Creating Shadow-Mapped Shadows.
You can also use volumic shadow maps with geometry hair to reveal more of it details and depth. Volumic shadow maps store the changes in color or intensity along with the depth at which the change occurred during the raymarching process.
For information, see Creating Volumic Shadow Maps.
 Except where otherwise noted, this work is licensed under a Creative Commons Attribution-NonCommercial-ShareAlike 3.0 Unported License