Hair that is created from curves does not have the same geometry base as hair created from other object, such as polygons. As a result, you cannot project texture maps onto the hair directly. However, you can extract the surface interpolation value of the hair between curves to create a surface for mapping.
The default noicon image applied to a surface created for curve-based hair.
Choose Nodes  Data Shading State Scalar State twice to create two Scalar State nodes.
Open the property editor for each of these nodes:
Change the State Parameter for one of the nodes to Barycentric B/Lengthwise Hair.
Change the State Parameter for the other node to Barycentric C/Spline Hair Interpolant.
See About the Barycentric Hair Parameters for an explanation.
Choose Nodes Conversion - Processing Scalars to Vector. Plug both of the Scalar State nodes to the InputX and InputY inputs of the Scalars to Vector node.
It depends on the orientation of the image you're using to determine which Scalar State node plugs into which input. For example, you can plug the Barycentric C (interpolant) node into inputx for the X direction and the Barycentric B (lengthwise) node into inputy for the Y direction.
Choose Nodes Map Lookup - Data Image Lookup. Open the Image Lookup property editor and get the image you want to map.
Plug the Scalars2Vector output to the coord input of the Image Lookup node.
Plug the Image Lookup output into any of the mappable color parameters in the Hair Shading or Hair Gradient Material shader.

Barycentric hair parameters in the Scalar State shader let you define more accurate specular color along a hair strand (see Connecting a Texture Map to Hair Color Parameters), as well as map custom values over hair or create a surface for curve hairs upon which you can apply textures.
Barycentric coordinates give the coordinates of a point relative to the triangle it is on as a weight of the three corner vertices, normalized so that the sum is 1. That means that from the barycentric coordinates of a point, you can get the "real" coordinates of the point.
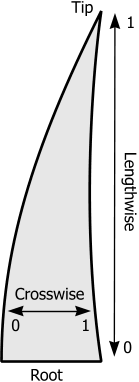
The Barycentric A / Crosswise Hair parameter returns values from 0 to 1 along the width of the hair (from one edge to the other: 0 > 1 > 0).
The Barycentric B / Lengthwise Hair parameter returns values from 0 to 1 along the length of the hair, with 0 being the root and 1 being the tip.
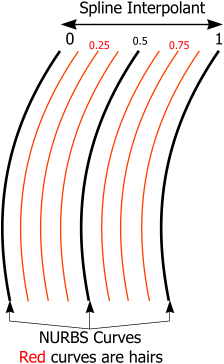
The Barycentric C / Spline Hair Interpolant parameter assigns a number to each hair created from curves. This number is based on where it originates within the collection of guide hairs (curves). If you have three curves, a hair that is generated between curve 1 and 2 gets assigned a number between 0 and 0.5 depending on its proximity to either curve.
|
|
 Except where otherwise noted, this work is licensed under a Creative Commons Attribution-NonCommercial-ShareAlike 3.0 Unported License


