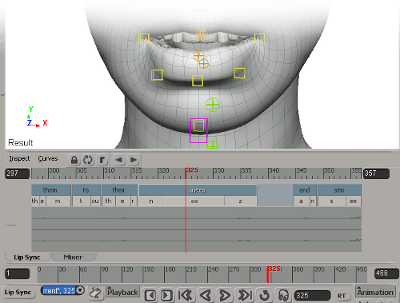
If you have completed the process of creating a speech clip for your character, the Lip Sync view appears automatically with the audio track and phonemes displayed in it. You can also open it as described below.
If you haven't already created a speech clip, follow the steps outlined in these sections:
You can also check Lip-Sync Workflow Overview for the big picture.
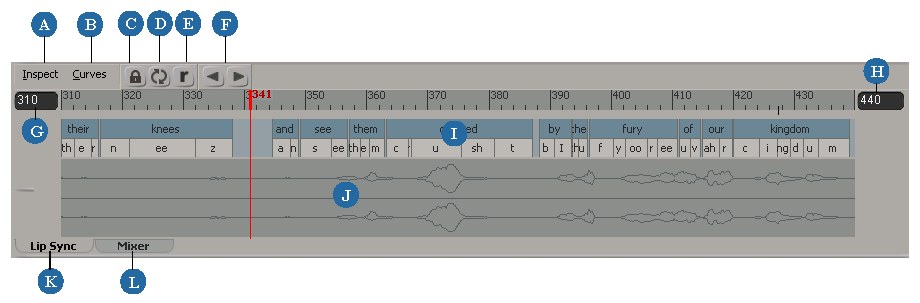
| A |
Choose the SpeechOp command from the Inspect menu to open the Speech Blend property editor. See Blending the Lip-Sync Animation for information. |
| B |
Select the options from the Curves menu to display Weight and Blend curves for the Lips, Jaws, and Tongue animation that is driven by the speech clip. See Weighting the Lip-Sync Animation and Blending the Lip-Sync Animation between Phonemes for information. |
| C |
Click the Lock icon to prevent the current view from updating if you select a different object. Click the button again to deactivate it (and update the view if the selection has changed). |
| D |
To update to a new object while keeping the Lip Sync view locked, select the object and click the Refresh icon. This refreshes the view to the currently selected object. |
| E |
Ripple allows you to push words/phonemes forward in time (to the right) and back in time (to the left) along the phoneme track when you move words or scale words/phonemes in that direction. However, when you ripple back in time, the words and phonemes to the left of the clip you're dragging do not move. |
| F |
The Previous and Next Phoneme buttons let you move easily among the phonemes on the phoneme track. |
| G |
Start frame of the audio and phonemes displayed in the Lip Sync view. Note that what's displayed here does not change what is displayed in the main timeline at the bottom of the Softimage window. |
| H |
End frame of the audio and phonemes displayed in the Lip Sync view. |
| I |
Phoneme track containing words that are broken down into phonemes. You can edit the phonemes on this track as described in this section. |
| J |
Audio track(s) containing the waveforms for the audio file that you've imported (either a mono or stereo tracks). These audio tracks are for reference only and cannot be altered in any way. If you want to change the audio clip, click the Mixer tab. For information on audio clips, see Audio Clips in the Mixer. |
| K |
Lip Sync tab displays the Lip Sync view (the one you're looking at) showing the words broken down into phonemes and the synced audio waveform. |
| L |
Mixer tab displays the speech clip and audio clip for the lip-sync animation—see Blending the Lip-Sync Animation for more information. |
You can zoom and pan in the Lip Sync view by using different key+mouse button combinations. The easiest way to zoom is by using the mouse wheel.
You can also use the mouse wheel with the Z or S keys.
If you like, you can disable the mouse wheel zoom or restrict it to the Navigation tool so that you can use the mouse wheel
with other tools. To do this, choose File  Preferences from the main menu: in the explorer that appears, click the Tools Camera icon and set the Mouse Wheel options.
 Except where otherwise noted, this work is licensed under a Creative Commons Attribution-NonCommercial-ShareAlike 3.0 Unported License