


Face Robot can generate realistic animation data from an audio file. To do this, it recognizes about 38 US English and 23 Japanese phonemes based on the IPA (International Phonetic Alphabet) and automatically determines where these phonemes occur in the sound file using speech recognition technology. The visemes in the library that you imported are automatically mapped to their corresponding phoneme sounds.
The animation of the visemes is stored in a speech clip that is loaded into the mixer for the head model. This clip contains the lip-sync animation that is on the face's lip, jaw, and tongue animation controls. The audio clip is loaded onto the track here and is linked relationally to the speech clip so that they stay synchronized in time if either one moves. See Blending the Lip-Sync Animation for more information.

The following audio file formats are supported by Face Robot. For more information, see Supported Audio File Formats.
Before you load the audio file, make sure that it's of a supported audio file format (see previous section). You also need to have a text file containing a transcript of this audio file. This text file usually has the same name as the audio file, but with some type of text file extension, such as .txt. Having a transcript of the audio file ensures that the best results are created for the lip sync.
If there is no text file that transcribes the audio file, you must first create an empty .txt file with the same name as the audio file and located in the same folder, then you can enter the text directly into the LipSync dialog box and save it.
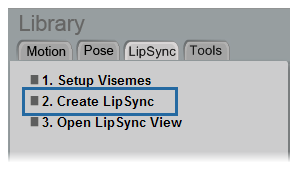
Select LipSync  Create LipSync from the Library panel.
In the LipSync dialog box that appears, select the Language of the audio file and text file to use for generating the lip sync: English or Japanese.
Click the browser button (…) for Audio to open a browser in which you can select an audio file.
If an accompanying text file exists for the audio file in the same folder, it is automatically loaded as well. You can fix any typographical errors here and click the Save button to update it before loading.
If no text file is automatically loaded with the audio file, click the browser button for Text to open a browser in which you can select the text file.
If no text file exists for the audio file, you must first create an empty .txt file with the same name as the audio file and located in the same folder. Then you can load that .txt file and enter the dialogue in the text box here. Click the Save button to overwrite the empty .txt file with your changes.
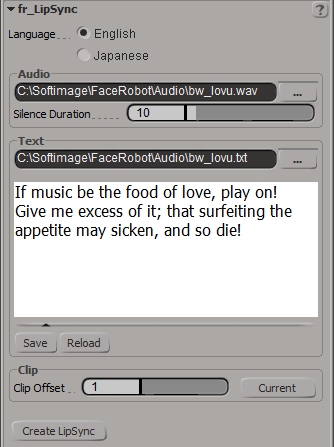
Select the frame at which you want to start the lip-sync clip:
Click the Create LipSync button in the Lip Sync dialog box when you're ready to generate the speech clip.
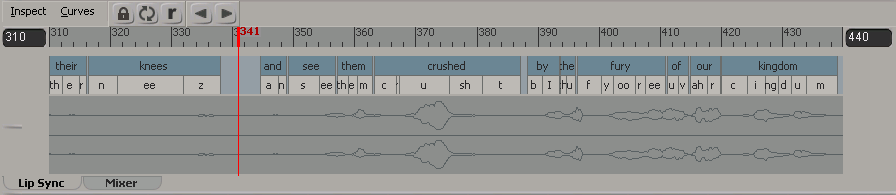
The audio and text files are analyzed and phonemes are created and put on tracks in the Lip Sync view, which automatically appears below the viewport—see The Lip Sync View.
The visemes in the library that you imported are automatically mapped to their corresponding phoneme sound in the audio file.
A speech clip is created in the mixer for the head model. The Speech Blend property editor appears in which you can set how the lips, tongue, and jaw animation is blended in this clip—see Blending the Lip-Sync Animation.
Play the animation to see how the mouth moves in relation to the dialogue. You may want to play in realtime instead of playing all frames for a better sound. See Playing the Audio for information on setting up the audio for playback.
You can also create a flipbook to analyze the initial results—see Previewing Animation in a Flipbook.
When you're ready to start making changes to the phonemes, open the Lip Sync view—see The Lip Sync View and Adjusting the Phonemes.
 Except where otherwise noted, this work is licensed under a Creative Commons Attribution-NonCommercial-ShareAlike 3.0 Unported License