When you generate the lip-sync animation, a speech action clip (SpeechAction) is created in the mixer for the head model. This clip is controlled by the SpeechBlend operator and contains the lip-sync animation that is on the face's lip, jaw, and tongue controls according to the sequence of viseme poses. The viseme poses represent the sequence of phonemes used for the audio clip in the Lip Sync view.
The SpeechBlend operator determines how smoothly the lips, jaw, and tongue animation blend with each other, as well as how they blend between phonemes. It also controls how the lip-sync animation is blended with other animation on the head (mocap or keyframes), as well as with corrective shapes.

Phonemes are expressed using a combination of jaw, tongue, and lip movements. Each of these parts of the mouth is called a channel in the Speech action clip. Having all three channels' animation within one clip helps you create smooth blending between the visemes because you can control the lip-sync animation as one entity. Within the clip, however, the animation of the lip, jaw, and tongue controls are separated into different fcurves so that you can control each channel on its own.
If you don't see the speech clip in the mixer, select the head and click the Refresh icon in the mixer's command bar.

For general information on the mixer, see Overview of the Animation Mixer.
Open the Speech Blend property editor.
This property editor appears automatically when you generate the speech clip, but you can also open it at any time by choosing
Inspect  Speech Op on the Lip Sync tab in the Lip Sync view.
Set the following options in the Speech Blend property editor:
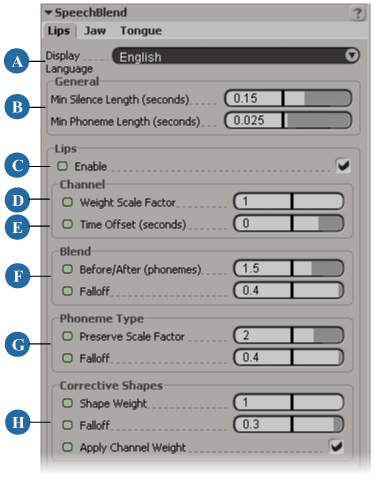
| A |
Select the language in which you want to display the phonemes in the Lip Sync view: English or Japanese. |
| B |
Set the General > Minimum Silence and Phoneme Length for all phonemes in the Lip Sync view—see Setting the Minimum Silence and Phoneme Lengths. |
| C |
Enable or disable each channel on its respective tab (Lips, Jaw, Tongue)—see Activating Each Channel. |
| D |
Set the Weight Scale Factor for each channel on its respective tab (Lips, Jaw, Tongue)—see Weighting the Lip-Sync Animation. |
| E |
Set the Time Offset for each channel on its respective tab (Lips, Jaw, Tongue)—see Setting a Time Offset for Each Channel. |
| F |
Set the Blend and Falloff for each channel on its respective tab (Lips, Jaw, Tongue)—see Blending the Lip-Sync Animation between Phonemes. |
| G |
Set the Phoneme Type parameters for each channel on its respective tab (Lips, Jaw, Tongue)—see Preserving the Viseme Pose When Blending Phonemes. |
| H |
If you have created any corrective shapes for the visemes, you can blend their weight in using the Corrective Shapes parameters on the Lips tab—see Blending in Corrective Shapes Globally. |
The General parameters appear on each of the three tabs, but apply generally to all three channels (lips, jaw, tongue) in the speech clip.
The Min(imum) Silence Length is the length (in seconds) at which a gap between phonemes (silence) is included in the blending.
If there is a silence gap that is smaller than this value, it is ignored when blending, and Face Robot instead blends into its neighboring phonemes.
If the silence is larger than this value, it is treated like a phoneme for blending (when computing how far to blend into the neighboring phonemes). However, very long silences are not treated like very long phonemes. Blending a long silence is "capped" based on the length of the next phoneme and how much there is left to blend.
The Min(imum) Phoneme Length is the length (in seconds) at which a phoneme is included in the blending.
If a phoneme is smaller than this value, it is ignored when blending. This can be useful for preventing animation "pops" where the blending hits the short phonemes, but doesn't have enough time to properly ease into and out of the neighboring phonemes.
You can toggle the Enable option on each channel's tab (Lips, Jaw, Tongue) in the Speech Blend property editor to determine whether or not the animation controls for that channel are used in the lip-sync animation. For example, if you have mocap controlling the jaw instead of the lip-sync animation, you could deactivate the Enable option for the jaw for the duration of the dialogue.
You can also animate this option to have a channel be active for only certain frames of the dialogue. For example, if you wanted to use keyframed animation on the tongue for certain phonemes, you could deactivate the Enable option for the tongue over the frames for those phonemes so that the keyframe animation takes over, then activate it again when you want the lip-sync animation to be used.
Set the Time Offset (seconds) on each tab (Lips, Jaw, Tongue) in the Speech Blend property editor to offset that channel's blend time.
For example, you can have only the lips and jaw channels lead the audio by an eighth of a second, which may generally look better than having the visemes sync exactly with the audio. Or you can have only the tongue start moving a quarter of a second before the audio.
Sometimes you need to change the way in which the lip-sync animation is blended between phonemes, such as to increase enunciation or to slur over some of the phonemes so that the mouth movement looks more natural (most people don't enunciate every phoneme distinctly). You can do this using the Blend parameters on each tab (Lips, Jaw, Tongue) in the Speech Blend property editor. These parameters determine the number of phonemes over which each channel (lips, jaw, tongue) is blended and how smoothly the mouth eases in and out (the falloff) of its viseme pose for each phoneme.
The higher the number of phonemes used for blending, the smoother the blend between the viseme poses. However, if this value is set too high, it can make all the viseme poses look slurred. Setting the value low is useful for keeping the viseme poses well defined, such as for well-enunciated passages, but too little blending can makes the mouth snap too much between phonemes.
You can animate the Blend value so that each channel's blend changes over the duration of the lip-sync animation.
Set the Blend Before/After (phonemes) on each of the channel's tabs in the Speech Blend property editor. This value is the number of phonemes before/after the
current phoneme with which it will blend.
The default value is 1.5 phonemes for the lips and jaw so that the change between phonemes is neither too abrupt nor too slurred. The default value for the tongue is 1.25 phonemes.
On the Lip Sync tab in the Lip Sync view, select the Curves Lips/Jaw/Tongue Blend option from the command bar. This displays a green curve that represents the Blend > Before/After value for that channel
over the duration of the lip-sync animation.
Enter a value in each channel's Blend slider text box at the right end of the Lip Sync view.
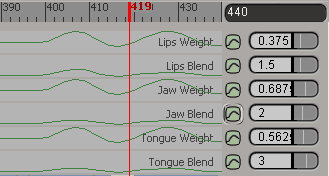
Change the Blend Before/After value in the property editor or in the channel's Blend slider in the Lip Sync view.
Click the animation icon  beside the Blend Before/After parameter or the channel's Blend slider in the Lip Sync view to set a key.
You can remove a key by going to a frame with a key and clicking the animation icon again.
Set the Blend Falloff value on each of the channel's tabs (Lips, Jaw, Tongue) in the Speech Blend property editor. This controls how smoothly the
viseme pose eases in and out of each phoneme for that channel. The default value is 0.4, which makes the pose blend in and
out fairly quickly.
You can enter Falloff values can between -1 and 1, even though the slider in the property editor doesn't show this.
For example, if your character is speaking slowly, you can lower the falloff value so that the viseme pose is blended into and out of the phoneme more gradually. Or if your character speaks in a very clipped manner, you can raise the falloff value so that the viseme pose hits the phoneme more abruptly.
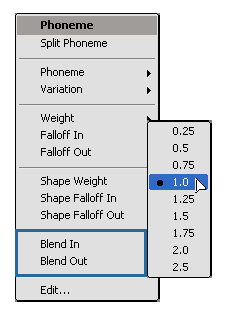
Once you have set the Blend values as described in the previous section, you can tweak how the lip-sync animation blend happens going into and coming out of each phoneme. The separate Blend In and Blend Out commands give you lots of control when you need it, such as where there is a change in speech behavior within a phoneme. For example, if a commander is calling his troops to attention ("Atteeeen-tion!"), you can blend the lip-sync animation smoothly going into the phoneme, then clip it short on its way out.
The Blend In and Out values per phoneme are applied as a scale factor "on top" of the global Blend values in the Speech Blend property editor. Their result always depends on the global Blend values which are applied first. For example, if you have the global Blend Before/After value set to 2 phonemes, you could set the Blend In value to 0.5 and the Blend Out value to 2.0 so that the lip-sync animation blends in 1 phoneme before and 4 phonemes after that phoneme.
You may notice that the blend in/out changes you make per phoneme are quite subtle. This is because the phoneme weight drops quickly due to any falloff that is set first with the global Blend Falloff value.
Open the Lip Sync view—see The Lip Sync View.
Right-click on one of the selected phonemes and choose Blend In or Blend Out from the menu, then select a value from the submenu.
If the Blend In/Out values are set to 1.0, the phoneme uses 100% of the global Blend Before/After value in the Speech Blend property editor. You can set the values to be within a range of 0.25 to 2.5. A value of 2 doubles the global Blend value.
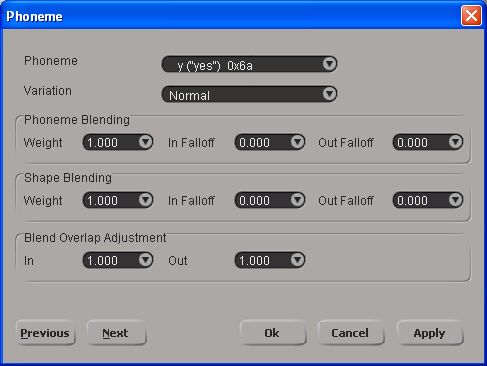
Right-click on one of the selected phonemes and choose Edit from the menu. In the Phoneme dialog box, set the Blend Overlap Adjustment In and Out values.
You can select a preset value from each parameter's list, or enter a value that is equal to or greater than 0 in its text box.
Click the Apply button to apply the values for these parameters to the selected phonemes.
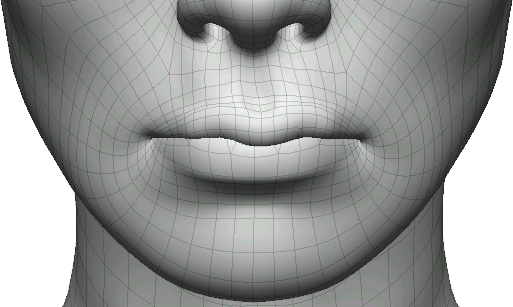
If you have a high Blend Before/After value, you will notice that some of the viseme poses may look too slurred. While this is okay for some visemes, there are others whose mouth shape needs to be properly formed to be identified properly as that phoneme. These are sometimes referred to as landmark visemes. For example, for the bilabial phonemes (M, P, and B), the lips in the viseme pose must come together and compress to some degree to be identified as these phonemes, as is shown in the P viseme here.
You can preserve the mouth shape for the visemes according to which part of the mouth—lips, tongue, or jaw—is being used. To see how each viseme/phoneme is classified for preservation, open the USEnglish.csv file in your current Viseme library (for Japanese, this is the same file). Each phoneme in the library is classified according to the type of mouth controls it involves: all mouth controls, jaw+tongue, or mainly the tongue. For example, the Jaw+Tongue protected phonemes would allow the lip controls to be blended, but would ensure that the jaw and tongue controls would always form the correct shapes.
Set the Phoneme Type Preserve Scale Factor on each tab (Lips, Jaw, Tongue) in the Speech Blend property editor to boost that channel's weight and preserve its viseme
shape.
A value of 1 means that no weight boost is applied. Anything over 1 applies that scale factor to the affected phonemes so that they have more of an influence in the blend, but the amount of weight boost depends on the surrounding phonemes.
For example, if you have one phoneme that involves mainly the jaw and the surrounding phonemes don't involve the jaw, the "jaw-y" phoneme will get the weight boost if you set this value higher than 1. However, if all the surrounding phonemes also involve the jaw, the scale factor won't really have any effect because they all get the weight boost and then everything will be normalized in the blend.
Set the Phoneme Type Falloff value to control how smoothly the preserved phoneme scale factor eases in and out of the phonemes. If the Falloff value is set to 0, a uniform falloff is used, but you can set this value to be within a range of -1 to 1 (you can enter these
values in the text box even if the slider doesn't show it).
 Except where otherwise noted, this work is licensed under a Creative Commons Attribution-NonCommercial-ShareAlike 3.0 Unported License


