Retargeting allows you to use motion capture data on any size or proportion of face. This is especially useful when you want to animate different characters with the same movements and expressions in mocap data files.
Face Robot uses C3D data files for motion capture animation, which is a standard optical marker-based file format used predominantly for facial capture. The C3D format is a public domain, binary file format that is used in Biomechanics, Animation, and Gait Analysis laboratories to record synchronized 3D and analog data. It is supported by almost all 3D Motion Capture System manufacturers, as well as other companies in the Biomechanics, Motion Capture, and Animation Industries. For more information, see www.c3d.org.
Before you can use the mocap data from these C3D files on a solved head in Face Robot, you must prepare the data from each mocap session. This involves loading the zero (base) pose C3D file into Face Robot and creating name and face map files. These files map the mocap data to the face in Face Robot.
You must prepare the mocap data in Stage 1: Assemble when your scene is empty. Once you've prepared the mocap data, it's ready to be used at any time and on any character in Face Robot.
To do all of this, follow the steps in the procedure in the section below.
Name map and face map files let you map the mocap data to the face in Face Robot.
A name map (nmap) creates links between the marker names in the C3D mocap data file and the corresponding control names on the solved head in Face Robot, like a name-mapping template.
A face map (fmap) provides a reference of the proportion of the face of the actor from whom you captured the mocap data. The face map takes a snapshot of the position of the mocap markers on the actor in a neutral pose (expressionless) which allows Face Robot to map that data onto a solved head. You cannot retarget mocap data without a face map.
When you do a mocap session with the same actor and markers, the marker names will be the same for all C3D files captured in that session and the face proportions will all be the same. This way, you need to create only one name map and one face map that will apply to all the C3D files from that session set. The only requirement is that all the motion capture files exist in the same folder as the generated face map. If so, Face Robot then uses a single fmap to calibrate all the mocap data in the folder.
If you are using the same actor but across different mocap sessions (so the markers are removed and reapplied in between), you will need to generate a separate fmap for each session. This is to account for any slight position shifts of the markers between sessions. As well, if you are using different actors, each one would require their own face map for calibration.
It is probably best if the person who placed the mocap markers on the model or supervised the mocap marker placement does the name mapping in Face Robot. This is because they will know the correlation between the mocap markers on the actor and the animation controls in Face Robot.
This person usually creates a "cheat sheet" of the marker placement on the actor to help them (or somebody else) figure out which marker is which when the mocap data is loaded into Face Robot.
Start with an empty scene in Face Robot.
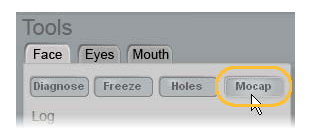
On the Stage 1: Assemble panel, click the Tools > Face tab and then click the Mocap button.
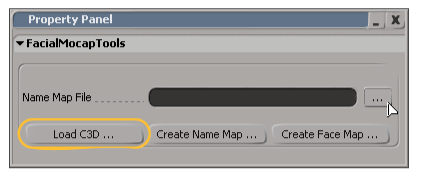
In the Facial Mocap Tools property panel that appears, click the Load C3D button to load a mocap file. This should be the zero or base pose that has no particular expression, which makes retargeting the mocap data easier to do.
A set of blue sphere-shaped markers in the shape of a head is loaded into the viewport. Each of these markers represents a mocap marker that was on the actor's head during the capture session.

Blue sphere markers appear in the vague shape of a head in the viewport when you load a C3D file. Make sure to have a reference sheet of the mocap marker names on the actor to make mapping easier!
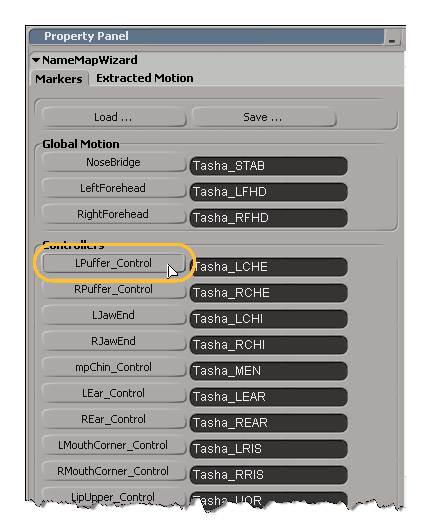
Click the Create Name Map button in the Facial Mocap Tools property panel.
This brings up a Name Map Wizard property panel with a list of all the Face Robot animation controls (buttons) to which you must pick the corresponding marker in the mocap data. These correspond to the naming convention that you used when you created the mocap files: you should have corresponding markers for each animation control.
If you have an existing name map file you want to use, click the Load button in this property panel to open the browser and load the file.
Select a blue sphere marker on the C3D data in the viewport, then click the corresponding animation control button on the page.
The picking session uses symmetry so that you only have to select the marker on one side of the face for markers that have a left and right equivalent.
Select a blue sphere marker on the C3D data in the viewport, then click the corresponding animation control button on this page.
When you're done, click the Save button in the property panel to save the name map (.nmap) file in the same folder as you have the C3D files.
Now you need to create a face map, which takes a snapshot of the proportion of the actor's face in a neutral pose (expressionless) so that it can be mapped onto a solved head in Face Robot.
Make sure that the C3D file you're using is the base pose.
The neutral pose doesn't need to be at the start of the animation sequence: simply find any frame in which there is a good expressionless pose.
In the Facial Mocap Tools property panel, click the Create Face Map button.
Enter a name for the face map file (.fmap) and save it in the same folder as the name map and C3D files.
In some motion capture sessions, the head's general (global) rotation and translation movements are saved in a separate file so that they don't affect the facial animation. This is known as stabilized mocap or extracted motion. By keeping the general head movements separate from the actual facial expressions created by the face's soft tissue, the data from the facial expressions can be purer and more stable.
If you are working with this type of mocap data, you can create a name map as described previously, except that you click the Extracted Motion tab in the Name Map Wizard property page and map only the Global Motion nose bridge, left forehead, and right forehead controls to the corresponding mocap markers. Then create a face map in a base pose as usual.
 Enable Rotation option in the Face Adjust property page so that global rotation on the head is not activated — see Adjusting the Retargeted Mocap Data.
If you have pre-stabilized motion capture data, you may want to keep that data intact to preserve any subtleties in the motion. However, by default, when you apply the mocap data in Face Robot, it uses its own stabilization algorithms in an attempt to recreate that work. Because certain adjustments are made to the motion in Face Robot with this algorithm, small artifacts may be introduced.
If you want to keep the stabilized mocap data intact, make sure to turn off this option before you apply the mocap data and retarget it.
 Except where otherwise noted, this work is licensed under a Creative Commons Attribution-NonCommercial-ShareAlike 3.0 Unported License


