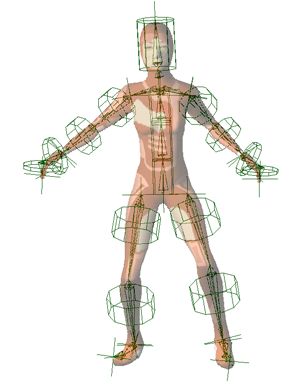
There are a number of tools in Softimage to help you create a rig for your character. The tools let you create control objects and constrain them to the skeleton, and help you easily create shadows rigs and manage the constraints between them and their parent rigs.
You can also use the prefab (ready-made) guides and rigs in Softimage to help you get going quickly. These are available for biped, dog-leg biped, and quadruped characters. To create a rig, you load a guide, adjust it to match the proportion of your character, then generate a rig based on those proportions and the options you set. The rigs are skeletons that include control objects that you can position and orient to animate the various parts of the character's body.
You can customize the rig so that it contains only the elements you need. The guides and rigs can be used as a starting point for different rigging styles, and technical directors can write their own proportioning script to attach their own rig to a guide.
Although not described in this section, there are a number of standard tools in Softimage that can help to streamline your rigging and character animation workflow. See Tools for Increasing Productivity and Tools for Easy Animation for more information.
You may not need to create a special control rig to animate simpler characters because the effector is a child of the chain root and can be easily put anywhere in a hierarchy or parented to other chains and objects (see D: Effectors).
When you set up a control rig, you should "zero out" the controls with a neutral pose. This means that when you set all the controls' rotation and translation to (0, 0, 0), it makes your character snap back to a neutral pose, or "rest" position. An advantage to setting up rigs this way is that fcurves and key values are easier to understand, making a better base for keying.
For information on how to do this, see Creating Neutral Poses for Skeletons.
You can display the bones, roots, effectors, and nulls in many different styles to make it easy to view and select them. You can do the same with the elements' shadow display styles as well, including scaling and offsetting them. See Displaying Chain Elements for more information.
Instead of creating a separate object to control chains, it's often better to use the chain element's shadow as the control object. This means that you can manipulate the shadows in both IK and FK and then have them control each other without creating cycles.

Jaiqua with shadows displayed as cylinders that have been scaled and offset along the bone. Notice how easy they are to see and select.
The Character Development Kit is a collection of character assembly functions, such as a spine, torso, hip, arms, and heads, which are the set of body parts that are required in typical rigging projects. Using programmed components is an efficient way to produce a large volume of characters. Basically, all you have to do is figure out which components you want, how they map to your character's envelope, and how they connect to one another.
Many of these commands have the same options available in the Softimage interface; for example, you can choose a quaternion spine for the torso, define forearm and biceps roll divisions, or control the location of the leg's up vector (see Creating Quadruped Rigs).
For more information, see the Character Development Kit [SDK Guide].
 Except where otherwise noted, this work is licensed under a Creative Commons Attribution-NonCommercial-ShareAlike 3.0 Unported License