One of the most powerful features of the animation mixer is its ability to mix and weight clips against each other. When two or more clips overlap in time and drive the same elements, you can mix them by setting weights that control their relative influence.
By adjusting the weight of a clip, you can control how much of an influence it has compared to the other clips in the resulting animation. The higher the mix weight, the more strongly a clip contributes to the animation. Mixing compound clips is an easy way to blend animation at an even higher level.
You can set keys on each clip's weight to animate the changes. When the weight is animated, a weight fcurve is created that you can adjust like any other fcurve.
You can also set the mixer properties to control how weights are combined in each model and compound clip. You can set mix weights outside the range [0,1]. By default, mix weights are averaged (normalized) so that, for example, if Clip A has a weight of 1 and Clip B has a weight of 1.5 at a given frame, then A's influence is 40% (1 Ö (1 + 1.5)) and B's influence is 60%.
If you turn off normalization in the mixer's property editor, it is possible to "overshoot" the data in the clip by setting weights higher than 1 (see Controlling How Weight Is Mixed).
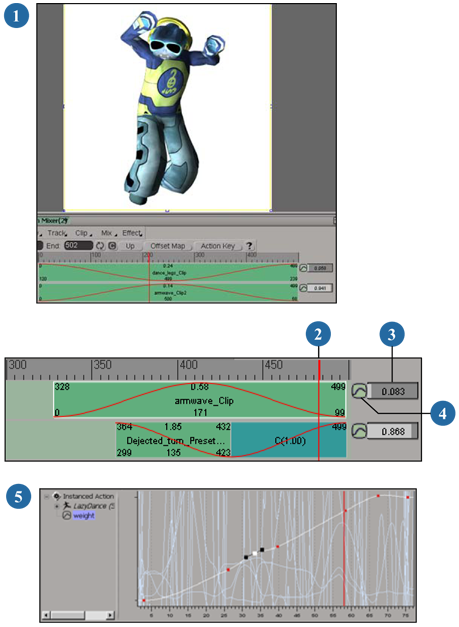
This overview shows the basic steps to how to set weight values and key them in the animation mixer.
| 1 |
Put clips on different tracks and overlap them where you want to mix them. In some cases, this can be for the whole duration of the scene. |
| 2 |
Move to the frame at which you want to set a key. |
| 3 |
Set a weight value for each clip at this frame. Red curves on the clip display its weight values. See Animating the Mix Weights for information. |
| 4 |
Click each weight's animation icon to set a key for this value at this frame. |
| 5 |
After you are done setting keys for the weights, you can edit the resulting weight fcurves. Right-click the weight's animation icon and choose Animation Editor. See Editing Weight Fcurves for information. |
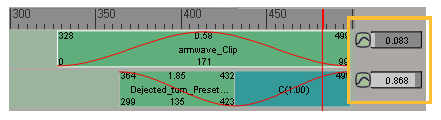
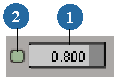
When setting the weights of clips in the animation mixer, make sure that View  Weight Mixer Panel is on (press the W key). A Weight Mixer Panel is displayed at the right end of each action and shape track, showing a weight slider and a green
animation icon for keying the weight.
Weight Mixer Panel is on (press the W key). A Weight Mixer Panel is displayed at the right end of each action and shape track, showing a weight slider and a green
animation icon for keying the weight.
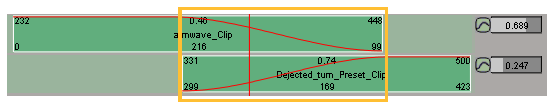
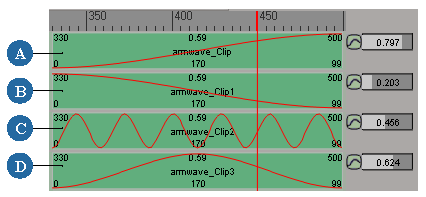
A red line runs across the clip signifying its general weight over time. If the weight is 1 (default), the red line is at
the top; if the weight is 0, the red line is at the bottom, etc. Make sure that View Weight Curves is selected to see this.
Red weight curves are displayed for each clip when you select View > Weight Curves.
On the right, the weight mixer panel for each track has a slider and an animation icon for setting and keying a clip's weight.
For each track, the Weight Mixer Panel affects the clip at the current frame. If the playback cursor is not on a clip, the mixer for the corresponding track is unavailable.
When setting clip weights, note the following:
If a clip's weight is 0, it does not contribute to the animation.
If a clip's weight is not driven by a function curve (for example, if it is controlled by an expression or linked parameter),
no weight curve is displayed on the clip when View Weight Curves is on.
However, if an expression is driving the weight, then the notation ->W appears to the left of the clip.
If there is a transition between clips that are part of the mix, the transition is calculated first, then mixed with the other clips.
If there is a non-overlapping transition, the contribution for each clip is also governed by the weight of the two clips (the end weight of the "from" clip and the start weight of the "to" clip).
There are different ways in which you can set and key a clip's weights, depending on how you like to work. You can set a clip's weight using:
See below for a description of each of these methods.
If you're setting the weights on shape clips, you can also use the weight sliders in a custom parameter property editor that is created if you are saving shape keys in mixed weight mode. This property editor contains proxies of each shape's weight parameters that are in the mixer. See Mixing Shape Weights in a Custom Parameter Set for more information.
To set the clip's weight, drag the slider. The slider's range is [0,1] but you can set values higher than 1 or lower than 0 (negative weights) by right-clicking on the slider and entering a value.
The higher the mix weight, the more strongly a clip contributes to the combined animation. For example, if you set the value to 4, the resulting action is 4 times greater than the original weight.
To set a key for the clip's weight at the current frame, click the animation icon beside the slider.
You can then edit the resulting weight function curve in the animation editor (see Editing Weight Fcurves).
Create a custom parameter set by choosing Create Parameter New Custom Parameter Set from the Animate toolbar. Give it a name.
In the explorer, click the custom parameter set's icon to open it.
Drag the animation icon for each weight slider from the animation mixer into the custom parameter set (just below the light gray bar) to make a proxy of it.
In the custom parameter set, drag the slider for each clip to set its weight and set keys using the animation icon as you would in the mixer's weight panel.
Because the slider in the custom parameter set is a proxy of the original slider in the mixer, anything you do to it (change value and key) acts as if you did it to the original slider.

After you have set keys for a weight in the mixer, you can edit the resulting weight curve as you would any other function curve in the animation editor.
You can open up the animation editor in any of the usual ways (in a viewport or press 0 to open in a floating window) to edit the weight curve.
However, if you want the weight curve to be already selected when you open the animation editor (which is a good idea if you have a lot of fcurves in your clip), do one of the following:
Right-click the animation icon beside the weight slider in the mixer (see previous page) and choose Animation Editor.
Right-click the clip with the weight curve and choose Animation Editor.
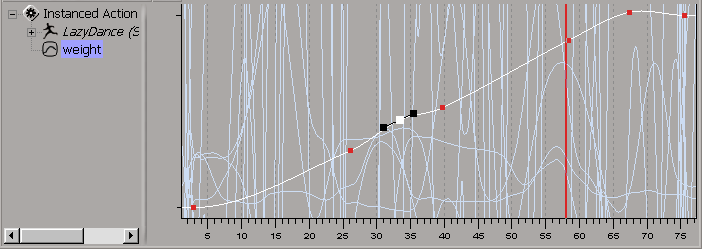
In the animation editor fcurve graph, the horizontal axis refers to each clip's local time rather than the scene's global time. If clips are of different lengths or have been offset, scaled, or trimmed, the frame numbers in local time and global time are different.
You'll also notice that the time cursor in both the animation mixer and the animation editor correspond to the same frames.
Like other curves, the interpolation of the weight curves are spline by default but often need to be linear. To change this,
as with any other function curve, open the animation editor, select the Weight parameter for each clip, and choose Curves Linear Interpolation (or click the linear icon on the animation editor's toolbar).

For more information on fcurves in general, see Editing Function Curves [Animation].
To make your life easier, there are a number of preset weights you can use to quickly achieve different common mixing effects, including a crossfade.
Select one or all of the clips you want to mix (action or shape).
Choose Clip Preset Weights, or right-click a clip and choose Preset Weights.
This menu lists all available preset weight curves you can apply to the clips, such as an exponential ease, linear ease, Gaussian, or oscillate.
A crossfade in animation is similar to that in video editing: one clip fades out as another fades in. In the animation mixer, you can create a crossfade between the overlapping portion of two action or shape clips. The weight curves of the two clips are modified so that one fades out as the other fades in (using a range of 0 to 1).
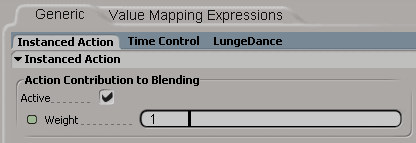
The mixer properties control how the weights of clips are combined within the mixer or a compound clip.
Right-click anywhere in the track area of the animation mixer and choose Mixer Properties, or choose it from the Mix menu.
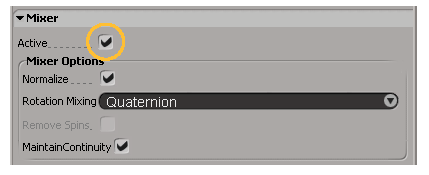
Select Active to have the entire compound clip contribute to the animation during playback.
You can determine how weight and rotations are mixed using the following two sections as your guide.
Whether you use averaged or additive weight mixing depends on whether you select the Normalize option or not:
By default, Normalize is on meaning that the weights are mixed with a weighted average (normalized).
The results are mixes that fall between the values of the separate clips. For example, with averaged weights, if Clip A has a weight of 1 and Clip B has a weight of 1.5 at a given frame, then A's influence is 40% (1 Ö (1 + 1.5)) and B's influence is 60%.
When Normalize is off, mixes are additive meaning that the values of the separate clips are added on top of each other.
This lets you "overshoot" the data in the clip by setting weights higher than 1. This method of mixing is especially useful when mixing clusters in shape animation. For more information on this, see Mixing the Shapes' Weights.
When you put competing rotations on different clips in the mixer, you can choose between two Rotation Mixing methods that describe how the resultant posed orientation is calculated: Quaternion (default) or Euler.
For information on these two types of rotations, see Animating Rotations.
Quaternions basically result in smoother rotations than Euler. With Quaternion selected, use the Maintain Continuity option to generate more continuous rotation curves, especially for operations such as plotting, freezing, and generating a bridge transition for rotation parameters driven by the animation mixer.
However, if you are mixing two or more rotations and using Quaternion, there may be some unexpected flips in the animation. Using Euler will probably solve this problem.
With Euler values, you can sometimes get rotation values with extra "spins" (such as getting rotation values of –591, 1015, and 15).
To solve this problem, select Remove Spins. This gives you the same rotation but without the spins (rotation values are between –180 and 180).
 Except where otherwise noted, this work is licensed under a Creative Commons Attribution-NonCommercial-ShareAlike 3.0 Unported License