For information on the render settings, see Render Settings window.
Not all options are available for all renderers.
Use this section to enable color management in your scene. For more information, see Using color management in your scene.
See Color Profile for a description of the available color profiles.
The name of rendered image files can consist of three separate components: file name, frame number extension, and file format extension. A combination of these three components is referred to as the file name syntax.
 the File name prefix attribute to add one or more of these fields to the file name for your scene, for example, scene name, layer name, camera
name, version number, current date or current time. Each of these fields are described in more detail below.
the File name prefix attribute to add one or more of these fields to the file name for your scene, for example, scene name, layer name, camera
name, version number, current date or current time. Each of these fields are described in more detail below.
You can also create subdirectories to save out rendered images by adding a / (slash) in your file name prefix. For more information about the file name syntax, see Subfolders and names of rendered images.
When rendering using passes, you can group render passes into logical file groups. Each render pass node has an attribute Pass Group Name that allows you to create a logical group. Select this render token to add the Pass Group Name to your output file name.
See Render pass Attribute Editor for more information.
Many different types of render passes are available for selection using the Render pass Attribute Editor, for example, beauty, shadow, specular, refraction, and so forth. When you use this render token, a unique abbreviation of the pass type, of less than 6 characters, is appended to your output file name, for example, REFR for refraction pass.
Select this render token to add the extension to your output file name. In many cases, you do not need this token, since the file extension is automatically appended by Maya. However, you may want to create a directory structure using the file type. For example, if you are using the.iff format, <EXT>/<RenderLayer>_<RenderPass> can create files such as the following: images/iff/bob_camera1_diffuse.1.iff .
The format for saving rendered image files. See also File formats. The default setting is Maya IFF.
Among the available multi-channel file formats, OpenEXR is the only file format where multi-channel is being leveraged. When using the multi-render pass feature, you can concatenate multiple render passes into a single multi-channel .exr file. Upon selection of the OpenEXR format, the Frame Buffer Naming option becomes active. Select the Automatic option to name each pass using the <RenderPassType>:<RenderPass>.<Camera> tokens, or, choose Custom to select the render tokens of your choice. See Frame Buffer Naming for more information.
(For Maya software renderer) Click this button to select the compression method for AVI (Windows) or Quicktime movie (Mac OS X) files. When you click this button, the Video Compression dialog box appears. Select the desired compression method from the Compressor drop-down list. Currently, Maya only supports the Uncompressed and Cinepack Codec compression methods.
This button only becomes active when you select AVI (Windows) or Quicktime movie (Mac OS X) as your image format (for Maya Software renderer only).
If you have selected mental ray as your renderer, the Image compression and Compression Quality attributes appear.
You can tweak the image compression method of your OpenEXR file by selecting among the following:
Run-length encoding. Fast and lossless compression. Achieves high compression ratios only with images composed mostly of solid colors.
Wavelet-based compression. Recommended for use with grainy images. Generally used for CGI. Lossless.
Huffman dictionary compression. Lossless. Generally used for photographic material.
 Similar to zip and used for rendering CGI and for compositing applications. Zip compression produces a slightly smaller file
than zips compression; however, its playback is slower by comparison. Zips compression, on the other hand, produces a slightly
larger file but its playback is faster in compositing applications.
Similar to zip and used for rendering CGI and for compositing applications. Zip compression produces a slightly smaller file
than zips compression; however, its playback is slower by comparison. Zips compression, on the other hand, produces a slightly
larger file but its playback is faster in compositing applications.
Data is first converted to 24-bit and then zip compression is applied. PXR24 is lossy if the written data is stored in full floating-point precision and lossless otherwise. The OpenEXR user guide recommends PXR24 for depth maps.
B44 is a lossy format for half-float renders. Therefore, some quality loss may occur when compressing with B44 in 16-bit half float mode. Use this compression method for quick decoding for playback purposes, for example, playblasts. Do not use this method for final renders requiring high quality output as it can be lossy.
When using this compression method, the size of the compressed file depends only on the number of pixels in the image and not on the pixel data. Therefore, all files with the same resolution and the same set of channels share the same file size. This method is recommended for real-time playback of image sequences, as the predictable compressed file size allows you to allocate space accordingly.
This method is meant as an intermediate playback format that provides a constant playback rate (which playback machines prefer).
If you select the default option, RLE compression method is used. For Maya 2012 and below, mental ray uses ZIP compression by default.
Use this field in conjunction with the multi-render passes feature. This attribute becomes active when you select the OpenEXR file format, and when your scene contains one or more render passes. Select the Automatic option to name each pass using the <RenderPassType>:<RenderPass>.<Camera> tokens, or, choose Custom to select the render tokens of your choice.
EXR version 1.7 supports 252 character channel names. If you want to use EXR version 1.7, your framebuffer name must be less than or equal to 252 characters in length. However, EXR version 1.7 is currently supported by few external applications, and embedding channel names longer than 31 characters may break compatibility with external applications that do not support it. By default, channel names are truncated to 31 characters for backward compatibility. You can create and set MAYA_EXR_LONGNAME to 1 to allow long channel names of 252 characters so that they are not truncated. See Image format for more information on the OpenEXR format. See Rendering environment variables for more information about the MAYA_EXR_LONGNAME environment variable.
You can add a version label to your render output filename. Use this attribute to customize the <Version> token in the File name prefix field in the Image File Output section.
You can select one of the following options: a version number (for example, 1, 2, or 3), the current date, or the current
time.  -click this attribute to add the version label you desire. The first two options available (use number: n) are automatically
updated each time you insert a numeric version number. For example, if you have added version number 3, the first option automatically
updates to use number: 2 and use number: 4. Alternatively, you can create your own custom version label.
-click this attribute to add the version label you desire. The first two options available (use number: n) are automatically
updated each time you insert a numeric version number. For example, if you have added version number 3, the first option automatically
updates to use number: 2 and use number: 4. Alternatively, you can create your own custom version label.
You can also set up your File name prefix using the command line. See Setting up your file name prefix using the command line for more information.
The increment between the frames you want to render. By frame is only available if Frame/Animation ext is set to an option containing #. The default value is 1.
If you use a value less than 1, make sure the Renumber frames using option is turned on. Otherwise, many frames will appear to be missing when they are just being overwritten.
Lets you change the numbering of rendered image files for an animation. The Renumber frames attributes are only available if Frame/Animation ext is set to an option with # (such as name.#.ext).
If on, Maya uses the frame number extensions beginning at Start Number and increasing by By Frame for rendered image file names.
Render a scene from one or more cameras. The default is to render from one camera.
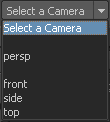
If you are rendering the scene from one camera (only), select the camera from the drop-down list. By default, the perspShape camera is the renderable camera.
The drop-down list is divided into sections, separated by dashes:
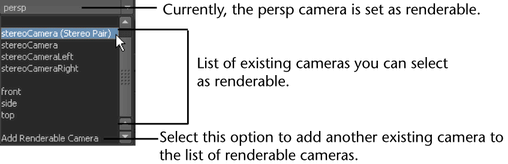
The first section is the camera currently selected as renderable.
The second and third sections list existing cameras that you can select as renderable, for example, stereo cameras and the front and side cameras.
The third section is the Add Renderable Camera option. If you want to add another existing camera to the list of renderable cameras, you can select Add Renderable Camera. When you select this option, a new Renderable Camera section appears. Select the additional renderable camera from which you want to render the scene from the drop-down list.
If you render from more than one camera, the rendered image output from each camera is stored in a different directory by default. For example, if you are rendering from camera1 and camera2, then the rendered images are stored respectively in camera1/scene.gif and camera2/scene.gif.
You can also override the default settings by using the File Name Prefix attribute. the File Name Prefix attribute and select Insert camera name <camera>. This way, all rendered images are saved to the same directory and identified
with the camera name (for example, <camera>_<scene>.gif produces camera1_scene.gif and camera2_scene.gif). See File name prefix for more information.
For each renderable camera, you can also turn on or off the Alpha or Mask channel for that camera.
To make a camera non-renderable, remove it from the list by clicking the  button beside the camera name. You should have at least one renderable camera in the scene. The remove button does not appear
if only one renderable camera is listed.
button beside the camera name. You should have at least one renderable camera in the scene. The remove button does not appear
if only one renderable camera is listed.
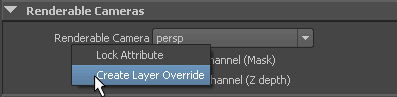
On any render layer, you can also override the list of renderable cameras for that layer. For example, you can set cameras
1, 3, and 5 as your renderable cameras for your master layer and then set cameras 1, 2, and 4 as renderable for layer 1. To
override the settings in a layer and render the scene from a different camera, select the layer, and then, in the Render Settings window, Renderable Camera beside the camera name and select Create Layer Override from the drop-down menu that appears. Renderable Camera turns red to indicate that a layer override has been incorporated.
The Image Size attributes control the resolution and pixel aspect ratio of rendered images.
For more information about resolution, see Resolution.
Select a film- or video-industry standard resolution. When you select an option from 7the Presets drop-down list, Maya automatically sets the Width, Height, Device Aspect Ratio, and Pixel Aspect Ratio.
You can also add a Presets option to output to an unlisted device.
Specifies the type of rendering resolution ratio you want to use, Pixel aspect or Device aspect.
The Pixel aspect ratio is the number of pixels in width to height, that compose the image. Most display devices (for example, a computer monitor) have square pixels, and their Pixel aspect ratio is 1. Some devices, however, have non-square pixels (for example, NTSC video has a Pixel aspect ratio of 0.9).
The Device aspect ratio is the number of units wide by the number of units high of your display. A 4:3 (1.33) display produces an image that is more square, and a 16:9 (1.78) ratio produces an image that is more panoramic in shape.
The aspect ratio of the individual pixels of the display device on which you are viewing the rendered image.
For more information about the pixel aspect ratio, see Pixel aspect ratio.
Specifies that Active Representations in the scene render at render time.
Type in the fields to create a filter that specifies which representations to render at render time.
See Specify assembly representations to render and Create a filter that specifies representations to render.
The representation you want to render has the specified Name.
The representation you want to render has the specified Label.
The representation you want to render is of the specified Type.
When on, Maya uses the expressions in the Representation Name, Representation Label, and Representation Type fields to specify which representations render at render time.
See Use regular expressions to specify representations for render.
Not available for Vector Rendering.
Turn the default lighting on or off during rendering.
For more information about Maya’s default lighting, see Default lighting in Maya.
A MEL command or script to run before rendering each frame (Pre render frame MEL), or after rendering each frame (Post render frame MEL).
For more information Pre render frame MEL scripts and Post render frame MEL scripts, see Pre Render MEL and Post Render MEL scripts.
 Except where otherwise noted, this work is licensed under a Creative Commons Attribution-NonCommercial-ShareAlike 3.0 Unported License
 over the attribute name to display the