
The Node Editor presents an editable schematic of the dependency graph, displaying nodes and the connections between their attributes. It allows you to view, modify and create new node connections. You can access the Node Editor from the Windows menu. (Window > Node Editor).
There are three ways to view nodes within the Node Editor: simple, connected and full.
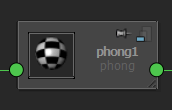
The simple mode shows one input and one output master port, represented as circles. The  icon also denotes that you are in the simple mode.
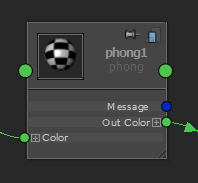
The connected mode shows the input and output master ports, as well as any connected attributes. These attributes have their
own ports, which are displayed as small circles. The  icon also denotes that you are in the connected mode.
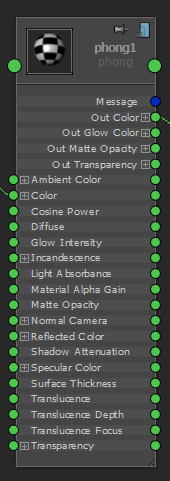
The full mode shows the input and output master ports, as well as primary node attributes. The set of primary attributes for
a given node is based on the properties of the attributes such as whether they are keyable or dynamic. The  icon also denotes that you are in the full mode.
Input attributes are displayed on the left side of a node in full mode. Output attributes are displayed on the right side.
To expand a node's attribute list, click the  located next to the attribute. If an attribute can be connected as either an input or an output, a port is available on both
the left and right sides of the node. For more information on node connections, see Displaying connections.
located next to the attribute. If an attribute can be connected as either an input or an output, a port is available on both
the left and right sides of the node. For more information on node connections, see Displaying connections.
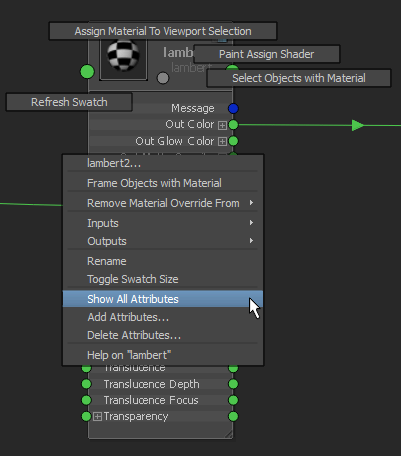
You can select the Show All Attributes option from the node marking menus to temporarily replace the full mode for a node with a listing of all of the attributes. The displaying of all of its attributes is only valid for this draw instance. If you regraph the node, or if you change the view mode of the node, you must re-select this option to see all of its attributes again. See Node Editor Marking Menus for more information about the Node Editor marking menus.
Changing view modes for multiple nodes
You can change the view mode for multiple nodes in one step by selecting the nodes and selecting the desired mode icon in the toolbar. You can also do the same via the menu options (Edit > Simple Mode, Connected Mode, Full Mode) or their shortcuts. See Node Editor Edit menu and Node Editor Toolbar for more information.
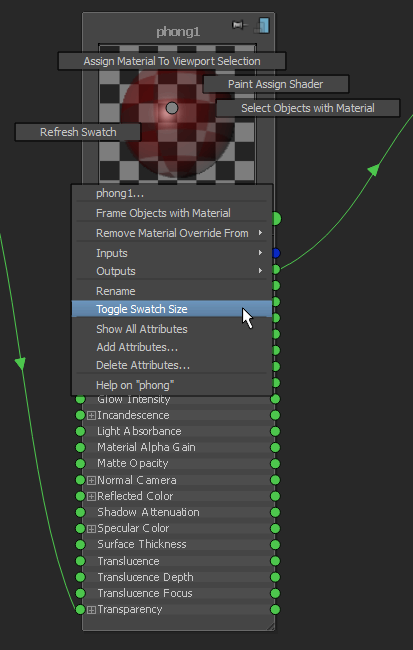
In any view mode, you can toggle between a larger and a smaller version of the node swatch by  the node and selecting Toggle Swatch Size from the node marking menu.
The following table lists the functionality of the Node Editor at a glance.


 icon in the toolbar to display the input and output node connections.
 drag and drop from the
  . Middle-mouse or left-mouse drag to create connection lines between your output and input attributes.
 +
+  +
+  icon to lock your view so that any new nodes you create do not appear in the graph.
 on the bottom right corner of a node denotes that it can be resized.
 to pin and
  to unpin. You can also pin or unpin multiple nodes in one step via the toolbar icons.