Chapter 8, Playing, Viewing and Sorting Shots
| Viewing Multiple Shots in the Player | Caching Frames to Memory for Real-Time Playback | ||
Chapter 8, Playing, Viewing and Sorting Shots |
|||
 Accessing the Timeline Sort Feature
Sometimes it may be easier for you to grade a timeline if the shots are in a different order than the final sequence. You can rearrange the order of the shots so common shots are grouped together, graded, and then returned to their original order. The timeline sort mode allows you to do this. You can modify the order of the shots in your assembled EDL and then apply grading to those shots. Once you have finished grading the sorted shots, you can output the shots to a VTR (via the write telecine tape feature), save the shots as a new cut, or return the shots to their original order. You can sort the shots either by the record timecode or by the reel name and source timecode.
By default, all the shots are sorted into a single layer when you use the timeline sort mode (whether you are sorting a single-layered timeline or a multi-layered timeline). You can also choose to sort only the selected shots within the timeline. If you are working with a multi-layered timeline, be aware of layers that are muted or if a layer is soloed. If a layer is soloed, then only the shots in that layer can be sorted. If any layers are muted, the shots within those layers cannot be sorted. As well, the same shot can appear in numerous layers. These shots are sorted from the bottom to top layer.
When the timeline is sorted, only the source media is shown, therefore, you cannot modify or collapse the timeline and dissolves and retimes are not visible. The Edit and Dissolve menus are greyed out and all the options within the Timeline menu and the Colourist Timeline menu are also greyed out. You also cannot add or delete shots while the shots are sorted.

To sort the shots within your timeline, you can access the Timeline Sort section in the Assemble menu.
In the Main menu, click Editing.
Click Assemble.
The Timeline Sort section appears.

 "Show full-size image")
|
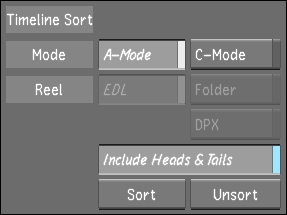
The Timeline Sort section is made up of the following buttons.

 "Show full-size image")
|
|
|
|
|
A-Mode button-- When enabled, this sorts either the entire timeline or selected shots by the order of the shots in the sequence. If you have a multi-layer timeline, the shots are organized by their time location in the sequence. See Sorting with A-Mode.
C-Mode button--This mode sorts either the entire timeline or the selected shots by the reel name and the source timecode. The Reel options (e.g., EDL, Folder, and digital picture exchange (DPX)) are only available for a C-mode sort. See Sorting with C-Mode.
EDL button-- The EDL option sorts the shots by the EDL reel name (in ascending alphanumerical order) and by source timecode.
Folder button-- This option sorts the shots according to the folder name (or directory if you are using Linux) your scans or footage are saved into and by source timecode.
DPX button-- Shots are sorted by DPX reel name and source timecode.
Include Heads & Tails button-- When enabled, the sorted shots' heads and tails portions are expanded to let you see and work on the entire shot. It also allows you to work on other parameters (e.g., animation, tracking feature, etc.) without disturbing the initial edits (such as dissolves). This option is available for both A-mode and C-mode and is disabled by default.
Sort button-- Once a sort mode, a reel option (if applicable), and the heads and tails option have been selected, click Sort to organize your shots according to those criteria. The editing tools are disabled and a green border appears around the timeline canvas.
Unsort button-- Click Unsort to return the timeline back to its original sequence. The editing tools are enabled.
When you use A-mode to sort your timeline, your shots are organized according to their time location within the sequence (i.e., the record timecode). The shots are displayed one after another on a single layer and any dissolves and retimes are not displayed.
Click Editing and then click Assemble to display the Timeline Sort section.
Select the shots you want to sort. If you want to sort the entire timeline, you do not need to select any shots.

 "Show full-size image")
Enable the A-Mode button and choose whether you want the head and tail frames to be exposed.
 "Show full-size image")
Note: If any of your shots have a retime value with heads and tails, the Retrim button (in the Edit menu) must be enabled so the sort function can calculate the handles properly.
Click Sort.
The shots are now sorted by the record timecode. A green border appears around the timeline canvas to indicate that you are working in a sorted timeline.
Note: You cannot do any editorial work or delete and add shots while you are in the sorting mode. As well, undo actions are disabled.
Once you have completed grading the shots, you can do one of the following:
Create a new cut list with the sorted shots. See Creating a New Cut.
Render the sorted shots. See Rendering Shots.
Play out the sorted shots to a VTR. See Playing Out to a VTR and Writing Telecine-Style Tape.
Return the sorted shots to their original order.
Do one of the following:
Click Unsort.
Press Alt+F8.
You can also sort the shots, without accessing the Assemble menu, by using hot keys. Press Alt+F9 to sort the shots in A-mode and enable the heads and tails. The heads and tails are showing 0 (zero) so you can work on every single frame within the shot.
 "Show full-size image")
Press Alt+F10 to sort the shots in A-mode and for head and tail frames to remain unexposed (disabled).

 "Show full-size image")
When you sort the timeline with C-mode, you are organizing the shots based on the reel name and the source timecode. If the shot does not have a reel/folder name, then the source timecode is used for sorting. The shots are displayed one after another on a single layer and dissolves and retimes are not displayed. You can choose to have your timeline sorted by EDL reel name, folder name, or DPX reel name.
You want to sort the shots by EDL if you are working with a cut that has been assembled from an EDL, or a cut that is based on a Wiretap EDL. When you sort the timeline using the EDL option, the shots are arranged by the EDL reel name in alphanumerical order (numerical before alphabetical), and then by source timecode in ascending order (e.g., from 00:00:00:00 to 23:59:59:29). This data is read from the cut file EDLReelName XML tag.
If you are sorting the timeline with the Folder option, the shots are arranged in alphanumerical order (numerical before alphabetical) by the folder or directory name where you are storing your scans or captured footage (see Recommended Directory Structure for Projects). You can view the folder name in the file browser. This data is retrieved from the cut file AliasName XML tag. This tag is based on the name of the reel folder or directory when you are working with imported scans or captured footage.
Lastly, you can sort the timeline of DPX files by their reel name. This data is read from the XML tag DPXReelName within the cut file. This XML tag is based on the data in the DPX header of the imported film scans. For more information on XML tags, see Appendix C, XML in Lustre.
Click Editing and then click Assemble to display the Timeline Sort section.
Select the shots you want to sort. If you want to sort the entire timeline, you do not need to select any shots.
Enable the C-Mode button, choose a Reel option, and choose whether you want the head and tail frames to be exposed.

 "Show full-size image")
Note: If any of your shots have a retime value with heads and tails, the Retrim button (in the Edit menu) must be enabled so the sort function can calculate the handles properly.
Click Sort.
The shots are now sorted according to your criteria. A green border appears around the timeline canvas to indicate that you are working in a sorted timeline.
Note: You cannot do any editorial work or delete and add shots while you are in the sorting mode. As well, undo actions are disabled.
The following image is a C-mode sort using the EDL option with heads and tails enabled. The heads and tails are showing 0 (zero), so you can work on every single frame within the shot.

 "Show full-size image")
This image shows the timeline being sorted by the C-mode EDL option and the heads and tails are disabled.
 "Show full-size image")
Once you have completed grading the shots, you can do one of the following:
Create a new cut list with the sorted shots. See Creating a New Cut.
Render the sorted shots. See Rendering Shots.
Play out the sorted shots to a VTR. See Playing Out to a VTR and Writing Telecine-Style Tape.
Return the sorted shots to their original order.
Do one of the following:
Click Unsort.
Press Alt+F8.
You can also sort the shots without accessing the Assemble menu. You can sort the shots by using the hot keys.
| Press: | To: |
| Alt+F11 | Sort the timeline in C-mode by EDL reel name and heads and tails are enabled. |
| Alt+F12 | Sort the timeline in C-mode by EDL reel name and heads and tails are disabled. |
| Ctrl+Alt+F11 | Sort the timeline in C-mode by folder name and heads and tails are enabled. |
| Ctrl+Alt+F12 | Sort the timeline in C-mode by folder name and heads and tails are disabled. |
| Ctrl+Alt+Shift+F11 | Sort the timeline in C-mode by DPX reel name and heads and tails are enabled. |
| Ctrl+Alt+Shift+F12 | Sort the timeline in C-mode by DPX reel name and heads and tails are disabled. |