Chapter 3, Project Management
| Working with Templates | |||
Chapter 3, Project Management |
|||
 Scanned Footage and Renders Stored in Project Home
Scanned Footage and Renders Stored Separately from Project Home
Using the [PROJECT_NAME] and [USER_NAME] Variables
Lustre stores all project metadata in sub-directories of the main project directory, Project Home. The metadata is saved per scene, each scene having its sub-directory. The sub-directory is created automatically and is named sacc_data.
Original footage and render files, both full and half resolution, can be stored per scene in the Project Home directory, or they can be stored in separate directories, as decided at project configuration. When directories are not located in Project Home, they can be located on another drive, mount point, or even on a remote SAN or file server. Select the location that best suits your hardware configuration. For example, if you work on one project at a time, you may have enough space to store all footage on the Master Station. If you are working on multiple projects, you may not have the required space on the Master Station; in this case, you could store your full scans and render files on a large remote server, and store the half-resolution scans locally.
The following tables provide examples of each of these possible scenarios.
Note: If configuring Lustre on an Autodesk IncineratorTM high-speed network, see Incinerator-Specific Project Management Configuration.

In this example, the Project Home is defined in Windows as the H:\ drive, whereas in the Linux version it is defined as the /mnt/md0/ mount point.
When using this structure, you can first create scenes in Lustre, which then generates directories for these scenes in the Project Home. You create the directories for your scans manually. The render directories related to the scenes are created automatically by Lustre. Alternatively, you can manually create the scene's directory under the Project Home in Lustre. Later you can define scenes in Lustre with the exact names you gave to the directories. Lustre will recognize them as existing scene directories and create the required metadata directories and files inside them. See Working With Scenes.
| Windows Folder: | Linux Directory: | Description: |
| H:\<project name> | /mnt/md0/<project_name> | Project Home directory. You do not necessarily have to create this off the root. |
| H:\<project name>\ <scene name> |
/mnt/md0/<project_name>/<scene_name> | Scene directory. |
| H:\<project name>\ <scene name>\sacc_data |
/mnt/md0/<project_name>/<scene_name>/sacc_data | Directory where most metadata associated with the scene is stored. |
| H:\<project name>\ <scene name>\<scans folder> |
/mnt/md0/<project_name>/<scene_name>/<scans_directory> | Directory in which you create sub-directories to store original footage. |
| H:\<project name>\ <scene name>\grd |
/mnt/md0/<project_name>/<scene_name>/grd | Directory in which Lustre creates sub-directories for render files. |
The following table shows the recommended sub-directory structure for scans. In this table, H:\...\ in the Windows column, and /mnt/md0/.../ in the Linux column, respectively, represent H:\<project name>\<scene name> and /mnt/md0/<project_name>/<scene_name>, as shown in the previous table.
| Windows Folder: | Linux Directory: | Description: |
| H:\...\<scans folder>\ <shot name> |
/mnt/md0/.../<scans_directory>/<shot_name> | Directory in which sub-directories for different resolutions of the scans are located. |
| H:\...\<scans folder>\ <shot name>\<resolution> |
/mnt/md0/.../<scans_directory>/<shot_name>/<resolution> | Directory in which the actual scans are stored. Half- and full-resolution footage should both be at this level, in different directories. The directory name must consist of the resolution expressed in numbers with a lowercase x in between. Example: 2048x1556. If you generate proxies in Lustre, the proxies directory is created automatically. |
The following table shows the sub-directory structure that Lustre creates for renders. The structure differs depending on the Render Place option specified when rendering. See Specifying the Destination for Local Render Files. In this table, H:\...\ in the Windows column and /mnt/md0/.../ in the Linux column, respectively, represent H:\<project name>\<scene name> and /mnt/md0/<project_name>/<scene_name>, as shown in the first table.
| Windows Folder: | Linux Directory: | Description: |
| H:\...\grd\ <shot name_grdxx> |
/mnt/md0/.../grd/<shot_name_grdxx> | Directory in which sub-directories for different resolutions of the renders are located when using the Normal or No Wedge Render Place option. In the example, xx is the grade number. |
| H:\...\grd\ <shot name_grdxx>\ <resolution> |
/mnt/md0/.../grd/<shot_name_grdxx>/<resolution> | Directory in which the actual renders are stored when using the Normal or No Wedge Render Place option. The directory name corresponds to the resolution of the render files, for example, 1280x1024. |
| H:\...\grd\<grdxx> | /mnt/md0/.../grd/<grdxx> | Directory in which the actual renders are stored when using the One Sequence Render Place option. In the example, xx is the grade number. |
In this example, the Project Home is defined in Windows as the H:\ drive, whereas in the Linux version it is defined as the /mnt/md0/ mount point.
To have the scanned footage and renders stored on a separate storage location, the Scans Full Home and the Renders Full Home must be explicitly defined as a separate location. On Windows, an example of this separate location could be a shared folder coming from a remote file server, and mapped to the local drive G:\ under the films\myfilm folder. On Linux, a corresponding example would be a directory exported from a remote file server, and mounted on the /mnt/fileserver/ NFS mount point under the films/myfilm directory.
| Windows Folder: | Linux Directory: | Description: |
| H:\<project name> | /mnt/md0/<project_name> | Project Home directory. |
| H:\<project name>\ <scene name> |
/mnt/md0/<project_name>/<scene_name> | Scene directory. |
| H:\<project name>\ <scene name>\sacc_data |
/mnt/md0/<project_name>/<scene_name>/sacc_data | Directory where most metadata associated with the scene is stored. |
| G:\films\myfilm\ <scans folder> |
/mnt/fileserver/films/myfilm/<scans_directory> | Directory in which you create sub-directories to store original footage. |
| G:\films\myfilm\grd | /mnt/fileserver/films/myfilm/grd | Directory in which Lustre creates sub-directories for render files. |
The following table shows the recommended sub-directories structure for scans. For the sake of simplicity, in this table, G:\...\ represents G:\films\myfilm\, and /mnt/fileserver/.../ represents /mnt/filesever/films/myfilm as shown in the previous table.
Note: If you decide to store half-resolution scans in a different location from the originals, the project directory structure must be identical in both locations and must include the root directory of the project. For example, if the Project Home is defined as V:\Data\Lustre_project\My_movie, the Scans Full Home could be defined as W:\mnt\San\Lustre_project\My_movie\ and the Scans Half Home could be X:\Lustre_project\My_movie.
| Windows Folder: | Linux Directory: | Description: |
| G:\...\<scans folder>\<shot name> | /mnt/fileserver/.../<scans_directory>/<shot_name> | Directory in which sub-directories for different resolutions of the scans are located. |
| H:\...\<scans folder>\<shot name>\<resolution> | /mnt/fileserver/.../<scans_directory>/<shot_name>/<resolution> | Directory in which the actual scans are stored. Half- and full-resolution scans should both be at this level, in different directories. The directory name must consist of the resolution expressed in numbers with a lowercase x in between. Example: 2048x1556. If you generate proxies in Lustre, the proxies directory is created automatically. |
The following table shows the sub-directory structure that Lustre creates for renders. The structure differs depending on the Render Place option specified when rendering. See Specifying the Destination for Local Render Files. For the sake of simplicity, in this table, G:\...\ represents G:\films\myfilm\, and /mnt/fileserver/.../ represents /mnt/filesever/films/myfilm as shown in the first table in this section.
| Windows Folder: | Linux Directory: | Description: |
| G:\...\grd\ <shot name_grdxx> |
/mnt/fileserver/.../grd/<shot_name_grdxx> | Directory in which sub-directories for different resolutions of the renders are located when using the Normal or No Wedge Render Place option. In the example, xx is the grade number. |
| G:\...\grd\ <shot name_grdxx>\ <resolution> |
/mnt/fileserver/.../grd/<shot_name_grdxx>/<resolution> | Directory in which the actual renders are stored when using the Normal or No Wedge Render Place option. The directory name corresponds to the resolution of the render files, for example, 1280x1024. |
| H:\...\grd\<grdxx> | /mnt/fileserver/.../grd/<grdxx> | Directory in which the actual renders are stored when using the One Sequence Render Place option. In the example, xx is the grade number. |
Instead of typing the path, you can browse for paths using the path browser.
Display the path browser by clicking '...'.

 "Show full-size image")
Using the path browser, navigate the directory structure to reach the desired directory.
The selected path is automatically displayed in the path field.
To exit the browser, click Enter.
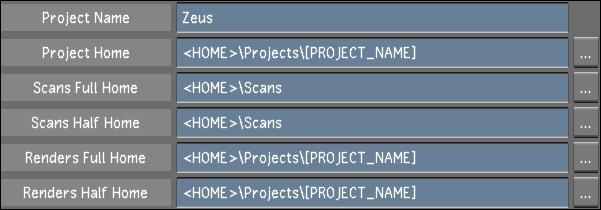
You can use your operating system's environment variables to define all or a portion of a path. In Lustre, if you choose to use environment variables, enclose the variable name inside diamond brackets. For example, the Project Home field might be:
<HOME>\Projects\Zeus
You can also use [PROJECT_NAME] and [USER_NAME] in your paths. You do not need to define these variables as they are predefined. The value of [PROJECT_NAME] is always the value you assign to Project Name in the Project settings page of Project Management. Likewise, the value of [USER_NAME] is always the value you assign to User Name in the Display & Interface settings page of User Management.
Note: Both the [PROJECT_NAME] and [USER_NAME] variables require opening and closing square brackets.
The following graphic shows the use of both types of variables.
 "Show full-size image")