Chapter 20, Video Capture and Video Playout
| Playout Menu Options | Writing Telecine-Style Tape | ||
Chapter 20, Video Capture and Video Playout |
|||
 Selecting a Raster for Playout
Defining In and Out Markers when Playing Out to Tape
Use the Playout tool to play out frames from Lustre so that they can be recorded to an external device.
Note: If you play out Telecine-style to tape, you can only play out in Assemble mode.
In the majority of cases, you will play out rendered frames to a VTR. See Rendering Shots. There are exceptions:
The creation of real-time deliverables using source material. See Creating Real-Time Deliverables from the Timeline or Rendered Material.
GPU playout from the timeline. See Play Out from Timeline with GPU Acceleration.
There are three modes for playing out to a VTR:
In Insert mode, you record video only, audio only, or a combination of both, to a tape that already contains material (either pre-striped with black or actual video material with a valid control track).
In Assemble mode, you can add video to the end of previously-recorded material.
In Record mode, you can play out video to a blank tape or a tape that contains existing material. Everything on the tape is overwritten when recording.
For some video formats, you can add 3:2 pulldown during the playout operation. See About 3:2 Pulldown.

The recommended steps for playing out video to a VTR are as follows.
| Step: | Refer to: |
| 1. Render the timeline in the appropriate resolution for the VTR to which you want to play out. | Rendering Shots. |
| 2. Use the transport controls to cue up the VTR to the in point. | Controlling the VTR. |
| 3. (Optional) Cue up the timeline. | Navigating through Shots. |
| 4. Select a playout mode. | Playing Out to a VTR. |
When playing out to an external device, you must select a raster. See Supported Video SDI and GFX SDI Rasters.
Note: When you select a drop frame (DF) video format, the timecodes are calculated in Drop Frame mode.
In the Video Device SDI group, toggle the Video/Graphics raster option box to display your video card (AVIO). See Playout Menu Options.

 "Show full-size image")
Select an option from the Link Type box. Select Single for a 4:2:2 video signal, and Dual for a 4:4:4 video signal.
Toggle the Format option box to the required raster format (SD, HD, Film, or Audio).
In the Raster list, select the raster for playout.

 "Show full-size image")
Note: If clicking on a raster in the Raster list does not select the item, that format is not available for capture on that system.
(Optional) If you need to add 3:2 pulldown frames when playing out, enable Pulldown.
The pulldown is added to the played out video. The first frame played out becomes the AA frame in the pulldown sequence. See About 3:2 Pulldown.
Users can create a video tape from a specific segment of the timeline by setting in and out points for playing out to tape. This is done using the same hot keys as for setting in and out points for playing shots in the Player. A new option has been added to the Editing > Playout menu that lets you select the marked section for playout to tape.
Go to the start and end frame and mark the in and out points.
| Press: | To: |
| Shift+I | Mark an in point. |
| Shift+O | Mark an out point. |
| Shift+L | Clear in and out points. |
Click Editing, and then click Playout to display the Playout menu.
Click Markers.

 "Show full-size image")
Note: If you enable an in point only, playout begins at that point and goes to the end of the timeline. If you enable an out point only, playout begins at the start of the timeline and ends at the out point.
Use Insert mode when you want to insert video only, audio only, or both video and audio onto a tape that already contains material. The entire area to which you are recording must have a valid, continuous control track, as this mode only plays out the video (existing timecode and audio are not affected).
Note: When recording to tape, you can only configure specific video and audio tracks to play out if you are in Insert mode.
Set the VTR to Regen timecode.
Before you can play out to a VTR, you must render the timeline at the appropriate video resolution. See Rendering Shots and Playout Workflow.
Click Editing, and then click Playout to display the Playout menu.
Select a raster for playout. See Selecting a Raster for Playout.
In the Sync Mode list, select the synchronization mode. See Playout Menu Options.
(Optional) To record only a portion of the timeline, use markers to define where, in the timeline, you wish to start and stop recording to tape. See Defining In and Out Markers when Playing Out to Tape.
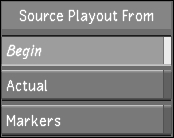
In the Source Playout From group, determine where the playout operation starts.
| Click: | To start the playout: |
| Begin | From the start of the current timeline. |
| Actual | At the current frame. |
| Markers | At the in marker in the timeline, and stop at the out marker. |
 "Show full-size image")
In the In field, enter the tape timecode where the video is to be inserted.

 "Show full-size image")
Hint: To find the desired timecode more quickly, click the Source Timecode field next to the playback controls while still in the Playout menu. The playback controls and Source Timecode field turns blue to indicate that they can be used to control the VTR. Scrub to the desired timecode, then enter it in the In field.
(Optional) In the Record To Tape Mode group, enable Preview.

 "Show full-size image")
With Preview enabled, your footage is played out in the Player, but nothing is written to tape. The Insert button turns green after the first click to show that the action is non-destructive.
(Optional) Configure video and audio record delay. See Playout Menu Options.
Configure Lustre to record specific video and audio tracks to tape. See Playout Menu Options.
Click Insert, and then click it again to confirm the action.

 "Show full-size image")
Hint: To record a single shot as opposed to the entire timeline, select the shot you want to play out and hold down SHIFT while clicking Insert.
The playout operation begins.
Use Assemble mode when recording on a tape that contains a valid control track up until a certain point, but you need to record beyond that point. In Assemble mode, you are attaching video and audio to existing material. For example, yesterday you played out your work onto a blank tape using Record mode. Today, you have completed additional work and would like to add it to the end of the tape. In this case, you cue the tape to the in point (at a point where there is a valid control track) and begin playing out in Assemble mode. The timecode is continued from the previously recorded material.
Note: When recording to tape, you can only configure specific video and audio tracks to play out if you are in Insert mode.
Set the VTR to Regen timecode.
Before you can play out to a VTR, you must render the timeline at the appropriate video resolution. See Rendering Shots and Playout Workflow.
Click Editing, and then click Playout to display the Playout menu.
Select a raster for playout. See Selecting a Raster for Playout.
In the Sync Mode list, select the synchronization mode. See Playout Menu Options.
(Optional) To record only a portion of the timeline, use markers to define where, in the timeline, you wish to start and stop recording to tape. See Defining In and Out Markers when Playing Out to Tape.
In the Source Playout From group, determine where the playout operation starts.
| Click: | To start the playout: |
| Begin | From the start of the current timeline. |
| Actual | At the current frame. |
| Markers | At the in marker in the timeline, and stop at the out marker. |
In the In field, enter the tape timecode where the video is to be edited.

 "Show full-size image")
Hint: To find the desired timecode more quickly, click the Source Timecode field next to the playback controls while still in the Playout menu. The playback controls and Source Timecode field turns blue to indicate that they can be used to control the VTR. Scrub to the desired timecode, then enter it in the Tape Rec IN field.
(Optional) In the Record To Tape Mode group, enable Preview.

 "Show full-size image")
With Preview enabled, your footage is played out in the Player, but nothing is written to tape. The Insert button turns green after the first click to show that the action is non-destructive.
(Optional) Enable Telecine. See Writing Telecine-Style Tape.
(Optional) Configure video and audio record delay. See Playout Menu Options.
Click Assemble, then confirm the action.

 "Show full-size image")
Hint: To record a single shot as opposed to the entire timeline, select the shot you want to play out and hold down SHIFT while clicking Assemble.
The playout operation begins.
Use Record mode to record an entire cut to a VTR. Record mode overwrites the entire contents of the tape (including timecode). To use Record mode, you must set the VTR timecode to Preset or Auto timecode.
You do not have to pre-stripe the tape with timecode when using Record mode.
You have the option of specifying a start timecode value, and including leader black and colour bars. Leader black and colour bars are added to the start of the program (on tape).
Note: In Record mode, it is not possible to record a subset of the total available tracks to tape; all tracks are recorded to tape in this mode.
At least 10 seconds of black are always recorded to the video tape before the footage. Also, footage always starts on the minute. Lustre pads the leader with additional black and colour bars to ensure that the video always begins on the minute. The following examples illustrate how this is calculated.
Start Timecode: 00:59:00:00
Min Colourbar Length: 15 seconds
Black Length: 15 seconds
To begin, Lustre always records 10 seconds of black from 00:59:00:00 to 00:59:10:00 (this length is locked and is always recorded).
After the initial black, colour bars are recorded from 00:59:10:00 to 00:59:45:00 (the Minimum Colourbar Length of 15 seconds is surpassed).
Finally, black is recorded from 00:59:45:00 to 01:00:00:00 (the Black Length value of 15 seconds must be respected) and the video material begins exactly at 01:00:00:00.
Start Timecode: 00:59:30:00
Min Colourbar Length: 20 seconds
Black Length: 10 seconds
To begin, Lustre always records 10 seconds of black from 00:59:30:00 to 00:59:40:00 (this length is locked and is always recorded).
After the initial black, colour bars are recorded from 00:59:40:00 to 01:00:50:00 (the Minimum Colourbar Length of 20 seconds is surpassed).
Finally, black is recorded from 01:00:50:00 to 01:01:00:00 (the Black Length value of 10 seconds must be respected) and the video material begins exactly at 01:01:00:00.
In this case, the Minimum Colourbar Length and the Black Length (which combine to add up to 30 seconds) does not fit into the gap between 00:59:40:00 and 01:00:00:00 (20 seconds). Because video must always start on the minute, additional colour bars are added so that the material starts at the next minute.
Before you can play out to a VTR, you must render the timeline at the appropriate video resolution. See Rendering Shots and Playout Workflow.
Click Editing, and then click Playout to display the Playout menu.
Select a raster for playout. See Selecting a Raster for Playout.
In the Sync Mode list, select the synchronization mode. See Playout Menu Options.
(Optional) To record only a portion of the timeline, use markers to define where, in the timeline, you wish to start and stop recording to tape. See Defining In and Out Markers when Playing Out to Tape.
In the Source Playout From group, determine where the playout operation starts.
| Click: | To start the playout: |
| Begin | From the start of the current timeline. |
| Actual | At the current frame. |
| Markers | At the in marker in the timeline, and stop at the out marker. |
(Optional) In the Record To Tape Mode group, enable Preview.

 "Show full-size image")
With Preview enabled, your footage is played out in the Player, but nothing is written to tape.
In the Record Mode Options group, determine where on the video tape you want to record to:
Enable Tape Begin to rewind to the start of the tape, and then begin the playout.
Enable Actual to start the playout operation at the current frame of the tape.

 "Show full-size image")
Enter the start timecode in the In field.

 "Show full-size image")
Enter the minimum colour bar length and the minimum Black length in the Bars Length and Black Length fields, respectively.

 "Show full-size image")
(Optional) Configure the video and audio record delay. See Playout Menu Options.
Click Record, and then click it again to confirm the action.

 "Show full-size image")
The playout operation begins.
Lustre to emulate a VTR for playback in real time, but not capture. When configured to emulate a VTR, Lustre can be controlled, using an RS-422 interface, by a third-party application or device. You control Lustre VTR emulation from the application or device that treats Lustre as a VTR device. Lustre supports SD and HD emulators.
The RS-422 commands that you can use for VTR emulation are summarized as follows:
|
|
|
Note: Unless otherwise configured by the controller device, the pre-roll time on the Lustre VTR emulator defaults to seven seconds with each video initialization.
Connect Lustre to the breakout box by doing one of the following:
If Lustre is running on the IBMTM IntelliStation® Z Pro 6223 or the HP xw8400, connect to the B port on the DVS Centaurus breakout box.
If Lustre is running on the HP xw8600, connect to the B port on the AJA breakout box.
Connect the master application or device to Lustre on the patch panel using a straight pin-to-pin serial cable. A cross-cable will not work.

|
Warning: Save your grade before editing your project, or you will lose any unsaved work. |
Launch Lustre and navigate to the Engineering page of the Project Management settings (See Engineering menu).
Enable VTR Emulator.
Use the Offset in Frames slider to set the number of frames you wish to shift ahead as footage is transferred from the controlling device to Lustre. Enter a negative number of frames to shift the clip backwards.
Click Save Project.
Click Editing, and then click Playout to display the Playout menu.
Select a raster for playout. See Selecting a Raster for Playout.
Prior to playout from the VTR emulator, perform the following tasks:
Add a header of at least five seconds to the start of the Storyboard.
Verify that the start Timecode begins at the end of the header, and not at 00:00:00:00. This is necessary because the Lustre VTR emulation does not provide a pre-roll outside of the boundaries of the existing Storyboard.
Click Eject.

 "Show full-size image")
To re-initialize, either switch between the Editing Capture and Playout menus, or re-select the DVS raster.