In Motion Flow mode, you combine BIP files, using either velocity-interpolated transitions or optimized transitions that compute minimum foot sliding, to create longer character animations.
First you add clips and reference them to BIP files in the Motion Flow Graph. You then use these to create a script in the Motion Flow Script list. You adjust transitions between BIP files with the Transition Editor. You save scripts, transitions, and clip references in a Motion Flow Editor file (MFE) for later editing.
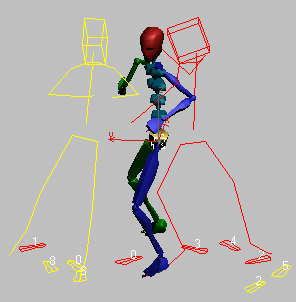
The Transition Editor uses ghosts to represent the source (yellow) and destination (red) clips. Use these stick-figure ghosts to judge body position and set a likely start frame in both clips for the transition.
You can generate random motions for one or more bipeds using the Create Random Motion command. For example, you can use these to animate a crowd of bipeds. For a crowd, you must share one motion flow script among many bipeds.
If you are driving a crowd using delegates and behaviors, then rather than a completely random motion, character studio picks appropriate clips based on the delegate's speed and direction. If the delegate slows to a stop, character studio will find and use a clip that slows to a stop, if one exists.
In all crowd simulations you must load clips and create transitions before synthesizing the crowd motion. Often, many clips are used to synthesize crowds. Automatic transitions relieve you of having to create transitions between clips manually.
One additional rollout displays in Motion Flow mode: The Motion Flow rollout provides access to the Motion Flow Graph and lets you load and save motion flow files (MFE). The rollout also contains a Scripts section where you can create scripts, edit transitions, create a unified motion, and create random motions for the bipeds.
Workflow: Getting Started with Clips and Transitions in Motion Flow Mode
Create your own library of BIP files from imported and converted motion-capture data and from your own character animation. With a biped selected, turn on Motion Flow mode. On the Motion Flow rollout, turn on Show Graph to open the Motion Flow Graph. On the Motion Flow Graph, click Create Clip, and add clips in the Motion Flow dialog. Associate the clips to BIP files by first turning on Select Clips-Transitions on the Motion Flow Graph toolbar and then right-clicking a clip icon; a clip dialog appears, allowing you to browse for a clip.
Click Define Script on the Motion Flow rollout, then select a series of clips on the Motion Flow Graph. By left-clicking on a clip it will appear in the Scripts list. The clips are connected visually in the Motion Flow Graph with red arrows (active script) representing default transitions (Minimum Motion Loss). The default duration for a transition is 25 frames, which provides good results in many cases. Transitions, by default, use velocity interpolation between clips.
Use Edit Transition in the Scripts section to fine-tune the transitions between clips. Select a clip in the Scripts list, then from the Scripts commands, click Edit Transition; the Transition Editor displays, and the source and destination clip names are displayed at the top of the Transition Editor.
In the Source Clip area, Start Frame represents the frame in the source file where the transition starts. For example, if Source Clip Start Frame is 60, the transition from the source clip starts at frame 60. The duration of the transition is set in the Length field at the upper left; Length values are in frames. In this example, if Length is set to 10, the transition to the destination clip takes 10 frames. In the Destination Clip area, Start Frame represents the frame in the destination clip that the transition starts; a value of 80, for example, starts the transition at frame 80 of the destination clip. In this example, the source clip plays from 0 to 60, there is a 10 frame transition from frame 60 of the source clip to frame 90 of the destination clip (frames 80 to 90 cover the destination clip transition period), then the rest of the destination clip plays.
When the Transition Editor displays, the first things to try, before manually editing the transition, are the Optimized Transitions. Optimized transitions use a minimum foot sliding algorithm. The top right-hand corner of the Transition Editor dialog is the icon for optimized transitions. If the optimized transition is not satisfactory, try editing the transition manually.
Manual transition editing offers the most control; the Frame spinners in the Ghost areas of the Transition Editor allow you to scrub the source and destination clips while viewing two stick figures. Find a good start frame in both clips using the Frame spinners. Things to look for in both clips are similar supporting feet, body momentum that will appear natural, and arm motion similarities. If velocity changes between the clips are too abrupt, use the Length field to adjust the duration of the transition.
On the Motion Flow rollout, click Save File to save your work as an MFE file; transitions and scripts are saved. These BIP files contain no footsteps. Biped foot keys are saved with an IK Blend value of 1 for footsteps. To extract footsteps, exit Motion Flow mode, use Load File on the Biped rollout, and then click Convert. Convert looks at foot IK Blend values of 1 to extract footsteps.
The Motion Flow rollout displays when Motion Flow mode is active on the Biped rollout. You can load, append, and save motion flow editor files (MFE), and open the Motion Flow Graph and Shared Motion Flow dialogs using controls on this rollout.
Create and delete scripts, name scripts, edit transitions, edit clips, and position the entire animation using tools in the Scripts group. Create random motion for one or more bipeds using controls in this rollout. The Scripts group on the Motion Flow rollout is available only when Motion Flow mode is active.
Use tools in the Motion Flow Graph to add clips to the graph, calculate optimized transitions, set random script transition values, move and delete clips, and display clip dependencies. Clips and transitions display as icons in the Motion Flow Graph dialog.
Display the Transition Editor by selecting a clip in the list of the Scripts group and clicking Edit Transition in the same group or right-clicking a transition arrow in the Motion Flow Graph.
You can randomly traverse clips in a motion flow graph to animate one or more bipeds using controls in the Create Random Motion dialog. Parameters for random motion are set in the Motion Flow Graph, in the clip and transition dialogs, as well as in the Create Random Motion dialog.
Controls in the Shared Motion Flow dialog allow you to assign one motion flow to multiple bipeds. Instead of choreographing a motion flow script for individual bipeds, you can create a motion flow with all the clips and transitions to create a script to animate multiple bipeds.
Options in the Transition Optimization dialog allow you to select the range over which the optimize algorithm will search for the transition. It can search either the whole clip, or it can search near the existing transition. You must specify the preferred length of the optimized transition. character studio will try to get as close to that length as possible, still opting to give you the best length.
Parameters in the Clip Properties dialog allow you to browse for a clip, set a start and end frame for the clip and set a random start probability for the clip. Random start probability is used when you use Create Random Motion to generate a random script for a biped.


 Motion panel