Command entry:
Select a biped body part.


Motion panel
Biped Apps
Workbench button
Select panel
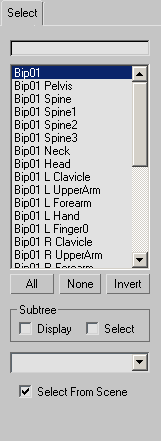
The Select panel of the Animation Workbench provides tools for selecting bipeds or biped components. You can manipulate the
selected biped part's animation tracks via curves displayed in the Workbench, or by using the Analyze, Fix, and Filter panels
to automatically identify errors and fix them.
The objects whose curves might be displayed are set using the selection drop-down list. To change the curves that are displayed
go into the Controller window and select the curves you want to see
 Once you’ve made a selection, you can hide the entire Tab area by clicking the Tab button on the Workbench toolbar. This
gives you more room to work on the curves in Curve View.
Once you’ve made a selection, you can hide the entire Tab area by clicking the Tab button on the Workbench toolbar. This
gives you more room to work on the curves in Curve View.
The functionality of the Select panel is similar to the standard 3ds MaxSelection Floater.
Procedures
To display a biped body part curve in the Workbench, do one of the following:
- On the Select panel, make sure Select From Scene is turned on, then in a viewport, click any biped object.
The object's curve is displayed in the Workbench Curve window.
- On the Select panel of the Animation Workbench, click to highlight the name of the body part in the scrollable Selection list.
- On the Workbench toolbar, turn on Controllers. In the hierarchy list, highlight the body part track whose curve you want to
see.
To hide or unhide the Tab panel:
- Click the Tab button on the Workbench toolbar.
The Tab panel disappears from view.
- Click the Tab button again.
The Tab panel returns to view.
Interface
- Selection field
-
Enter the name of the biped part you want to locate. That name (if found) will be highlighted in the Selection list. This
is useful when you can't find an entry by scanning the list.
You can use the question mark and asterisk characters as wildcards, in order to select multiple objects at once.
- Selection list
-
The Selection list displays all the body parts of all the bipeds in the scene.
You can use the Shift, Ctrl, and Alt keys to build selection sets, as in the rest of 3ds Max.
- All
-
Selects every entry in the list.
- None
-
Clears the selection so nothing is highlighted.
- Invert
-
Selects everything not highlighted in the list.
Subtree group
- Display
-
Indents the list to show the biped hierarchy. Default=off.
- Select
-
When on, selecting one biped part selects both it and all of its children. Default=off.
_____
- Named selection list
-
When you create a named selection in the scene, the named selection becomes available.
- Select From Viewport
-
When Select From Viewport is on, you can click the biped body parts directly in the viewport, rather than from the list. The
curves are immediately displayed in the Workbench Curve View. This is handy if you don't know the name of the part you need
to select.