Command entry:

Material Editor

Maps Rollout
Click any map selector button.
Material/Map Browser
Double-click Bitmap.
Select Bitmap Image dialog
Command entry: Material Editor
Bitmap map
Bitmap Parameters rollout
Bitmap button
Select Bitmap Image dialog
Command entry: Slate Material Editor
Material/Map Browser
Choose a Bitmap
Select Bitmap Image dialog
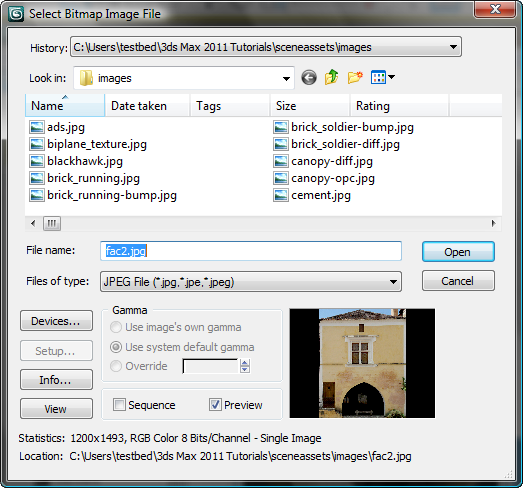
The Select Bitmap Image dialog allows you to choose a file or sequence of files for a map. If a sequence of files is selected
by turning on Sequence, the Image File List Control dialog is opened when you click Setup or Open.
Procedures
To select a bitmap image for a map:
- In the Material Editor, open the Maps rollout.
- Click any button in the Map column.
This adds a map to the component you chose. For example, clicking the Map button of the Diffuse channel creates a diffuse
or texture map.
3ds Max opens the Material Map Browser.
- In the Material/Map Browser, double-click Bitmap.
3ds Max opens the Select Bitmap Image dialog.
Alternatively, in the Slate Material Editor you can wire a Bitmap to the material component. When you choose Bitmap as the map type, 3ds Max opens the Select Bitmap File Image dialog at once.
- In the Select Bitmap Image dialog, use the Look In field to navigate to the appropriate directory.
NoteThe Select Bitmap Image File dialog uses the last location where a bitmap was chosen, rather than the default bitmap path
defined in Customize
Configure User Paths.
- Highlight the file name in the file list window.
- Click Open to close the dialog.
To select a set of still images as a bitmap sequence:
- In the Select Bitmap Image dialog, use the Look In field to navigate to the directory containing the sequence of files.
- If necessary, change Files Of Type to match the file extension of the sequence, or choose All Formats.
- Turn on Sequence, and choose the name of the first file in the sequence.
- Click the Setup button.
3ds Max opens an Image File List Control dialog.
- Click the Browse button and set the Target path to a writable directory on your hard disk. Do not set the path to a CD-ROM
drive.
- Choose the options you want and click OK.
3ds Max writes the IFL file to the target directory.
Interface
TipYou can resize the dialog by dragging an edge or a corner.
- History
-
Displays a list of the most recent directories searched. Whenever an image is selected, the path used is added to the top
of the history list as the most recently used path. The history information is saved in the
3dsmax.ini
file.
- Look In
-
Opens a navigation window to browse other directories or drives.
-
 Go to Last Folder Visited
-
Click to return to the folder you previously browsed to.
-
 Up One Level
-
Moves you up a level in the directory structure.
-
 Create New Folder
-
Lets you create a new folder while in this dialog.
-
 View Menu
-
Lets you choose the level of detail to display in the file list.
- List Window
-
When details are turned on, the contents of the directory are displayed with Name, Size, Type, Date Modified, and Attributes.
You can sort based on each of these columns by clicking the column label.
- File Name
-
Displays the file name of the file selected in the list.
- Files of Type
-
Displays all the file types that can be displayed. This serves as a filter for the list.
- Open
-
Selects the highlighted file and closes the dialog.
- Cancel
-
Cancels the selection and closes the dialog.
- Devices
-
Lets you choose the hardware output device, for example, a digital video recorder. The device, its driver, and its 3ds Max plug-in must all be installed on your system to use the device.
- Setup
-
When Sequence is turned on, and there are sequential files in the directory displayed, clicking Setup displays an Image File List Control dialog to create an IFL file.
- Info
-
Displays expanded information about the file, such as frame rate, compression quality, file size, and resolution. The information
here depends on the type of information that is saved with the file type.
- View
-
Displays the file at its actual resolution. If the file is a movie, the Media Player is opened so the file can be played.
Gamma Group
These controls are available only when Preferences dialog Gamma and LUT panel Enable Gamma/LUT Correction is on.
ImportantWhen combining standard (low-dynamic-range) and high-dynamic-range images in the same scene, make sure to treat each image’s
gamma correctly. For more information, see
Gamma Pipeline.
- Gamma
-
Specifies how to handle gamma with the bitmap image.
- Uses the gamma of the incoming bitmap.
- Replaces the image gamma with the system default gamma, as set on the Gamma and LUT panel of the Preferences dialog.
- Defines a new gamma for the bitmap that is neither the image’s own, nor the system default.
NoteIn general, it is less confusing to use the system default gamma for incoming bitmaps. But if you are using bitmaps created
(or edited) by a variety of other programs, and need to adjust gamma differently for each program, then use Override.
_____
- Sequence
-
If there are more than one files that have the same root name and end in sequence numbers, turning on Sequence creates an
Image File List (IFL). Default=off.
Each time you choose an image, 3ds Max checks to see if an IFL sequence can be created. If the selected image does not yield a list, this option is unavailable.
You can use wild-card characters to filter image files. When sequence is turned on, you can click Setup to configure the IFL
file.
- Preview
-
Displays the image as a thumbnail in the image window. Default=on.
_____
- Statistics
-
Displays the resolution, color depth, image type, and number of frames of the selected file.
A full-color image with an alpha channel will show “RGBA Color 16 Bits/Channel”; a bitmap with a limited color depth might
show “Indexed Color 8 Bits/Pixel,” and so on.
- Location
-
Displays the full path for the file. With this information at the bottom of the dialog, you always know exactly where you
are.