Loft objects are two-dimensional shapes extruded along a third axis. You create loft objects from two or more existing spline objects. One of these splines serves the path. The remaining splines serve as cross-sections, or shapes, of the loft object. As you arrange shapes along the path, 3ds Max generates a surface between the shapes.
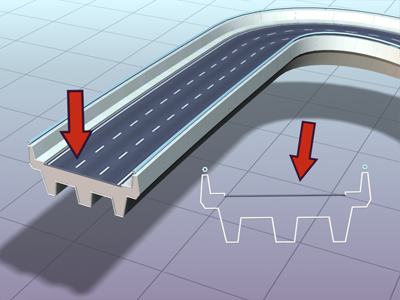
Roadway created as a lofted shape
You create shape objects to serve as a path for any number of cross-section shapes. The path becomes the framework that holds the cross sections forming your object. If you designate only one shape on the path, 3ds Max assumes an identical shape is located at each end of the path. The surface is then generated between the shapes.
3ds Max places few restrictions on how you create a loft object. You can create curved, three-dimensional paths and even three-dimensional cross sections.
When using Get Shape, as you move the cursor over an invalid shape, the reason the shape is invalid is displayed in the prompt line.
Unlike other compound objects, which are created from the selected object as soon as you click the compound-object button, a Loft object is not created until you click Get Shape or Get Path, and then select a shape or path.
Loft is enabled when the scene has one or more shapes. To create a loft object, first create one or more shapes and then click Loft. Click either Get Shape or Get Path and select a shape in the viewports.
Once you create a loft object, you can add and replace cross-section shapes or replace the path. You can also change or animate the parameters of the path and shapes. Another method is to use the Modify panel's Deformations rollout to add complexity. See Deformations for further information.
Once you've created a loft object, you can also use the Modify panel's Deformations rollout to add complexity. See Deformations for further information.
You can't animate the path location of a shape.
You can convert loft objects to NURBS surfaces.
Creating loft objects is detailed and offers many choices, but the basic process is quite simple.
 Select the path shape and use Get Shape to add the cross sections to the loft.
Select a shape and use Get Path to assign a path to the loft. Use Get Shape to add additional shapes.
Select the path shape and use Get Shape to add the cross sections to the loft.
Select a shape and use Get Path to assign a path to the loft. Use Get Shape to add additional shapes.
You can use the loft display settings to view the skin generated by your loft in both wireframe and shaded views.
To create a loft with Get Path:
 Create panel, with
  (Geometry) active, choose Compound Objects from the drop-down list. On the Object Type rollout, turn on Loft.
The cursor changes to the Get Path cursor as you move it over valid path shapes. If the cursor does not change over a shape, that shape is not a valid path shape and cannot be selected. The first vertex of the selected path is placed at the first shape's pivot and the path tangent is aligned with the shape's local Z axis.
When you click the path, 3ds Max builds the loft at the location of the shape. The location of the path doesn’t matter.
To create a loft with Get Shape:
Create panel, with (Geometry) active, choose Compound Objects from the drop-down list. On the Object Type rollout, turn on Loft.
The cursor changes to the Get Shape cursor as you move it over potential shapes. The selected shape is placed at the first vertex of the path.
When you click the shape, 3ds Max builds the loft at the location of the path. The location of the shape doesn’t matter.
You can choose between a shape or a path for creating the loft object using the Creation Method rollout, as well as the type of action for the loft object.
On the Surface Parameters rollout, you control smoothing of the surface of the loft as well as designate if texture mapping is applied along the loft object.
The Path Parameters rollout lets you control the position of shapes at various intervals along the path of the loft object.
On the Skin Parameters rollout, you adjust the complexity of the mesh of the loft object. You can also optimize the mesh by controlling the face count.
Deformation controls let you scale, twist, teeter, bevel or fit shapes along the path. The interface for all deformations is a graph. Lines with control points on the graph represent the deformations along the path. Control points on the graphs can be moved or animated for modeling purposes or for various special effects.
The Path Commands rollout appears only when you are modifying an existing loft object and have selected Path from the Sub-Object list. The Put command allows you to make a copy or instance of the loft path.
Shape Commands let you align and compare shapes along the loft path.


