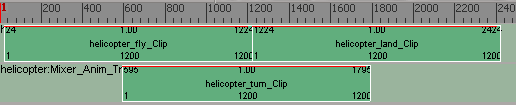
Clips are instances of action, shape, audio, animation layer, cache file, or image sources that you have created. Clips are represented by boxes on tracks in the mixer that you can move, scale, copy, trim, cycle, bounce, etc. Clips define the range of frames over which the items in the source are active and play back.
While sources contain data such as function curves or cluster shapes, clips contain the time control and other properties. You can instantiate multiple clips from the same source and modify the clips independently of each other without affecting the data in the source.
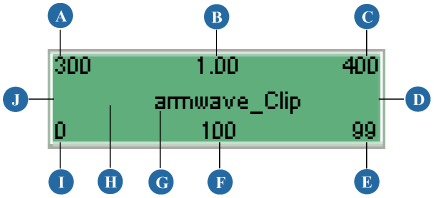
| A |
Clip start frame. This is the frame on the scene's timeline (global time) at which the clip starts. Drag this corner to the left to hold frames before the clip — see Cycling, Bouncing, and Holding Clips (Extrapolation). |
| B |
Time scale of the clip - see Changing Time Relationships (Timewarps). A value of 1 means that it's the same scale as its source. |
| C |
Clip end frame. This is the frame on the scene's timeline (global time) at which the clip ends — see Clip Timing below. Drag this corner to the right to hold frames after the clip — see Cycling, Bouncing, and Holding Clips (Extrapolation). |
| D |
Drag the middle of the clip edge to the right to scale — see Scaling Clips. |
| E |
Source out point. Drag this corner to the right to add cycles after the clip; press Ctrl+drag to add bounces after the clip — see Cycling, Bouncing, and Holding Clips (Extrapolation). |
| F |
Source length is the number of frames of animation that are stored in the source from which this clip is instanced. |
| G |
Clip name. |
| H |
Drag anywhere in the middle area of a clip to move it along the track or between tracks of the same type. See Moving Clips. Press Ctrl+drag to copy it — see Copying Clips. |
| I |
Source in point. Drag this corner to the left to add cycles before the clip; press Ctrl+drag to add bounces before the clip — see Cycling, Bouncing, and Holding Clips (Extrapolation). |
| J |
Drag the middle of the clip edge to the left to scale — see Scaling Clips. |
An important thing to know about clips is that they drive the animation for the frame at which they start but not the frame at which they end. At the end of the clip, the clip is not driving the animation: at one frame before the end it is driving. The numbers on the clip show you the clip in and out values.
For example, if you key an animation at frames 1 and 30, then create an action, the Clip In and Out values are 1 and 30. The clip on the track has a duration of 30 frames.
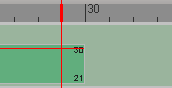
|
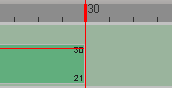
|
In the image above on the left, the clip drives the animation at frame 29.
In the image above on the right, the clip does not drive the animation at frame 30. You can add another Add another clip to drive the animation beginning at frame 30.
When you create a clip, the stored information drives the corresponding parameters over the range of frames covered by that clip.
The process of adding a clip to a track depends on the type of clip you're creating: action, shape animation, audio, cache file, animation layer, or image. For information on creating clips from sources, see the appropriate section:
For actions, see Creating Action Clips in the Mixer.
For shapes, see Adding Shape Clips to the Mixer.
For audio, see Loading Audio Files in the Animation Mixer.
For cache files, see Caching Animated Deformations and Simulations. You can use cache clips with each other in the mixer, but not with other types of clips.
For animation layers, see Animation Layers. When you create an animation layer, its clip appears automatically in the mixer: you cannot add new clips manually. You cannot generally use animation layer clips with other clips in the mixer, but you can set their weights against action clips that share the same animated elements.
For images, see Manipulating Image Clips in the Animation Mixer.
When you select one or more clips, all appropriate commands are applied to them, such as copying, scaling, moving, adding clip effects, etc. Selected clips have a white border.
There are two tools in the mixer you can use for selecting clips: the Select tool and the Rectangle Select tool.
By default, the Select tool is active, which makes it easy to immediately select and move clips around after they are created. When over a clip, the cursor looks like a double-headed arrow when it is active.
You can press the space bar or choose Edit  Select Tool from the mixer's command bar to activate this tool.

To make sure the clips don't move at all, switch to the Rectangle Select tool. The cursor looks like a single arrow when it is active.
You can press the Q key or choose Edit Rectangle Select Tool from the mixer's command bar to activate this tool.
By default, clip names have the form sourcename_Clip, but you can rename them as you like. Remember that if you change the clip's source name at any time, any clip that is created (instanced) from it is automatically renamed to reflect the new source name.
Right-click a clip on the track and choose Rename. Change the name in the property editor that appears. This works only for action clips (but not compound action clips).
Rename clips in the same way as other elements in the explorer —see Finding Mixer Node Elements in the Explorer for information. When you change the name in the explorer, you'll see the clip in the mixer update to reflect this.
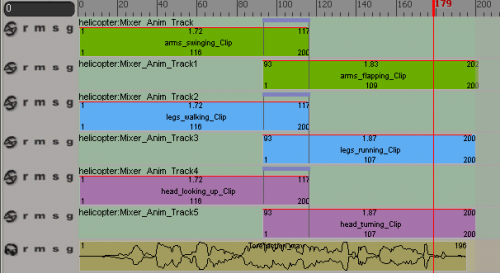
When you create a clip of any type, it takes the color associated with that type: green for action, dark green for compound action, blue for shape, dark blue for compound shape, sand for audio, cream for animation layer, orange for cache file, and purple for image.
You can change a clip's color to help you identify it in the mixer. For example, if you have several action clips that are used for different body parts of a character (arms, legs, head, etc.), you can give each group of clips their own color.
The clip color is based on its source, so all clips based on the same source will share the same color.
Right-click on any type of clip on a track in the mixer and choose Source.
You can also select a clip and press Enter, or right-click on a clip (except shape or shape compound) and choose Clip Properties, then click the tab with the name of the source in the property editor that appears.
On the Source property page for that type of clip, click the color chip for Clip Color and select a color from the color editor, or drag the color sliders to select a color.
See Defining Color Properties for general information about setting colors.
Any clip that is instantiated from this source turns this color.
You can toggle the display of clip information in any of the following ways:
Choosing the appropriate clip-related commands in the View menu on the animation mixer command bar (such as weight curves, timewarp curves, cycle marks, clip markers, etc.).
Choosing View Preferences from the animation mixer command bar to set a preference for the display options.
In the Animation Mixer Preferences dialog box, click the Clips tab and select which clip items to view (such as clip name, in/out frames, scale value, weight curves, and clip markers).
Right-clicking a clip and choosing Display Options. This opens the Animation Mixer Preferences dialog box with only the Clips page visible.
You can choose to mute certain clips so that they're not considered in the current animation. Remember that the current state of the track is also a consideration when you're muting individual clips (that is, the track itself can be set to mute or solo — Muting and Soloing Tracks for Playback).
Deleting a clip removes that instance from the animation mixer, but does not affect its source. This is useful if, for example, you applied a shape key at the wrong frame and now need to get rid of it.
This deletes the clip from the track's clip list but does not affect the original animation in the model's source list.


