A timewarp basically defines the speed of the animation in a clip. Timewarps change the relationship between the local time of the clip and the time of its parent (either a compound action or the entire scene) while taking into account other things like scales, cycles etc. You can make a clip speed up, slow down, and reverse itself in a nonlinear way (such as making a character run or walk backwards).
When you apply timewarps to a compound clip, it creates an overall effect that encompasses all clips that are contained within the compound clip.
|

|
|
A timewarp is an fcurve which is associated with the time control property of a clip, which handles timing changes on action clips. When you create a timewarp, its curve becomes an additional intermediate time transformation between container (global) time and the time taken from the action source that is used for a clip. It applies the timewarp to all items inside the clip.
If your clip is cycled or bounced, the timewarp can either be repeated on each extrapolation or encompass the duration of the whole extrapolated clip (the warp is not repeated with each cycle or bounce). This means, for example, that the overall animation on a clip could increase in speed with each cycle (see Applying a Timewarp Over Cycles and Bounces).
To apply a timewarp to a clip or a compound clip:
Choose View  Time Warps on the mixer's command bar so that you can see the orange timewarp curves on the clips.
Right-click a clip or a compound clip and choose Time Properties, or select a clip and press Ctrl+T. The clip's Time Control property editor opens.
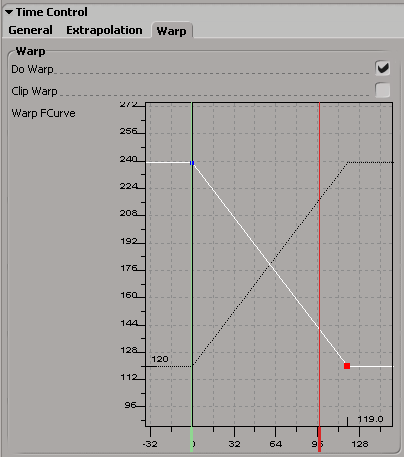
On the Warp page, select the Do Warp option to make the fcurve available for editing.
Select the function curve to edit it.
The first and last keys are locked to prevent accidental editing of the clip in/out values. Keys locked in time (X) are green, keys locked in value (Y) are blue, and keys locked in both are light turquoise.
You need to unlock the keys to edit the curve. To do this, right-click the selected curve or an empty area in the graph and
choose Keys Unlock All Keys.
The graph is a miniature version of the animation editor: you can use any of the keyboard commands here that are defined for the animation editor. You can also right-click the curve to open an editing menu (change the curve's X or Y value, edit the keys, etc.). When you edit the curve, a ghosted copy of the original curve is kept as a reference.
See Editing Function Curves for more information on editing function curves in general.
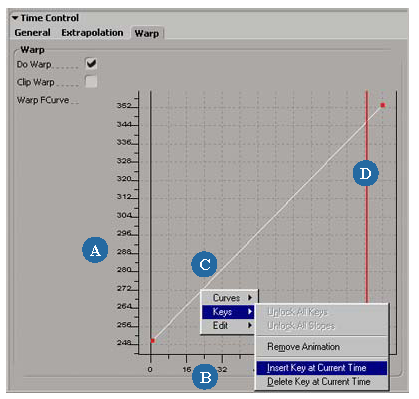
The horizontal axis represents the time of the object containing the clip, whereas the vertical axis represents the time of the source. Thus the keys on the curve span from point (X = offset, Y = clip in) to point (X = offset + duration, Y = clip out).
If you change the clip's offset, scaling, or clip in/out value, you will notice a change in the first and last keys' X values on the curve.
If you change the clip in/out value, you will notice a change in the first and last keys' Y values on the curve.
Example: Reversing an Animation
In this example, there is an action clip of a character who is walking. By using the Do Warp option and inverting the curve, the animation is reversed so that he walks backwards.
Right-click the action clip and choose Time Properties.
The clip's Time Control property editor opens. The Warp page shows a graph with a straight line plotted on it from bottom-left to top-right.
Select the Do Warp option to make the fcurve available for editing.
Select the fcurve and unlock the keys on it so that you can edit it: right-click the curve or graph and choose Keys Unlock All Keys.
Right-click the curve or graph and choose either Curves Flip X (Time) or Curves Flip Y (Value).
This flips the curve, thus reversing the animation. You can also drag the points on the line to reverse the direction so that it goes from top-left to bottom-right.
|
|
On the left, the Warp curve before flipping. Unlock the keys by right-clicking the fcurve or in the graph and choosing Keys > Unlock All Keys.
On the right, the Warp curve after flipping. Notice the ghosted curve that shows its previous state.
Applying a Timewarp Over Cycles and Bounces
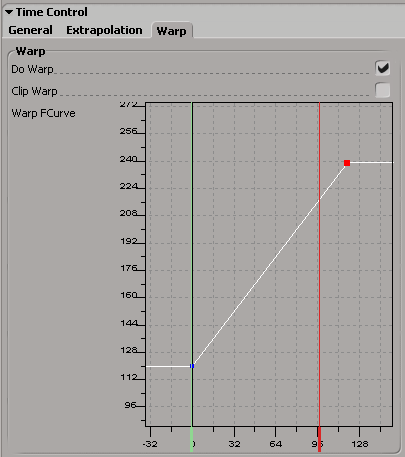
The Clip Warp option on the Warp page allows you to set a warp on an extrapolated clip. The effect of the warp repeats over the duration of the whole clip, encompassing the cycles or bounces. The timewarp is applied on the extrapolated clip time ("global") as opposed to the local time of the clip if you do not select Clip Warp.
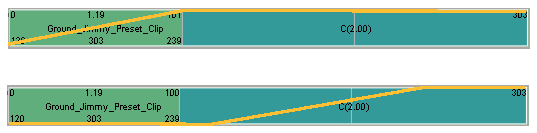
On the top, a regular Warp repeats on each extrapolation of the clip (warp curve shown only on original clip).
On the bottom, a Clip Warp encompasses the duration of clip and its extrapolations.
When you select the Clip Warp option, the selected clip in the mixer turns yellow indicating that it's in global time. When the curve is yellow, it means you can't convert local time back to a global time.

Open the clip's Time Control property editor and deselect Do Warp.
The mapping from the clip's local time to its parent's time becomes linear again. However, the warp profile curve is not affected and you can turn Do Warp back on to reactivate it without re-editing the curve.
Applying a Timewarped Action Back to the Source
If you want to apply the effects of a timewarped clip back to the animation source of the model, you can freeze the clip to
a new source and then apply it to the object. The reason you have to create a source is because timewarps are applied at a
clip level, but the Apply Action command only works on sources.
Select the clip that has the timewarp and choose Clip Freeze to New Source or Freeze and Replace. Freezing works out which parameters the given clips drive and plots them to new curves that are placed in a new source.
In the explorer, select the new frozen action source to which you want to restore animation.
Choose Actions Apply Action from the Animate toolbar. The animation is restored to the original objects.
For more information on this command, see Restoring (Applying) the Animation in Action Sources to an Object.


