There are a number of standard ways of defining color properties, from textures and materials to the background color used in a 3D view — it's all done using the same tools. These tools include the following color controls: color sliders, color chips, color model switcher, and the color editors.
In any property editor where you can define color properties, you are likely to find color sliders. As you use the color sliders, you will notice that each slider immediately updates to show you a gradient of the color you have selected. The gradient shows you what color will result if you move the slider to a new position.
The specific channel corresponding to a slider depends on the color model you selected; for example, if you selected RGB, the sliders correspond to the red, green, and blue channels. The values range between 0 and 1.
To define a color using the color sliders
Select the color model that best suits your needs. Below the color chip, you can click on the color model name to toggle between RGB, HLS, and HSV.
Do any of the following to set the color:
Click and drag the sliders to change the strength of each channel independently, or type a numerical value directly in the space provided.

To move all three sliders at once, hold the Ctrl key down while moving the sliders with the cursor.
For fine-tuning a single color value, hold down the Shift key while moving the cursor over a color slider bar.
You can quickly copy a color by clicking a color chip and dragging and dropping it on another color chip in the same property editor or another one. This is especially useful when you want to match ambient or diffuse colors across object materials.
To toggle the display of gamma correction
When a color chip shows a dotted highlight this indicates that the color chip and its associated color sliders are inheriting a global display-only gamma correction defined on the Color Management tab of the Display Preferences [Preference Reference].

Color chip (with dotted highlight) displays the gamma correction inherited from the global color management preference.
Defining Colors with the Color Editors
When defining or choosing colors, or to choose a color from a 3D view, you can use one of the two color editors: the mini color editor or the full color editor. In the full color editor, you can create and modify colors for your materials and lights. This can be useful for creating specific palettes to apply consistently to a group of materials. The mini color editor is a quick and easy tool for defining a single color. Both editors allow you to use a color picker to pick a color displayed in any 3D view, including Rotoscope views or the Image Clip editor.
Defining a Color Using the Mini Color Editor
Click the color chip next to the color sliders in a property editor.

When you are done modifying your color, close the color editor to use the color you created.
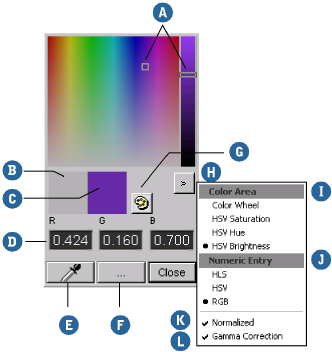
| A |
To set a color, click in the color area and then adjust it using the slider. To select which color components appear in the color area and which one appears on the slider, click the ">" button. |
| B |
The color box on the left shows the previous color for reference. |
| C |
The color box on the right shows the current color. |
| D |
Use the numeric boxes to set color values precisely. To select a color model, click the ">" button. |
| E |
To pick a color:
|
| F |
Click on the browse (...) button to open the full color editor, where you can use additional controls. |
| G |
Click the palette button to choose a preset color. |
| H |
Click the ">" button to open the menu shown. |
| I |
The Color Area commands specify the configuration of the color area and slider. |
| J |
The Numeric Entry commands select the color model for the numeric boxes. |
| K |
The Normalized option specifies whether numeric values are represented as real numbers in the range [0.0 – 1.0] or as integers in the range [0, 255]. |
| L |
The Gamma Correction option toggles gamma correction display for all color controls in the color editor. See Display Preferences [Preference Reference] for how to set the color management preference. |
Finetuning a Color Using the Full Color Editor
In the property editor, click a color chip to open the mini color editor.
In the mini color editor, click the browse (...) button. The full color editor opens.

| A |
To set a color, click in the color area and then adjust it using the slider. |
| B |
Specify the configuration of the color area and slider. |
| C |
The color box on the left shows the previous color for reference, and the one on the right shows the current color. Click the bottom arrow to copy the previous color over the current color. This lets you revert changes. Click the top arrow to copy the current color over the previous color. This lets you temporarily store the current color while you finetune values further. |
| D |
The Gamma Correction option toggles gamma correction display for all color controls in the color editor. See Display Preferences [Preference Reference] for how to set the color management preference. |
| E |
To pick a color, use the color picker as described in Defining a Color Using the Mini Color Editor. |
| F |
Enter numeric color values using the RGB, HSV, or CMYK color models. |


