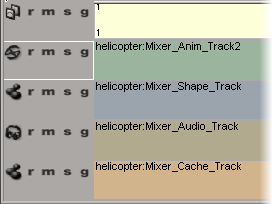
Tracks are the background on which you add and sequence clips in the animation mixer. There are six types of tracks in the mixer:
Animation Layer tracks are cream-colored and can contain only animation layer clips. When you create an animation layer, tracks and clips for the layers appear automatically in the mixer: you cannot add new tracks manually. See Animation Layers for more information.
Animation tracks are light green and can contain only action clips. See Actions for information about creating and using action clips.
Shape tracks are light blue and can contain only shape animation clips. See Animating Shapes for information about creating and using shape clips.
Audio tracks are sand-colored and can contain only audio clips. See Audio and Animation for information about creating and using audio clips.
Cache tracks are light orange and can contain only clips created from cached simulation or animation files. When you create a cache file, you can choose to have cache files be automatically loaded as clips in the mixer. You cannot use cache clips with other elements in the mixer. See Caching Animated Deformations and Simulations for information about creating cache clips.
Image tracks are light purple and can contain only image clips; however, they are not defined as an element as are the other types of tracks. See Manipulating Image Clips in the Animation Mixer for information.

You can sequence one clip after another on the same track or different tracks. However, clips cannot overlap on one track; to overlap clips in time, they must be on separate tracks. See Working with Clips for more information.
Displaying Tracks and Their Information
You can toggle the display of tracks and their information in the mixer in any of the following ways:
Choosing the appropriate Tracks command from the View menu on the animation mixer command bar to determine which type of tracks to display.
Choosing View  Preferences from the animation mixer command bar to set a preference for the display options.
In the Animation Mixer Preferences dialog box, click the Tracks tab and select which type of tracks to display.
On the Tracks page, you can also select which track display options to view (Track Name, Transitions, and Track Tooltips).
Right-clicking a track and choosing Display Options. This opens the Animation Mixer Preferences dialog box with the Tracks page visible.
When you select a track, all appropriate commands are applied to it, such as inserting a track or accessing track controls. A selected track is indicated by a white line around the track's control icon area.
Tracks in the mixer are always grouped by type in this order from top to bottom: layer, animation, shape, audio. and cache. When you add a track to the mixer, this grouping is maintained.
If you have nothing selected and you add a track to the mixer, it is added to the bottom of its type's "stack." For example, if there are shape and audio tracks in the mixer and you add a shape track, it's added below the other shape tracks, but above the audio tracks.
If you select a track, you can insert a track of the same type directly above it. For example, if you select an animation track, you can insert an animation track directly above it; however, if you add a shape track, it's still added to the bottom of the shape track stack.
To add a track to the mixer, do either of the following:
Right-click an existing track and choose Add Track (or press the I key). Then select the appropriate type of track from the menu.
Choose the appropriate command from the mixer's Track menu:
Add Animation Track adds a track that can hold only action clips. You can also press Shift+A.
Add Shape Track adds a track that can hold only shape clips. You can also press Shift+S.
Add Audio Track adds a track that can hold only audio clips. You can also press Shift+U.
Add FileCache Track adds a track that can hold only cache clips.
After you have created some tracks in the mixer, you can change their order. For example, you can group tracks, such as keeping multiple shape tracks together for each part of the face (upper lip, lower lip, left eyebrow, right eyebrow, and so on). Or you can move all muted tracks to the bottom of the track type (animation, shape, cache, etc.) so that they're not cluttering your view.
You can move a track only where there are other tracks of the same type. For example, you can't move a shape track to be between animation tracks. This is because the tracks are organized into different parent containers that can't be combined.
You can reorder all types of tracks except for tracks that contain image clips.
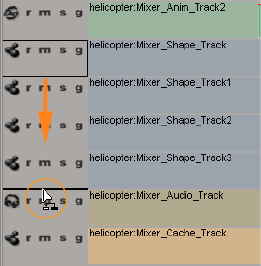
To change the order of a track, click in its icon region and drag it to its new location among other tracks of the same type. A black bar indicates where the track will be placed.
The new track order is also automatically updated in the model's Mixer > Tracks folders in the explorer.
In the image below, the Mixer_Shape_Track is being moved down below Mixer_Shape_Track3.
Muting and Soloing Tracks for Playback
As you work in the mixer, you can play the tracks in your scene as usual using the buttons in the Playback panel or by scrubbing the timeline. You can also use the mute and solo options to concentrate on specific tracks:
Activate a track's Mute option (click the m button) to stop it from playing back with the rest of the scene. It turns light orange when active. When you do this, any clips on that track appear in a light gray to show that they're inactive.

Activate a track's Solo option (click the s button) to play back only that track. It turns green when active. You can solo more than one track so that only the tracks you specify play back.

You can also set these options by right-clicking on a track and choosing Track Properties or by selecting the track and choosing Tracks Track Properties from the mixer's command bar.
If you move a clip from a muted track, the clip will stay muted. To work around this, mute and then unmute the new track on which that clip is located.
In addition, you can mute individual clips. To mute a clip, right-click it and choose Clip Properties, then turn Active off in the property editor that appears.
Removing a track deletes it together with any clips that it may contain. This removes the tracks from the mixer, but it does not delete the sources for any clips on the tracks.
Right-click the track you want to delete and choose Delete Track. This deletes only the track on which you right-click: any other selected tracks are not deleted.
Select one or more tracks by clicking on their icons (Shift+click for multiple tracks), then choose Tracks Remove Track from the mixer's command bar or press Delete.
Choose Tracks Clear All to clear all tracks from the animation mixer.


