Chapter 1, Managing Projects
| Setting Up Project Folders | Previewing Video | ||
Chapter 1, Managing Projects |
|||
You typically set project preferences when you first set up a project. If you modify preferences during the project, the changes take effect from that point on. The changes do not affect operations performed using the previous preference settings. For example, if you change the Channel setting in the Composition preferences from RGB to RGBA, the change has no effect on compositions you created previously; those compositions remain RGB.
Note: All operations you perform during a session use the project preferences of the currently open project.
Note: Project preferences from a read-only file are not modifiable, unless saved under a different location with read/write permissions, and then reloaded.
Open a project in Toxik.
Do one of the following:
From the menu bar, select Edit > Preferences > Project.
In the taskbar, click the project name.
The Project Preferences window is displayed.
 "Show full-size image")
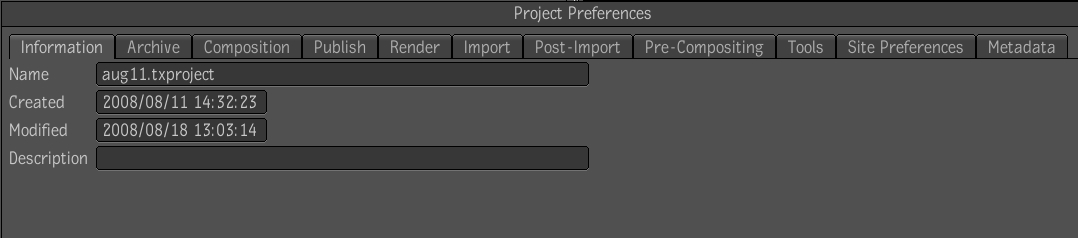
Information on the project is displayed on the Information tab. It contains basic information that is set automatically when the project was created. You can enter a description of your project in the Description field. The remaining tabs contain the preferences you can set for the project.
Select the Archive tab and set the preferences for your archive and restore operations--see Archiving or Restoring.

 "Show full-size image")
Archive Directory -- The folder in which archives are stored.
Archiving Executable -- The Python command line that executes when you perform an archive operation in Toxik. It starts the archive.py script, located in the \resources\bgTasks folder of the Toxik program folder. Consult the script for an explanation of each of the command line options. You can click in the Archiving Executable field to edit the command line. For example, you can edit the argument for the -f option to change the default location where Toxik stores archive files. The value of the DL_OUTPUT_DIR variable is the value of the environment variable $DL_OUTPUT_DIR if that variable has been defined, or $TMP/Toxik (the value of the Windows environment variable $TMP, with Toxik appended to it) or $TEMP/Toxik (the value of the Windows environment variable $TEMP, with Toxik appended to it). To view and set Windows environment variables, right-click My Computer, select Properties, select the Advanced tab, and click Environment Variables. User environment variables take precedence over System environment variables, and $TMP takes precedence over $TEMP. For example, consider that you have only the $TEMP user variable and the $TEMP system variable set ($DL_OUTPUT_DIR is not set and neither the $TMP user nor $TMP system variables are set). Toxik looks for $DL_OUTPUT_DIR, then looks for the $TMP user variable; it uses the $TEMP user variable. If the $TEMP user variable was not set, Toxik would look for a $TMP system variable, and finally use the $TEMP system variable. As an example, if the value of the $TMP variable Toxik uses is C:\warehouse, the value of $DL_OUTPUT_DIR is C:\warehouse\Toxik.
Note: The following are illegal characters in file names and will cause the archiving to fail: *?:"<> (asterisk, question mark, colon, quote mark, open angle bracket, close angle bracket).
Restore Executable--The Python command line that executes when you perform a restore operation in Toxik. This command line launches the restore.py script, which is located in the \resources\bgTasks folder of the Toxik program folder. Consult the script for an explanation of each of the command line options. You can click in the Restore Executable field to edit the command line (for example to change the script that the command line launches).
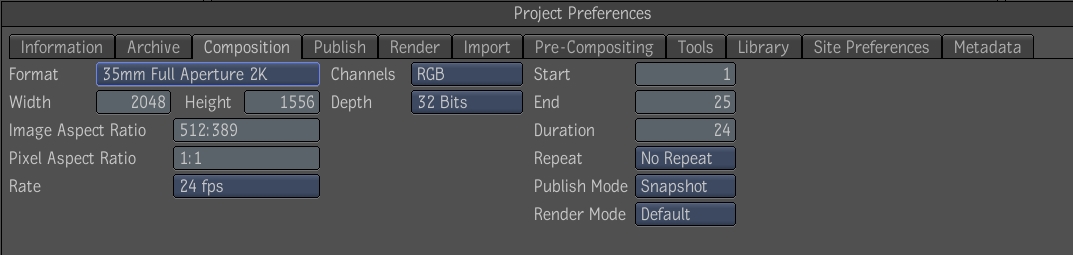
Select the Composition tab and set the media preferences for the project. These preferences set the media format for any compositions you subsequently create.
Note: These preferences apply only to compositions you create in the project. The compositions Toxik creates when you import media retain their original format information.
 "Show full-size image")
Format -- Set the media format for the project. Select Custom to define a custom format.
Width, Height -- Displays the width and height (in pixels) of the selected format. If you selected Custom in the Format box, you can click in these boxes and edit the values.
Image Aspect Ratio -- Displays the image aspect ratio of the selected format. If you selected Custom in the Format box, you can click in this box and edit the ratio.
Pixel Aspect Ratio -- Displays the aspect ratio of each of the pixels of the selected format. If you selected Custom in the Format box, you can click in this box and edit the ratio.
Rate -- View the frame rate of the selected format. Click to display the list of frame rates available for this format, and select the one you want to use.
Channels -- Select the channels you want the media for the new composition to have by default. Select A to only have the alpha channel, RGB to have only red, green, and blue channels or RGBA to have all channels (red, green, blue, and alpha).
Depth -- Select the bit depth (8, 16, or 32 bits) for new compositions.
Start, End, Duration -- Set the start, end, and duration of the footage.
Repeat -- Select the default repeat mode (Hold, Loop, Ping-Pong, No Repeat) for new compositions when you play them in the Player.
Publish Mode -- Choose the publish mode. You can create a snapshot, render a composition locally or on Backburner--see Publishing a Composition.
Render Mode -- Choose the render mode.
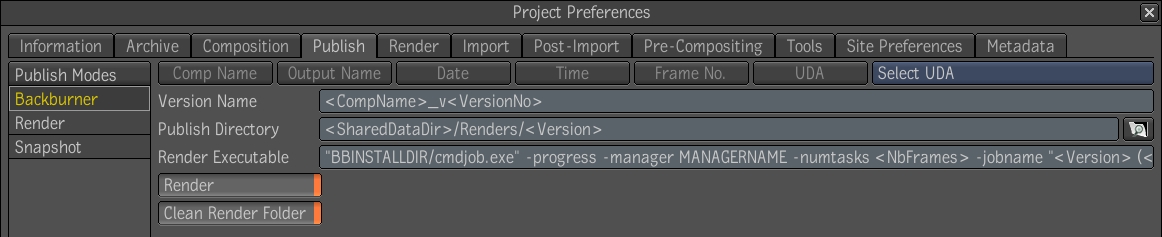
Select the Publish tab to set the preferences for Publish Mode and published results.
Note: The following are illegal characters in file names and will cause publishing to fail: *?:"<> (asterisk, question mark, colon, quote mark, open angle bracket, close angle bracket). A failed result may be created, indicated by a red X, but it will not be exported to the destination folder.
 "Show full-size image")
Publish Modes -- Choose the publish mode. You can create a snapshot, render a composition locally or on Backburner--see Publishing a Composition.
Version Name -- Enter the file name of the published result in the Versions tab in the Tool UI area. You can enter any alphanumeric character, or click the Comp Name, Date, Time, or Frame No. buttons to insert any of those variables as part of the name. If you defined custom attributes, you can also insert any of these as variables in the file name. Click the Select UDA button to select the custom attribute you want to insert, then click UDA to insert it. Note that the file name, after all variables are resolved, cannot exceed 126 characters in length.
Publish Directory -- Specify the folder in which to save the media created when you publish a result. You can enter any alphanumeric character, or click the Name, Date, Time, or Frame No. buttons to insert any of those variables as part of the name. If you defined custom attributes, you can also insert any of these as variables in the file name. Click the Select UDA button to select the custom attribute you want to insert, then click UDA to insert it. The value of the OutputDir variable is the value of the environment variable $DL_OUTPUT_DIR if that variable has been defined, or $TMP/Toxik (the value of the Windows environment variable $TMP, with Toxik appended to it) or $TEMP/Toxik (the value of the Windows environment variable $TEMP, with Toxik appended to it). To view and set Windows environment variables, right-click My Computer and select Properties, click the Advanced tab, and click Environment Variables. User environment variables take precedence over System environment variables, and $TMP takes precedence over $TEMP. For example, consider that you have only the $TEMP user variable and the $TEMP system variable set ($DL_OUTPUT_DIR is not set and neither the $TMP user nor $TMP system variables are set). Toxik looks for $DL_OUTPUT_DIR, then looks for the $TMP user variable; it uses the $TEMP user variable. If the $TEMP user variable was not set, Toxik would look for a $TMP system variable, and finally use the $TEMP system variable. As an example, if the value of the $TMP variable Toxik uses is C:\warehouse, the value of $DL_OUTPUT_DIR is C:\warehouse\Toxik.
Render Executable -- The Python command line that executes when you perform a publish operation in Toxik. This command line launches the publish.py script, located in the \resources\bgTasks folder of the Toxik program folder. Consult the script for information about each of the command line options. You can click in the Publish Executable field to edit the command line (for example to change the script the command line launches).
Render -- Render the composition whenever the Publish command is executed.
Clean Render Folder-- When selected, does not create the following in the Render folder when you publish a composition: a copy of the Footage folder, project, composition, and project preferences.
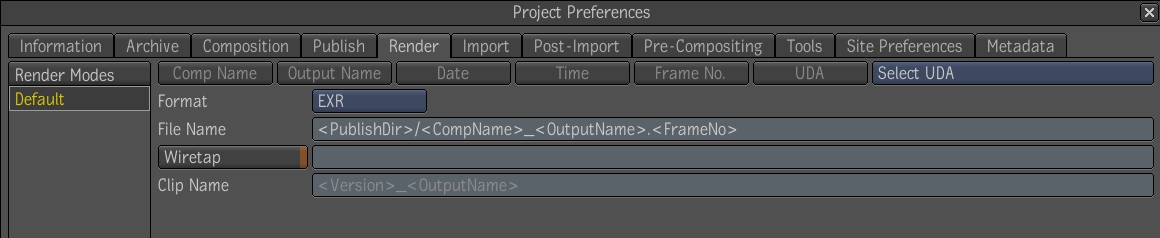
Select the Render tab. Select a render mode and set the render preferences.
 "Show full-size image")
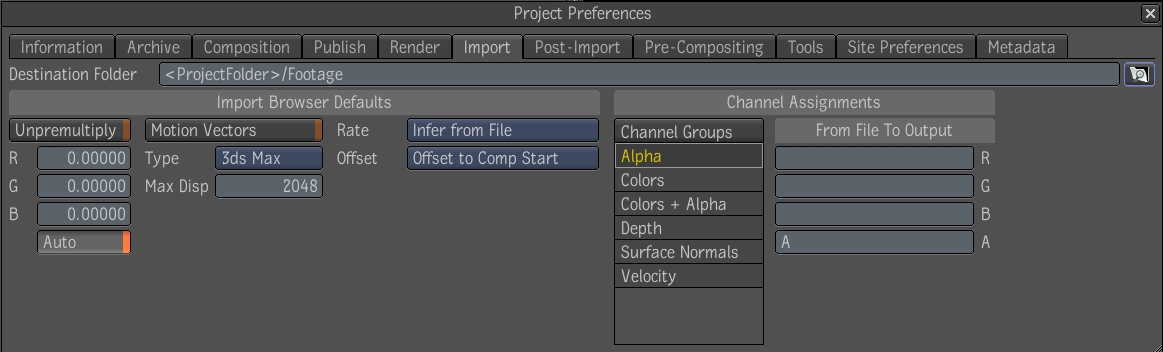
Select the Import tab to set preferences for the import operation--see Channel Assignments, Channel Groups (Import Preferences), Unpremultiply in Import Mode, and Specifying the Destination Format.
 "Show full-size image")
Destination Folder -- Enter the path to the project folder in which you want to import media. By default the path is to the project Footage folder, but you can specify any folder in the project hierarchy.
Select the Post-Import tab and add the name and Python command(s) to execute any post-processing.

 "Show full-size image")
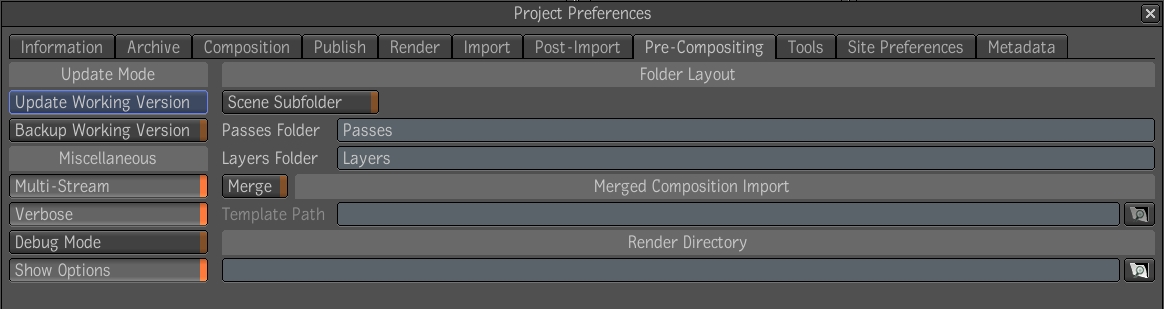
Select the Pre-Compositing tab and set the preferences for importing pre-comp files--see About Pre-Compositing.
 "Show full-size image")
Select the Tools tab and set the path for the CTL tool--see CTL Tool.
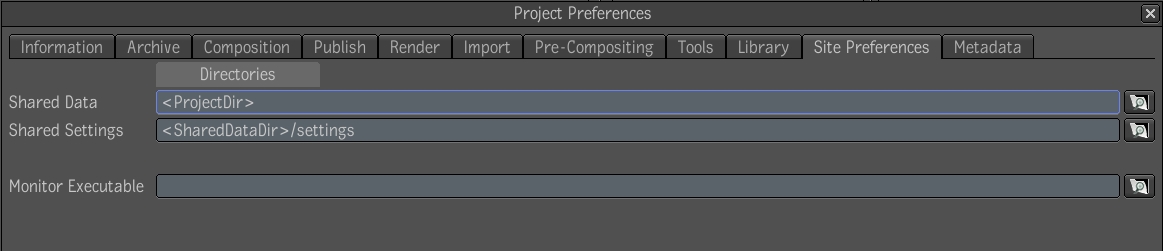
Click the Site Preferences tab and set the preferences for Shared Storage.
 "Show full-size image")
Shared Data -- A shared result is a precomputed result that must be saved permanently and that must be accessible by any workstation to correctly render the output of a given composition.
Shared Settings -- The path to the .xml resources files, which can be used not only to specify the UDA, but also to create a layout (form) to display and edit the UDAs within the application. You can modify these files and share them with other workstations running Toxik. This directory can be located on the network, so that each workstation uses the same resource file for displaying and creating UDAs. If the files exist in this directory, they will be used, otherwise the resources files in the default location will be used.
Monitor Executable -- Enter the command line that launches the render queue monitor.
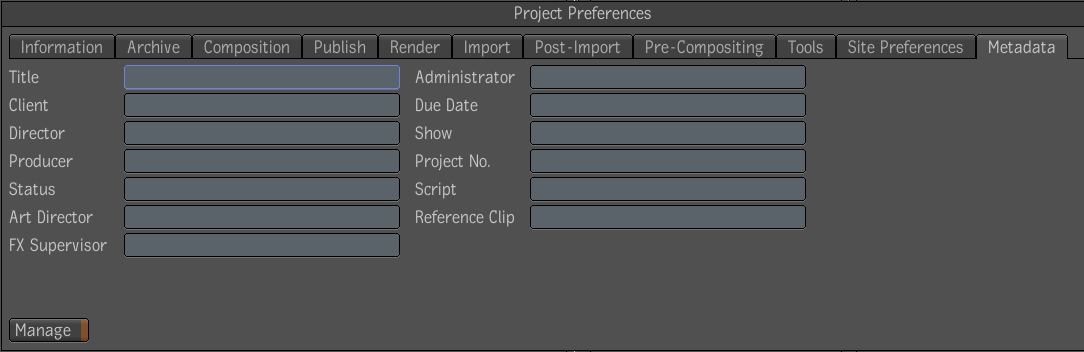
Select the Metadata tab and enter any information you'd like to describe the project--see Creating UDAs.
 "Show full-size image")
Things to Remember
If you change preferences during the project, it does not affect operations performed using the previous preference settings.