Chapter 9, Pre-Compositing
| The Pre-Compositing Import Options | |||
Chapter 9, Pre-Compositing |
|||
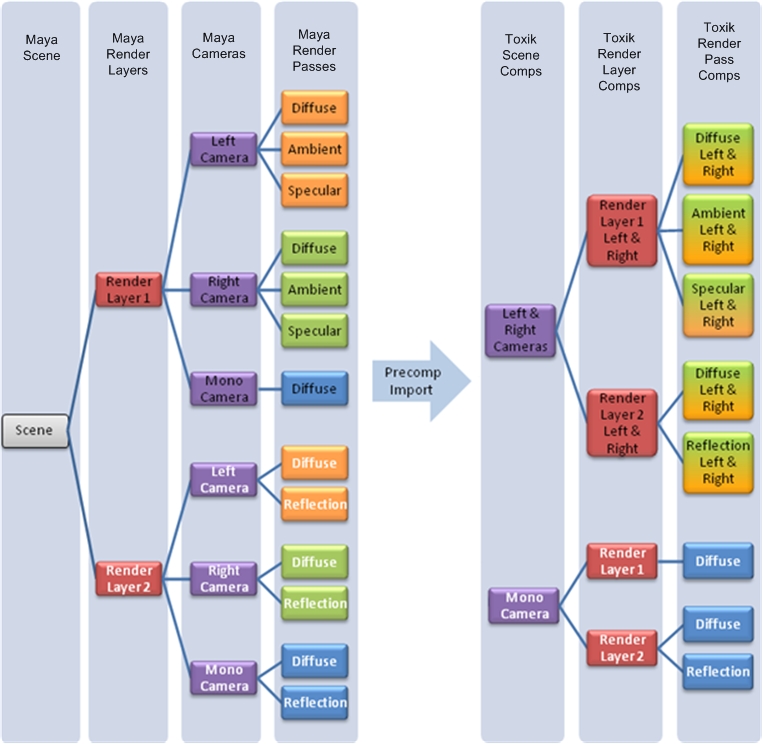
Toxik 2009 allows you to import a render layers and passes setup exported as a pre-comp (.precomp) file by 3D applications that support this file format, such as Autodesk Maya and Autodesk 3ds Max. Once imported into Toxik, a set of compositions is automatically created, representing the render layer setup. For example, the left side of the following illustration shows the structure of a Maya scene and its render layers, cameras, and render passes. The right side shows the corresponding compositions that are created after it has been imported into Toxik.
 "Show full-size image")
3D applications are render layer centric because it suits 3D artists. However, once you import a pre-comp file into Toxik, it becomes camera centric because it is more suitable for the 2D artist. Now you can perform any compositing work needed on the pre-comp file, and go back and forth between Toxik and the 3D application.
The Toxik pre-compositing interoperability supports having a different set of render passes for each render layer. In our example, Render Layer 1 has more passes than Render Layer 2. Render Layer 1 only has an Ambient pass and Render Layer 2 only has a Reflection pass.
For a given render layer, the set of render passes produced by each camera can be different in a pre-compositing setup. For example, Maya cameras can decide whether to contribute to a pass or not (compare the Mono camera against the Right and Left cameras on Render Layer 1 in our example).
A render pass composition imports render pass file sequences; it's a footage composition.
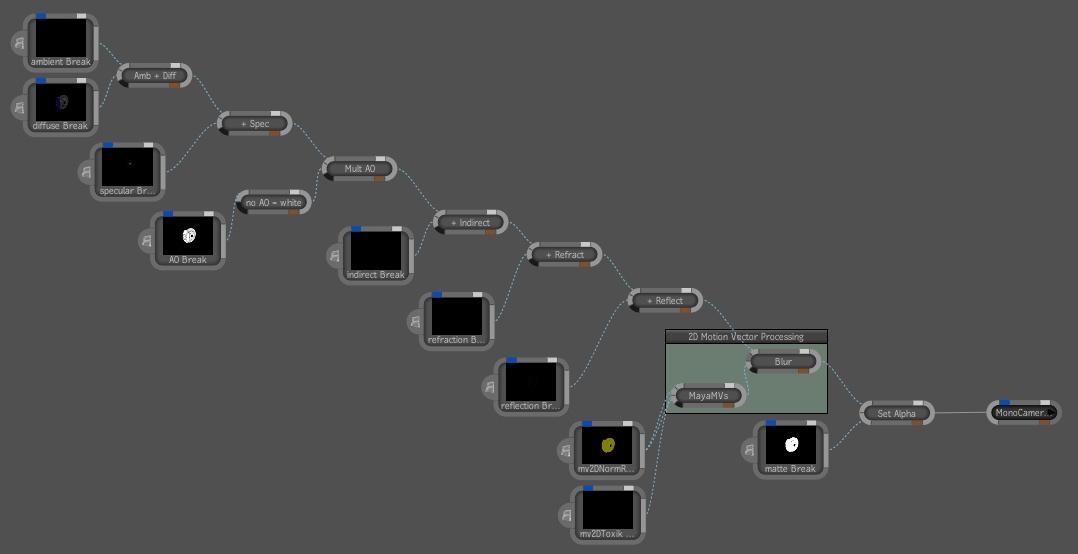
A render layer composition assembles the render passes for a given render layer. A render layer composition is basically a representation of the 3D application shading/rendering network that produced the set of passes for a layer.
A scene composition assembles (stacks) the render layers in the scene for a specific camera view point.
Sets or pairs of cameras are also supported by the pre-compositing workflow (for stereoscopy purposes).
Render passes produced by cameras of a set (Right and Left cameras in our example) are imported in the same render pass composition in Toxik.
Dependency graphs of render passes produced by camera pairs are also created in the same render layer composition.
Finally, render layers produced by camera pairs are stacked in the same scene composition.
This classification facilitates stereoscopic compositing once in Toxik. The dependency graph of the left camera can be manipulated next to the dependency graph of the right camera in the same composition, allowing expressions to be set between the two dependency graphs. Or, if you import in Multi-Stream mode, images from the left and right camera views can be merged and processed by a multi-stream dependency graph--see Working with Stereoscopic Compositions.
Hint: Pre-comp files are actually Python modules that you can read and edit with any text editor. Just be sure to conform to the Python syntax if you choose to edit your pre-comp file. Otherwise, Toxik will encounter an error and display a dialog box highlighting the problem.

You can either import render passes from a pre-comp file generated by any 3D application or import Maya passes directly from the Maya (.ma or .mb) file.
A Maya pre-comp file contains the same information as the corresponding .ma or .mb file of the 3D scene. However, pre-comp files are faster to import into Toxik and more stable to use. An advantage of using pre-comp files is that they are self-contained. That is, you don't need to have Maya installed and licensed on your system like you do for importing Maya files. Before importing a Maya file, see Before Importing a Maya File....
Select File > Import or press Ctrl + I.
The Import Browser is displayed.
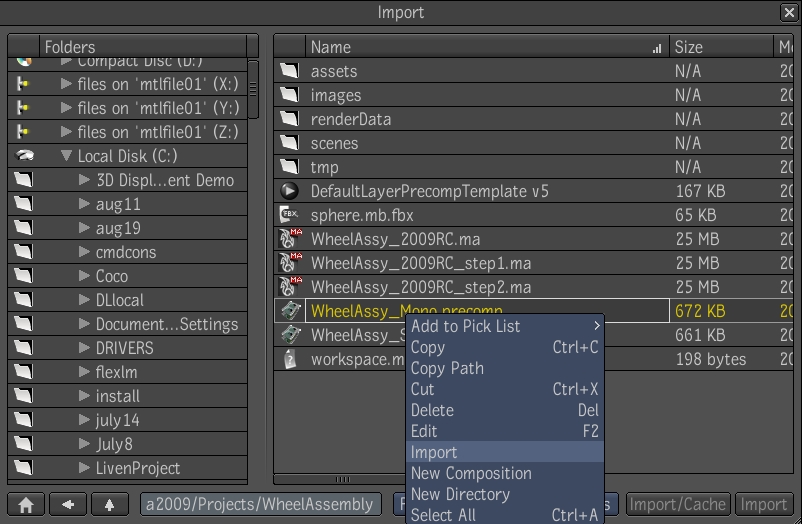
Locate the folder that contains the pre-comp file.
Right-click the pre-comp (.precomp) file and select Import.
Hint: You can also drag and drop the pre-comp or Maya file into a particular Toxik folder to start the import, which sets the destination of the pre-comp import to the drop folder. Otherwise, the destination is the project root folder.
Note: Pre-comp and Maya files can only be imported in Toxik one at a time.
 "Show full-size image")
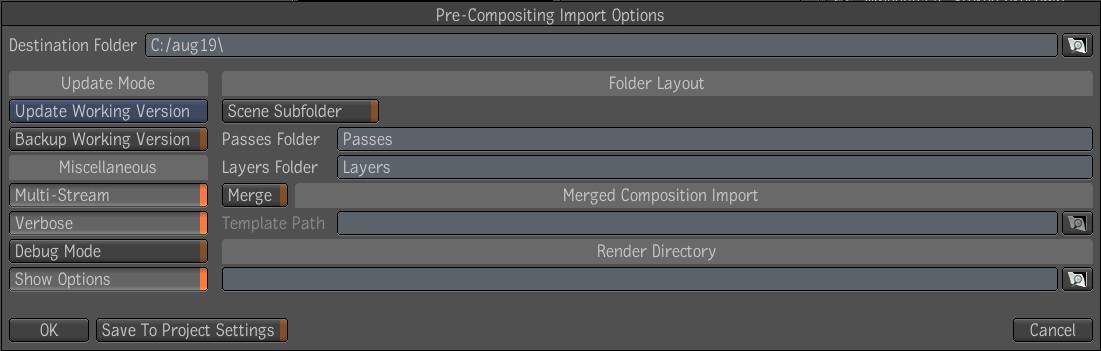
The Embedded Script Console displays the progress of the import, and the Pre-Compositing Import Options dialog box displays.

 "Show full-size image")
 "Show full-size image")
Set parameters for the pre-comp file--see The Pre-Compositing Import Options.
If images are missing, you are prompted to locate the folder that contains the images.
Note: The Browse button does not work when importing Maya files.
Note: For Maya files, by default, Maya expects the render files to be in the default location for the Maya project. Place them there to avoid having to input the location or add the correct path in the dialog box. On Windows, the location is C:/My Documents/maya/projects/default. You will need to locate the My Documents folder as it could at a different location, depending on where it was installed. On Linux, the location is: ${HOME}/maya/projects/default.

 "Show full-size image")
If Toxik cannot find a pre-compositing template referenced by the pre-comp file, the following dialog box is displayed:

 "Show full-size image")
Do one of the following:
If you have a template you want to use, locate it.
If you want to use the default template provided by Toxik, click Default Template.
Note: The Browse button does not work when importing Maya files.
If you do not want to use a template, click No Template.
For more information, see Using Pre-Compositing Templates.
The render layers and passes are imported. The scene composition, named after the scene anchor and camera(s) anchor, is created in the folder you specified during import. This folder contains a Layers folder and a Passes folder, unless you specified a different name during import. Render layer compositions are named after the scene anchor, the camera(s) anchor, and the layer anchor. Render pass compositions are named after the scene anchor, the camera(s) anchor, the layer anchor, and the pass anchor.

 "Show full-size image")
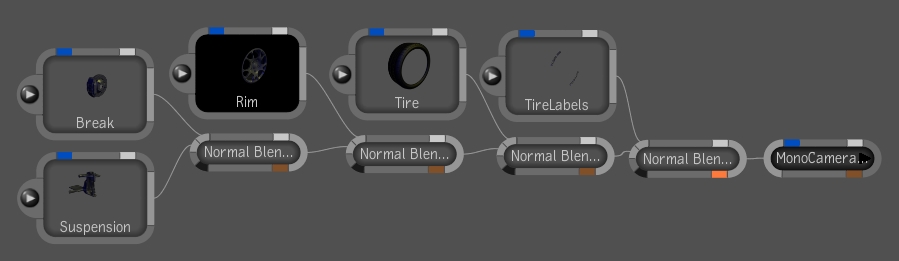
Open the imported composition.
The composition and associated render layer compositions are opened, and the chain of Blend & Comp nodes in the scene composition matches the order and blend modes in the render layers.
 "Show full-size image")
To view a layer composition, do one of the following:
Double-click a link node.
Right-click a link node and select Open.
In the Library Browser, open it from the Layers folder.
 "Show full-size image")
To view a render pass composition, open it from the Passes folder in the Library Browser. Click the Import Image node.

 "Show full-size image")
In the tool UI, select the Import Image tab.

 "Show full-size image")
Notice that the Path field displays path of the image sequence that is imported for that render pass. And, the image format, pixel format, rate, frame range and pre-multiplication import options are properly set.
| |