Chapter 7, Working with Compositions
| Creating Compositions | Rendering a Composition | ||
Chapter 7, Working with Compositions |
|||
 Creating Versions of a Composition
Changing the Publish Preferences
Publishing Results Over a Network
Viewing Published Versions of a Composition
Most of the time, you'll be creating published versions to share with other artists who are collaborating with you on a project, and to save different ideas for a shot. For example, you can publish several color correction possibilities to show a client. When the client decides on one, you can resume working on the result that was chosen. If the client changes their mind later, it is easy to switch to a different result.
There are several concepts that are fundamental to understanding compositing in Toxik: intermediate results, publishing results, and versions of compositions.

Intermediate results are the results rendered at the output of any node, other than the output nodes, in the dependency graph. When you set a node to create intermediate results, the frames displayed in the Player when you preview the results are saved to your local media cache. These frames do not need to be reprocessed as you continue adding tool nodes and viewing the results.
For example, you can add a glow tool to your composition and set it to create intermediate results. As you play the composition (or scrub through the frames), the glow is displayed as it processes. At the same time, the result is stored in your local media cache. If you add another node after the glow, Toxik will not reprocess the frame.
Intermediate results are stored in the media cache as long as there is room. When the media cache is full, Toxik will start discarding the images that are least recently used. You should consider this and the type of work you are doing when turn on intermediate results for a node.
Toxik also has a in-memory cache that supersedes the intermediate results. If a frame is generated and reused before the memory cache is exhausted, there won't be any need to visit the IRs in the media cache. The added value of intermediate results is to indicate to Toxik: what frames should be stored to disk when the memory cache is full, and what frames are worth retaining if the application is exited and restarted.
Do one of the following:
In the Schematic, click the orange IR tab at the lower-right of a node.
Select a node from the dependency graph and click the IR button in the Tools Options area.
 "Show full-size image")
Open a Library Browser (Ctrl + O), right-click a composition and select Clear Cache.
The intermediate results for all nodes of all versions of the composition are cleared.
You can publish a composition as many times as desired, creating either an unrendered version of a composition or one with rendered results. Footage compositions have a rendered result in their primary version.
You can create different versions of your compositions using different publish modes. You can modify the publish settings in the Publish tab when you set project preferences, as well as define the naming convention.
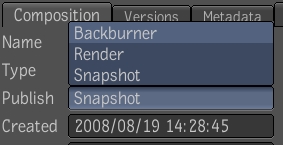
The default Publish mode is Snapshot, which creates a new unrendered version. You can set the default publish mode for your project in the Composition tab of the project preferences. However, you can publish each composition in a different mode.When you render a composition, the dependency graph in the Schematic is applied to the media and the result is saved in the location defined in the project preferences.
There are three predefined modes available: Snapshot (unrendered version), Render (render locally), and Backburner (render on a network).
You can publish results locally or over the network. You can modify the settings to change the file name, the rendered result name, the destination folder, and the executable that handles network rendering--see Publishing Results Over a Network and Publishing to Wiretap.
Note: You can perform string substitutions in various Toxik modules to change the default execution settings--see String Substitutions.

|
Warning: Manipulating a published version may cause unpredictable behavior/results. Because link nodes in other compositions are linking to these versions, changing such a version causes changes in other compositions that the creator of these other compositions may not expect. |
The different versions of a composition include the following:
| Version | Description |
| Primary | The version of a composition used for linking to external compositions. |
| Working | The live version of a composition; one that you can open and edit (read/write). |
Versions of a composition are listed in the Versions tab. Compositions always contain a working version and a primary version.
When you revert to a previous version of a composition, the contents of that version are copied over to the working version.
Note: The working version and primary version can be the same version, but it is not recommended as they have opposing purposes.
For more information, see Viewing Published Versions of a Composition.
In the Tool UI, select the Composition tab.
From the Publish list, select a publish mode:
 "Show full-size image")
By default, the following modes are provided for any new project. You might see more modes if they have already been defined in your project preferences. The predefined modes are only examples and can all be modified or even deleted.
Snapshot -- Create a version of the composition, without rendering.
Render -- Creates a version and performs a render of the composition. The default file format is OpenEXR.
Backburner -- Creates a version and performs a render using the Autodesk Backburner background rendering network system.
Project preferences specify the default settings for publishing--see Changing the Publish Preferences.
In the Tool UI, select the Composition tab.
From the Publish list, select a publish mode.
Do one of the following:
In the Library Browser, right-click the composition and select Publish.
In the Player controls, click Publish.
From the menu bar, select Composition > Publish.
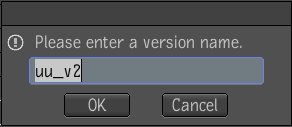
A window appears with the name of the composition, appended with "v" and the number of the version that will be published. The naming convention is derived from the Project Preferences (Publish tab). You can modify the naming convention.
 "Show full-size image")
Click OK to accept the name or enter a name for the composition.
If you selected Snapshot as the publish mode, an unrendered version of the composition appears in the Versions tab. If you selected Render or Backburner as the publish mode, the progress of the composition being rendered is indicated in the taskbar.
 "Show full-size image")
Select the Versions tab to see the version that was created.

 "Show full-size image")
|
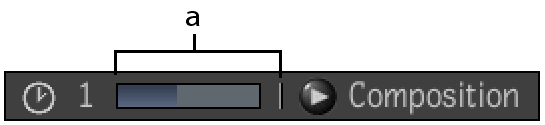
In the taskbar, click the number representing the number of ongoing render tasks.

 "Show full-size image")
|
Things to Remember
All rendered files for a composition are saved in the Renders folder for the project.
The Publish tab in the Project Preferences window specifies the physical location of the Renders folder, as well as determines the naming convention for the versions. The destination and naming conventions for the rendered files can be set in Project Preferences (Render tab).
You may want to take a look at the rendered files. You cannot do it with the Library Browser since they will be hidden. Bring an Import browser into a view or open the floating one (Ctrl + I). Then go to the project folder (use Project Folder bookmark) and then navigate the Renders folder. You should be able to find the files and look at them.
The publish preferences of the project apply to all published results created in the project. The name of the file that Toxik creates to save the media associated with a rendered result, the name of the folder in which the media is saved, and the name of the rendered result is saved in the Renders folder. These names can all contain variables, which ensure unique names across all results and their associated media files.
Publish preferences also include the script that executes when you click Publish, and the program that monitors background rendering (Site Preferences tab in Project Preferences).
Note: The following are illegal characters in file names and will cause publishing to fail: *?:"<> (asterisk, question mark, colon, quote mark, open angle bracket, close angle bracket). A failed result may be created, indicated by a red X, but it will not be exported to the destination folder.
Do one of the following:
From the menu bar, select Edit > Preferences > Project.
In the taskbar, click the project name.
The Project Preferences window is displayed.
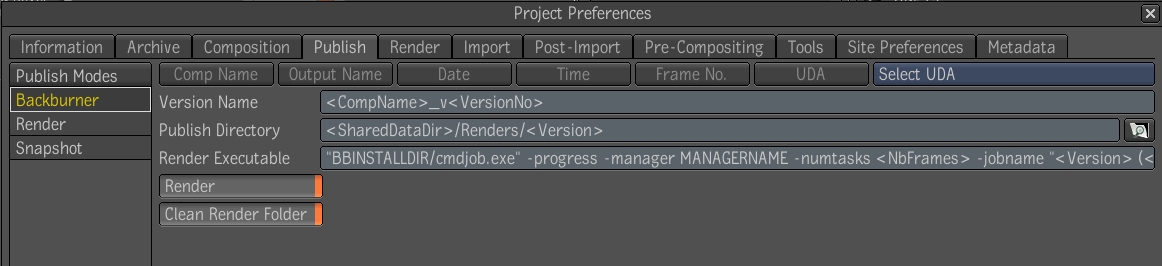
Select the Publish tab to set the preferences for publishing compositions.
 "Show full-size image")
Publish Modes -- Predefined modes are provided. You can create, delete, rename and modify any modes. To do so, right click in the Publish Modes list to view the options.
Version Name -- Enter the name of the version that appears in the Versions tab in the Tool UI. You can enter any alphanumeric character, or click the Comp Name, Output Name, Date, Time, or Frame No. buttons to insert any of those variables as part of the name. If you defined custom attributes, you can also insert any of these as variables in the name. Click the Select UDA button to select the custom attribute you want to insert, then click UDA to insert it. Note that the name, after all variables are resolved, cannot exceed 125 characters in length.
Publish Directory -- Specify the folder in which to save the rendered files created when you render. You can enter any alphanumeric character, or click the Name, Date, Time, or Frame No. buttons to insert any of those variables as part of the name. If you defined custom attributes, you can also insert any of these as variables in the file name. Click the Select UDA button to select the custom attribute you want to insert, then click UDA to insert it.
Render Executable -- The command line that executes when you perform a publish operation that is set to start a render in Toxik. It specifies the external application to run. For example, the Render publish mode uses a python script, render.py, provided by Toxik in resources/bgTasks.
If you are using the Backburner network rendering application, you will have to select the Backburner publish mode and replace the words "BBINSTALLDIR" and "MANAGERNAME" with the appropriate values, where BBINSTALLDIR is the directory where Backburner is installed and MANAGERNAME is the name of the machine running the Backburner Manager. For more information, refer to the Backburner User's Guide.
You can change the Publish Directory setting because the default points to a local folder on the user machine. A network accessible folder should be used if results are to be shared with other users. You can add a shortcut to your network rendering monitoring application in the Monitor Executable (Site Preferences tab, Project Preferences). This will allow you to quickly pull up the user monitoring application by clicking the clock icon next to the progress bar in the taskbar. If you are using Backburner, you can put the path to the Backburner Monitor which is BBINSTALLDIR\monitor.exe, where BBINSTALLDIR is the folder where Backburner is installed.
Render -- Determines whether this Publish mode should perform a render or not.
Clean Render Folder-- When selected, does not create the following in the Render folder when you publish a composition: a copy of the Footage folder, project, composition, and project preferences.
You can perform string substitutions in various Toxik components to change the default execution settings--see String Substitutions and About the Executable Files.
Things to Remember
You can display the list of background tasks that are in progress.
You can create, copy, delete, and edit publish modes.
In the taskbar, click the project name to open the Project Preferences window.
Select the Publish tab.
Right-click an empty area of the Publish Modes and select New.
Enter a name for the new publish mode and press Enter.
The new publish mode appears in the list of publish modes.
Set the version name, publish directory, render executable, and Render (on/off) setting for the project.
In the taskbar, click the project name to open the Project Preferences window.
Select the Publish tab.
Select a publish mode from the list, then right-click and select one of the following:
Copy -- Create a copy of the selected publish mode.
Delete -- Remove the selected publish mode.
Edit -- Change the name of the publish mode and press Enter.
If you are copying or editing a publish mode, set the version name, publish directory, render executable, and Render (on/off) setting for the project.
You can publish results over a network. The default "Render executable" setting is the following:
"<PythonExec>" "<BgTaskDir>/render.py" -p "<CurrentProject>" -u "<CurrentUser>" -c "<CompositionPath>" -f "<FilenamePattern>" -D "<DestinationPath>" -C "<Custom>" -r "<ResultName>" -i "<ImageFileFormat>".
This command invokes the render.py Python script (found in the \resources\bgTasks folder of the Toxik program folder) locally on the machine to render all the frames of the composition. The command parameters tell the publish script which project and composition to use, and the file name to use for the output frames from the rendering, the destination folder where rendered frames should be placed, etc. By examining the render.py script, you can determine all the different parameters which can be passed to the publish script.
To render over the network, the "Render executable" setting must be changed, so that instead of invoking the rendering locally on the machine for all frames, it will submit a job to a network render management software, which will then invoke the rendering on multiple render nodes in the render farm one frame at a time.
Instead of using the publish script, the standalone renderer can be used for network rendering (the standalone renderer is the txpublish.exe executable located in the Toxik program folder). The parameters for the standalone renderer are very similar to those for the publish script. If you run the standalone renderer without any parameters, you will be given a useful help message which includes all the parameters which you can specify.
From the Windows Start menu, choose Programs > Autodesk > Autodesk Toxik 2009 > Toxik Command Prompt.
Enter the following command:
dir
A list of folders is displayed.
Open a shell by doing one of the following:
Right-click the desktop and choose Open Terminal.
From the taskbar, choose System Tools > Terminal.
Determine the type of shell you are using by entering the following command:
# echo $SHELL
If your shell is tcsh or csh, enter the following command:
#source /opt/Autodesk/Autodesk_Toxik-2009/bin/toxik-env.csh
If your shell is bash, enter the following command:
#source /opt/Autodesk/Autodesk_Toxik-2009/bin/toxik-env.sh
The following lists the variables.
| Variable | Description |
| <InstallDir> | Toxik root installation folder. |
| <BgTaskDir> | Points to the \resources\bgTasks folder of the Toxik installation. |
| <PythonExec> | Points to the Python executable used by Toxik. |
| <SharedDataDir> | Folder on the network where shared data files are stored. |
| <DestinationPath> | The destination folder specified in the current project's Publish settings. |
| <CurrentUser> | The current user. |
| <CurrentProject> | The current project. |
| <CompositionPath> | The path to the current composition. |
| <ProjectFolder> | The path of the current project. |
| <Name> | The current composition name. |
| <Date> | The current date. |
| <Time> | The current time. |
| <FilenamePattern> | The file name pattern specified in the current project's Publish settings. |
| <Custom> | The custom string associated with the current composition. |
| <FrameNo> | The current frame number (only available in the file name Publish setting). |
| <NbFrames> | The number of frames in the current composition. |
| <StartFrame> | The start frame index for the current composition. |
| <EndFrame> | The end frame index for the current composition. |
| <RenderedResult> | The current published result name. |
Ensure Python 2.5.1 is installed in the same path on every workstation that is part of the render farm: C:\Python25\.
Ensure Toxik is installed in the same path on every workstation that is part of the render farm: C:\Program Files\Autodesk\Autodesk Toxik 2009\Toxik\.
Ensure the rendering application is installed on every workstation that is part of the render farm.
Note: If you are using the Autodesk Backburner network rendering application, ensure that one Backburner Manager is running on one workstation and one Backburner Server is running on each workstation that is part of the render farm. In addition, each Backburner Server should be connected to the Backburner Manager.
Open a project and a composition.
Set the publish mode to Backburner.
For information on setting the publish mode, see the To set the publish mode procedure in Publishing a Composition.
The Wiretap protocol allows some degree of data exchange between Autodesk Toxik and Autodesk editing and effects products, such as Smoke and Flame. In a facility where Toxik is used with one of these Wiretap-compatible products, publishing to Wiretap is an easy way for you to quickly make available the rendered result of a composition to the Flame or Smoke user--see Navigating and Browsing.
If the Wiretap mode is enabled for the selected publish mode, a clip is created with the Toxik rendered media on the Flame or Smoke workstation, provided a Wiretap server is running on the remote host--see Accessing the IFFFS Libraries on the Network Using Wiretap.
When publishing to Wiretap, here is the general workflow:
Set the appropriate publish mode for the composition.
Select the publish mode for which you have enabled Wiretap.
Click the Publish button.
Use the Import Browser to confirm that the clip has been created and published as expected on the Wiretap server. The clip name will be identical to the rendered file.
In the menu bar, select Edit > Preferences > Project.
In the Project Preferences window, select the Render tab.
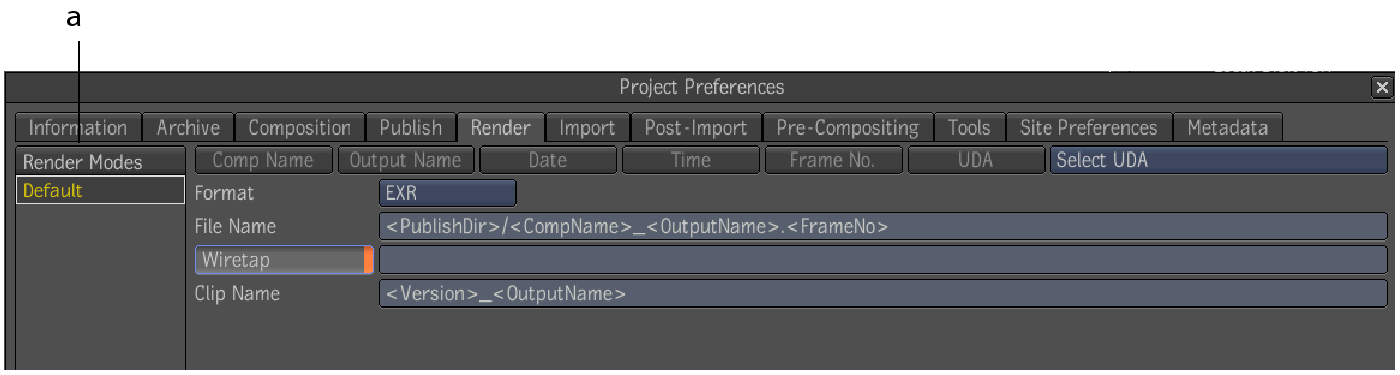
 "Show full-size image")
|
Select a render mode.
The default format is EXR, but you can change it to your desired format if it is supported by the remote application, such as Flame.
Note: The Wiretap mode is available in all publish modes except Snapshot, since that mode does not render.
Click the Wiretap button.
In the text field next to the Wiretap button, do one of the following:
Type in the path.
Using the Import Browser, navigate to a Wiretap folder, right-click the item in the right pane, and select Copy Path. Paste the contents in the Wiretap field (Ctrl + V).
Using the Import Browser, navigate to a Wiretap folder, select the path in the browser path text field, copy it (Ctrl + C), and then paste it in the Wiretap field (Ctrl + V). Either one of the following forms are acceptable:
Wiretap:<servername>/…
or
<servername>/…
The server specified corresponds generally to an IFFFS server. In the text field, the prefix "Wiretap:" is stripped off if present, because it is implicit. For IFFFS, the path must specify a writable folder, which is either a library or a reel. For example: Wiretap:/belgium/stonefs/myProject/myLibrary/myReel/. The trailing slash is optional.
If the clip is not publishing to Wiretap, it may be for one of the following reasons:
The Wiretap server on the destination host is down.
The file format chosen by the publish mode is unknown to the destination host, for example HDR.
The destination folder is not a library or a reel.
The library is already opened by a Smoke or Flame user on the remote machine which will only allow the read only mode.
A composition name contains parentheses.
In the Versions tab, you can view the list of all published versions for a composition when you have that composition open. Once you have published versions of a composition, you can open and view any of them, as well as revert and render any unrendered compositions you may have.
Open a composition--see Opening and Viewing Versions.
In the Tool UI, select the Versions tab.
The Versions tab displays all existing published versions of the composition, including versions that were not created with Toxik 2009. The working version of a composition is always listed first, followed by the most recently created versions.
To view a version, double-click any entry in the list.
The read-only version is opened. If the version of the composition is already open, then Toxik switches to display it. If you double-clicked the working version, it is opened in read/write mode.
The Player updates to display the selected published version.
Note: If the rendered version does not appear in the Player, verify that the Rendered Output option is selected in the Display tab of the Player options. To set the Player options, press the tilde key (~) to display the Gate UI and swipe through the south gate--see Setting the Target for the Player.
Things to Remember
Project preferences determine the naming convention for published results.
In the Schematic view, click the node of the linked composition.
In the Tool UI, select the Versions tab.
The left side contains the list of all published results for the composition. The right side shows the published result of the selected version.

 "Show full-size image")
In the Versions tab, select a version to open and do one of the following:
Click the Open button.
Double-click the selected version.
On the left side of the Versions tab, select a version to delete and do one of the following:
Click the Delete button.
Right-click and select Delete.
Press Delete on the keyboard.
Reverting to a previous version of a composition lets you replace the working composition by the previous one. When you do this, you are actually working on a copy of the previous version and not on the copy itself, which is read-only.
In the Versions tab, select a version to revert and do one of the following:
Click the Revert button.
Right-click and select Revert Working To.
In the message box that appears, click OK to confirm the reversion.