Chapter 18, Rendering
| Rendering Shots as You Work | |||
Chapter 18, Rendering |
|||
 Remote Rendering with Burn and Wiretap
Submitting a Remote Render Job
Monitoring the Render Tasks with Backburner Monitor
Burn for Lustre allows you to render shots using Linux servers set up on the network, speeding up the rendering process and freeing up the Lustre stations. On a 2K film project, you might, for example, want to render half-resolution versions using the local machine and render 2K final versions using Burn for Lustre, as this takes much longer. Or, when you are satisfied with the grade of a reel, use the render farm to render 1K or 2K versions of it.
Note: When rendering a Multi-Layer Timeline, Burn only renders the flattened timeline. It does not take into account the Solo (see Multi-Layer Timeline) or Mute (see Muted Layers) status, since these modes are not saved in the grade.
Files rendered using Burn for Lustre are stored in the same directories as those used for renders created using the Render Local menu. Render directories are set up in the Render Backburner menu. See the Autodesk Lustre Software Installation Guide for your platform.
To view and manage jobs sent to the render farm, you use Autodesk BackburnerTM Manager and Backburner Monitor.

Burn for Lustre allows you to render footage stored in the local storage array, or footage imported via Wiretap, to a destination specified in the Burn Render Fulls Home. The destination could be the local storage array, shared network storage, or the Stone filesystem via Wiretap.
Note: If rendering footage imported via Wiretap, the footage must be located on the Stone filesystem.
Enter the Wiretap path in the Renders Full Home field in the Render Backburner menu. See Submitting a Remote Render Job.
Example:
BURN_PROJECT_HOME 192.23.200.76:/L:/lustre_project
BURN_RENDERS_FULL_HOME 192.23.200.76:/L:/renders/full
./render -s <scene_name> -g <grd_name> -r <output_resolution> -i -1
192.23.200.76:/L:/lustre_project -2 192.9.200.19@wt:/stonefs/project/library -3
192.23.200.76:/L:/renders/full
Note: Use the -i option to render, taking trim information into account.
For more information, see Command Line Renderer.
Before you can start a network render, you must start Backburner Manager on a Windows or Linux workstation designated as the Manager, and start Backburner server on each rendering server.
Lustre supports Autodesk BackburnerTM 2008.1. In Backburner 2008.1, the Backburner Web Monitor has all the features of the Windows-based Backburner Monitor. The Backburner Web Monitor runs in a Web browser from any workstation on the network. You can use it to view and control jobs currently being processed. Jobs in the Distributed Queueing System can be stopped, restarted, reordered, archived, or removed. You can monitor the overall health of the Distributed Queueing System and identify any Render Nodes that are not working. See the Autodesk Backburner 2008.1 User Guide.
For details on starting and configuring Backburner Manager, see the Autodesk Backburner 2008.1 Installation Guide.
You can render one shot, several selected shots, or all shots in a scene using Burn for Lustre. Jobs are submitted from the Render Backburner menu, where you can also monitor job progress.
Load the cut containing the shots you want to render. See Loading a Cut.
Apply the required colour grading changes, and then save the grade.
If you do not wish to render out the entire timeline, flag the shots you wish to render. See Flagging Shots.
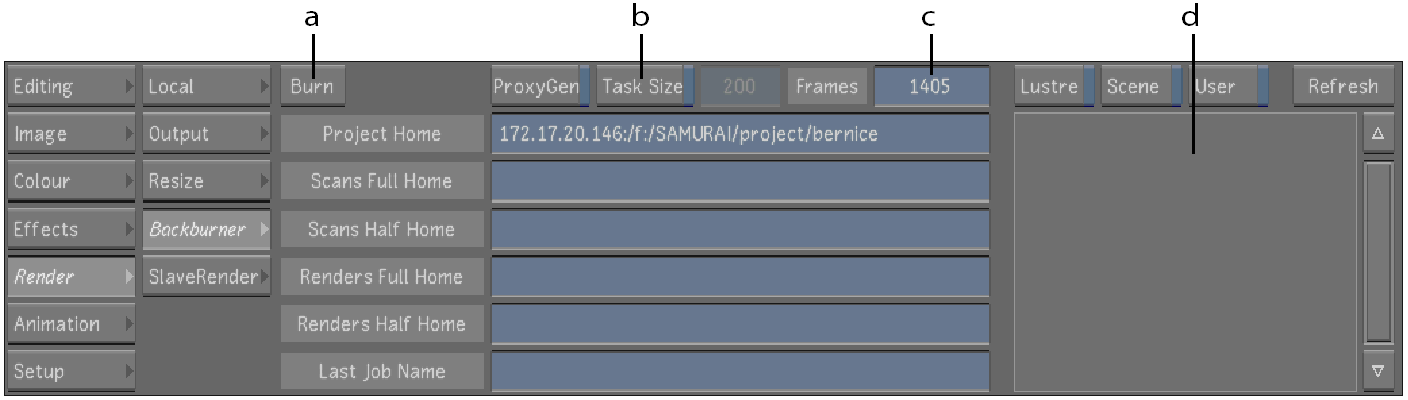
Click Render and then click Backburner.
The Render Backburner menu appears.
 "Show full-size image")
|
|
|
|
If needed, change the size of the task (in number of frames) sent to individual Linux systems by enabling the Task Size button and then changing the value in the Task Size field.
Note: It is recommended that you save the grade file before proceeding to the next step. If not, changes made in the Render menu might not be submitted to the render farm. Press S on the keyboard to save your changes.
Click Burn.
The job is submitted to Backburner, which then queues and distributes it to the render farm. The last successfully submitted job appears in the Last Job Name field. If the job submission was unsuccessful and nothing appears in the Last Job Name field, check for errors in the Lustre console. Otherwise, check for errors in the Backburner Monitor.
Note: The total number of frames in the cut is displayed in the Frames field, for reference.
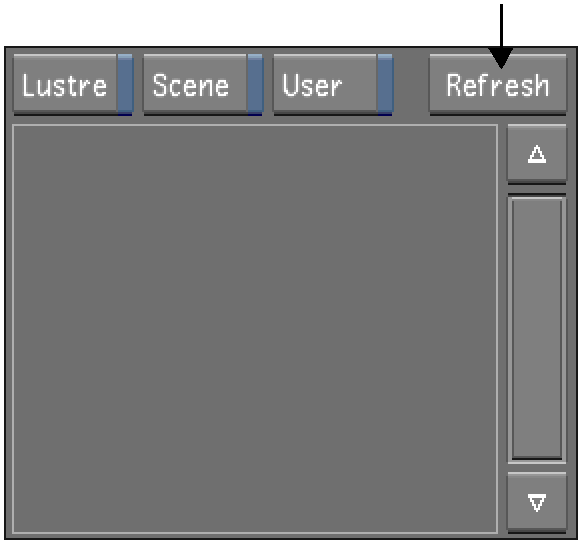
In the Render Backburner menu, click Refresh.
 "Show full-size image")
All submitted jobs appear in the Job list. This is the same list of jobs shown in the upper-left panel of the Backburner Monitor. See Monitoring the Render Tasks with Backburner Monitor.
To view a subset of the jobs, apply a filter to the job list by enabling one or more of the filter buttons above the job panel.
| Enable: | To view: |
| Lustre | Only jobs submitted from Lustre (as opposed to other Autodesk applications such as Flame or Combustion). |
| Scene | Only jobs for the currently loaded scene. |
| User | Only jobs submitted by the current user. |
During an active render session, you can use Backburner Monitor on any Windows workstation on the network to view and edit jobs that are in process or in the job queue.
On the workstation designated as the render monitor, choose Start | Programs | Autodesk | Backburner | monitor.
The Monitor window appears.
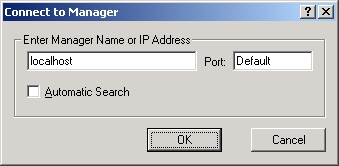
If no servers or data appear in the Backburner Queue Monitor, the Backburner Manager was not found with the current settings. Choose Manager | Connect to connect to the Backburner Manager.
The Connect to Manager dialog appears.
 "Show full-size image")
Enter localhost if you are using Backburner Monitor on the same workstation as Backburner Manager. Otherwise, enter the IP address of the workstation on which Backburner Manager is running.
When Backburner Manager is found, its name appears in the title bar and the list of servers is updated.
 "Show full-size image")
|
|
|
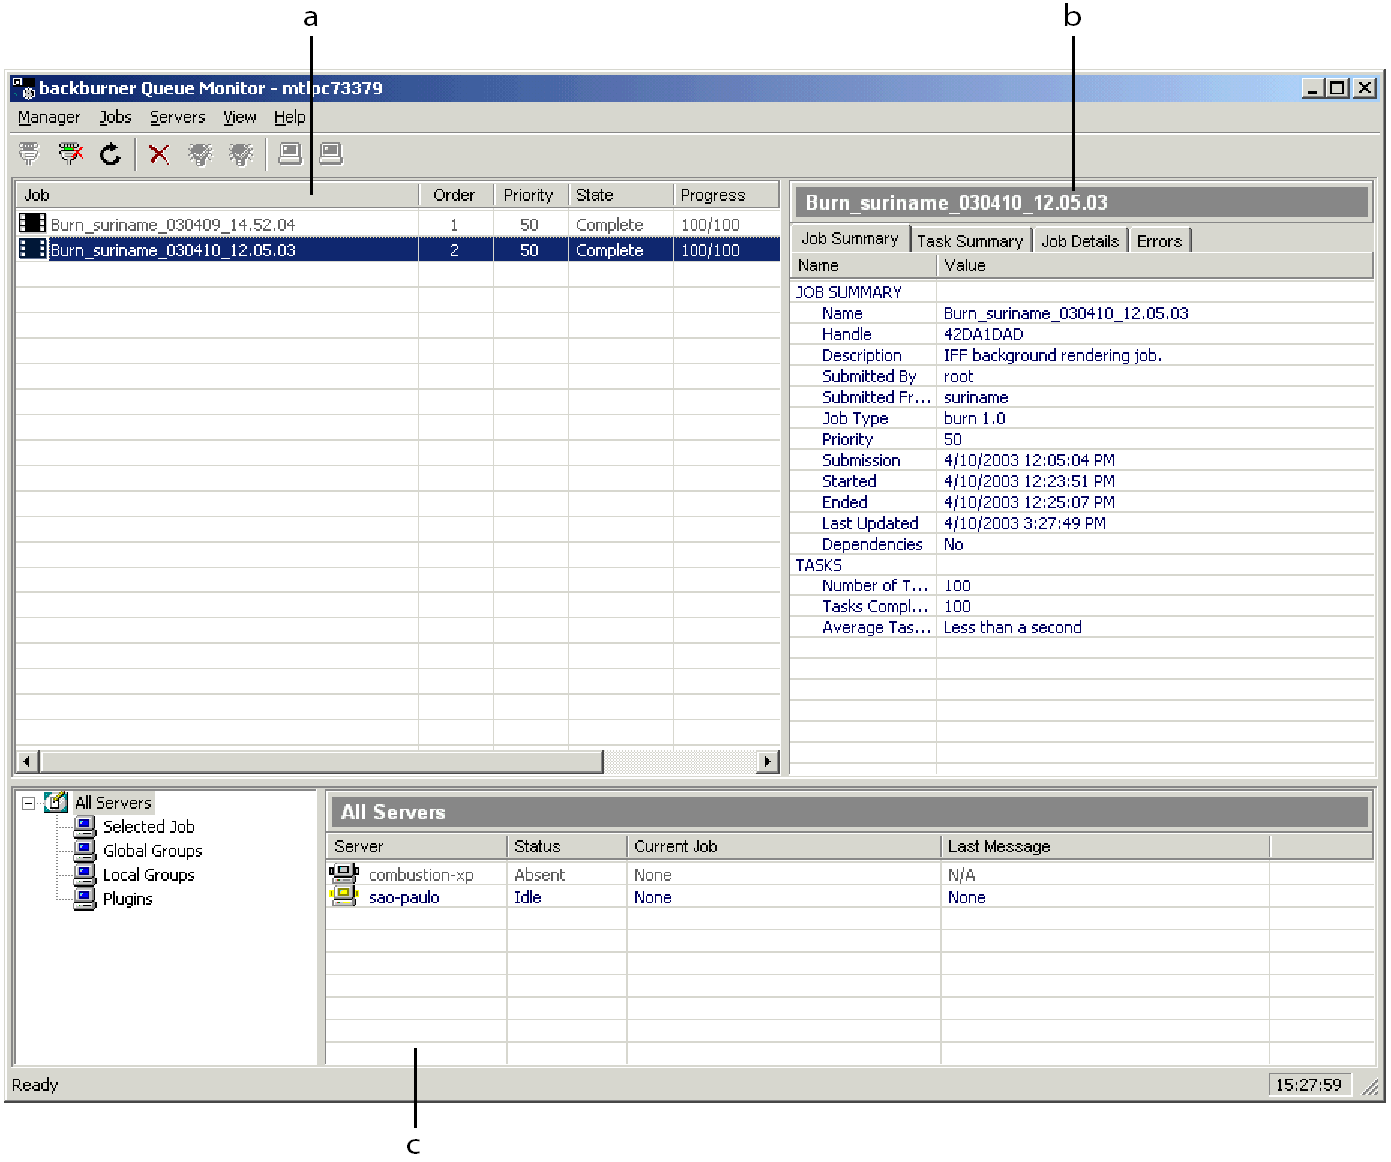
In the Job list, select a job.
The columns in the Job list include Order, Priority, State, Progress, and Owner. The Job Summary, Task Summary, and Job Details panels are updated to reflect the selected job.
In the Job list, right-click a selected job to choose from a list of operations. For example, activate, suspend, delete, or restart the current job.
You can access Backburner Monitor by running a Windows session on the Linux system using rdesktop--a remote desktop protocol client. The rdesktop application is an open source client for Windows NT Terminal Server and Windows 2000 Terminal services. The rdesktop application displays your NT desktop on the Linux platform. For more information, see www.rdesktop.org.
The Command Line Renderer allows you to render shots by entering a command in a Linux shell instead of using the Render Backburner menu.
Note: Use the bbserver.log file describing the Command Line Renderer output to view error messages and other pertinent information.
Run the Command Line Renderer on the machine you want to render on. Files rendered using the Command Line Renderer are stored in the same directories as those used for renders created using the Render Local menu. Render directories are set up in the Project menu.
The Project Home directory must be specified when you use the Command Line Renderer. The Scans home and Renders home directories must also be specified if they are not sub-directories of the Project Home directory. You can specify these directories in two ways. You can either use the -1, -2, and -3 parameters in the command line, or you can set them as environment variables on the Linux server.
To use the Command Line Renderer, Burn for Lustre must be installed and licensed on each machine (node). For information, refer to the Autodesk Lustre Software Installation Guide for your platform.
The Command Line Renderer uses the following syntax:
./render -s <scene_name> -g <grade_name> -o <output_file_format> -r <output_resolution>
Note: This syntax example shows required parameters and modifiers when environment variables for project directory locations have been set on the local machine. For a complete list of parameters, refer to the following table.
| Par. | Modifier | Description | Req'd | Comments |
| -s | <scene_name> | The name of the scene containing the grade and associated cut you want to render. | Yes | |
| -g | <grade_name> | The name of the grade and associated cut you want to render. | Yes | |
| -o | <output_file_ format> |
The file format of the render files. Valid modifiers: cin, dpx, tga, sgi, tif or bmp. | Yes | |
| -r | <output_ resolution> |
The resolution of the render files. Valid modifiers: full, half. | Yes | |
| -l | <video_format> | Renders to a specified video format. Valid modifiers: HD, PAL, or NTSC. | No | |
| -1 | <project_home_folder> | The path and directory name of the Project Home directory, including the drive letter. Example: G:\ProjectAB | No | Not required if set as environment variables on the local machine. See Project Configuration. |
| -2 | <footage_home_folder> | The path and directory name of the original footage directory, including the drive letter. | No | Not required if set as an environment variable on the local machine. |
| -3 | <renders_home_folder> | The path and directory name of the render files directory, including the drive letter. | No | Not required if set as an environment variable on the local machine. |
| -n | <number_shots> | The number of shots, starting from the first shot in the cut, to be rendered. | No | Use only when rendering to the Slave Renderer. |
| -f | <first_frame last_frame> | Renders a range of frames within the set of shots defined for rendering. Example: -f 120 340 | No | Can be used to specify a new range when restarting a cancelled render. |
| -a | <start_fr_no end_fr_no> | Renders a range of frames in the timeline, between the Start Frame number and End Frame number. Example: -a 140 480 | No | Do not use this parameter with other parameters that specify a subset of shots. |
| -i | None | Renders shots taking trim information into account. | No | |
| -e | <preset> | Name of output colour space preset, if used. | No | See Saving and Loading Colour Mapping Presets. |
| -t | <number_of _threads> |
Specifies the number of threads, or processors, used for processing. You can opt to use only one of two processors. Example: -t 1 | No | On Linux machines, you must set this parameter to -t 2. |
| -w | None | Renders wedges to the same place. | No | Same as No Wedge option. See Specifying the Destination for Local Render Files. |
| -q | None | Renders to one sequence. | No | Same as One Sequence option. If neither -w nor -q are specified, Normal is used. This parameter should be used with -i. |
| -p | <part_of_ frame> |
Renders a fraction of the shots in the cut. Express the modifier as a fraction, for example, <1/4> would render the first 25% of the shots. | No | You can use this parameter to divide the job between several machines. |
| -u | None | Renders dust removal data. | No | |
| -k | None | Renders with timecode burned in. | No | |
| -L | None | Render using the Normal filter for reposition. | No | See Rendering menu. |
| -M | None | Render using the Mitchell filter for reposition. There are three parameters (s = size; B = blur; C = ringing). | No | See Rendering menu. |
| -T | None | Render using the CatmullRom filter for reposition. | No | See Rendering menu. |
| -O | None | Render using the new type Lanczos3lobe filter for reposition. | No | See Rendering menu. |
| -d | None | Debug level. | No | |
| -h | None | Print help to command prompt window. | No | Use this parameter by itself. Example: render -h. |
render -s alabama -g grd21 -o dpx -r half -i -q -1 g:/project1 -n 1
Where alabama is the scene name, grd21 is the grade name, dpx is the output format, and g:/project1 is the Project Home directory as mapped from the local (rendering) machine.
Open a Command Prompt window on the machine on which you want to render the shots by choosing Start | Programs | Accessories | Command Prompt.
Go to the Lustre application directory by typing:
cd C:\Program Files\Autodesk\Lustre 2009
where C is the local drive.
Enter the render command using the syntax provided in the previous table.
Open a Linux shell.
Go to the Lustre application directory by typing:
cd /usr/autodesk/lustre2009
Enter the render command using the syntax provided in the previous table.