


Learning Resources > Tutorials > Getting Started with Maya > Animation > Lesson 4: Nonlinear animation
with Trax >
Creating clips with Trax
A clip is a time-independent sequence of animation data for one or more animated attributes that you create from existing animation (keyframe animation, expressions, constraints, motion capture data, and so on). A clip is time independent, allowing you to position, scale, and cycle a clip independently of other animatable attributes or other clips. This means you can arrange the clips into a particular sequence, and then play it back to see the results. You can adjust the timing, length, and rearrange or edit the same clips in a different order to modify the motion sequence.
Most commonly-used clips are reusable sequences of animation that are easy to sequence or blend with other clips. For example, suppose you create three clips: a karate punch, tumble, and kick. You can run the clips in any order, and you can repeat clips or blend the motion between them. You can scale or cycle clips to alter the time frame over which the animation occurs. You can either return the clip to its original state or reload a duplicate of the original source clip and begin again. In this way, the Trax Editor allows you to experiment with animation sequences on a character.
In the steps that follow, you key some animation for the aircraft and then create clips from the keyed animation for use in the Trax Editor.
To create keyframe animation for the aircraft
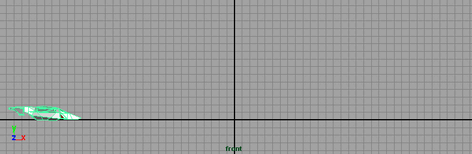
The panel updates to display the aircraft’s side from the front view.
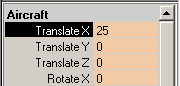
The aircraft is repositioned at -25 along the X axis. The aircraft disappears from the front view because it has been repositioned outside of the viewing area.
In the Channel Box, the channels display in a different color. The color change indicates that the channels now have animation applied to them.
The aircraft is repositioned at 25 along the X axis (the right hand side of the current front view).
The Translate X name becomes highlighted.
Key Selected sets a keyframe for only the selected attribute.
Confirm that the animation sequence works as expected in the steps that follow.
To playback the animation using the playback controls

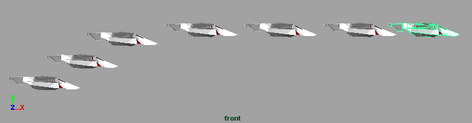
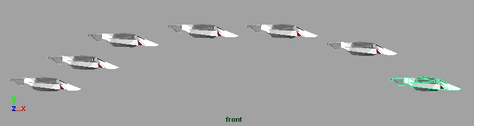
The aircraft travels from left to right in the front view.
![]()
Now that you have keyframed an animation sequence and confirmed that it works, you can create an animation clip.
To create an animation clip of the keyframe animation
 .
.
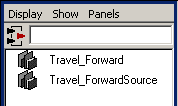
The Outliner updates and lists two items: clip1 and clip1Source. If the clips do not display refer to To set the Outliner to display clips
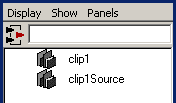
When you created the clip, two clips were generated: a regular clip and a source clip. The source clip contains the animation curves for the character (based on the keyed attributes that the clip was created from). The source clip is stored with the file and can only be accessed from the Visor or Outliner. Maya saves the source clip outside of the Trax Editor to protect the original animation curves from being accidentally modified and ensures you have an unmodified clip to revert back to.
A regular clip (referred to simply as a clip) contains the same information as the source clip, and is placed in a track in the Trax timeline. It is this regular clip that you work with and modify in Trax.
A clip does not yet appear in the track area of Trax Editor because the character set associated with the clip (the aircraft) has not been loaded to display.

The clip appears as a blue rectangular box in a track in the Trax Editor. A track is an area in the Trax Editor to place and work with one or more non-overlapping clips in relation to the animation timeline. Tracks allow you to work with your clips in a nonlinear manner by allowing you to reposition and scale clips in time or juxtapose them with other clips. You can work with multiple tracks in the Trax Editor.
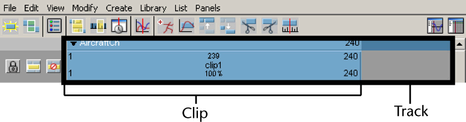
The Trax Editor updates to show the beginning and end point for all of the items displayed in the Trax Editor. (In this case the new clip.) The clip represents the Translate X animation for the aircraft going from -25 to 25, for a time range of 1 to 240 frames.
Every clip contains interaction controls that relate to information about the clip:

Each area on the clip has a hot spot which you can either double-click on for numeric values, and in some cases, click-drag to modify the related attribute. For example, you can double-click on the hot spot for the clip name to edit the name. For more information about clips and tracks, see Track view area in the Maya Help.
To edit the name of the clip in the Trax Editor
The clip highlights in yellow to indicate it is selected and the clip1 name becomes highlighted.
The clip is renamed to Travel_Forward. The clip and the source clip’s name are updated in the Outliner to reflect the change.
If you play this clip in Trax, the animation is played back from the clip data, not the keyframe data that you set previously in the scene. When you created the clip, the source of the animation for the aircraft was changed to come from the clip instead of the keyframes.
When you create a clip, Maya creates a character set to contain the clip. A character set is the parent of the hierarchy of clips and tracks for a particular animated object. A clip’s animation resides under the character set node and additional clips are placed under that node unless you specify otherwise.
For more information see Nonlinear animation components in Trax in the Maya Help.
Now that you have created your first animation clip and renamed it using the Trax Editor, you need to create a few more clips by setting additional keys and creating clips of the sequences. You need to create separate clips of the aircraft taking off and landing.
To create an animation clip of the aircraft taking off
![]()
Key Selected sets a keyframe for only the selected attribute.
![]()

The Trax Editor updates to create an additional track and places the new clip on the new track. The Outliner updates to list the new clip and source clip.

To create an animation clip of the aircraft landing
The aircraft travels forward and then lands as it nears the end of its travel.
