How to set keyframes in your animation to objects, lights, shaders, textures, cameras, and other objects.
Apply a keyframe to your animation
A keyframe represents an object's position at a certain time. You can animate an object by setting a few keyframes at certain points. Alias can then fill in the object's motion between each pair of keyframes.
 ❒ to open the Set Keyframe Options box.
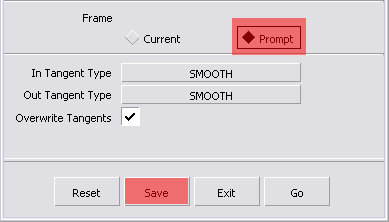
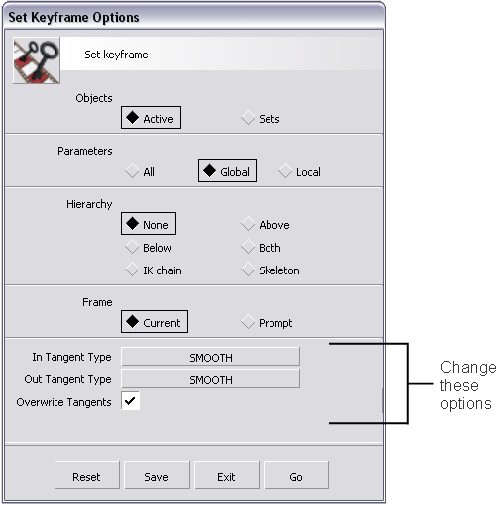
The Set Keyframe Options box is opened.
Then, click the Save button.
The Set Keyframe Options box closes.
and click the object in your model you wish to animate.
 .
.
The object you have chosen is now in a new location.
to create a keyframe for the object at its current position.

Your object is now snapped to final position in the animation.
to create a keyframe for the object at its current position. 
Edit the animation curve tangents
There will be a number of times when you want to edit your animation to make it more realistic. To show you how this is done we provide an example of editing a sphere in an animation.
First you'll change the sphere's rate of speed at the beginning of the animation by editing its animation curve tangents.
 to open the Action Window.
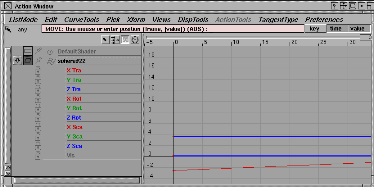
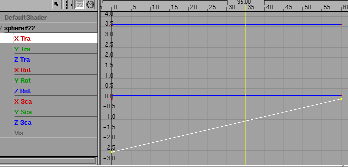
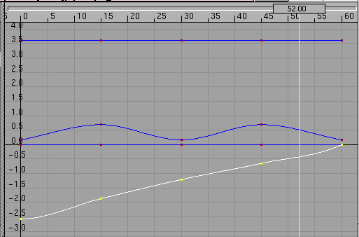
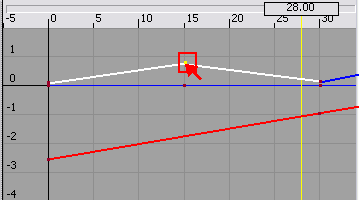
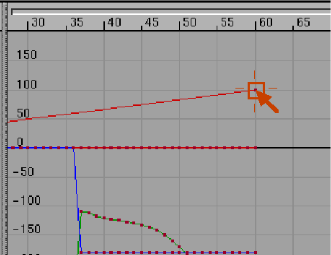
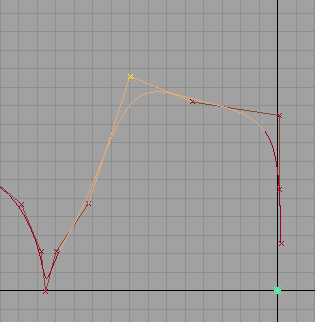
The Action Window displays the animation of selected objects using line graphs called animation curves. Each animation curve represents one of the object's parameters. An animated parameter is referred to as a channel.
The horizontal axis represents time and the vertical axis represents the parameter's value. Each keyframe is indicated by a small red dot.
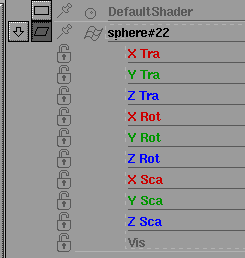
The parameter names are listed along the left side of the window.
The complete animation curves are displayed.
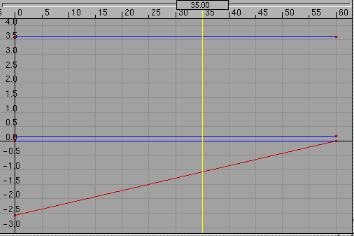
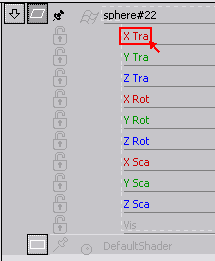
You will note that all of the animation curves are horizontal except for one diagonal line.
This is the X translation parameter. It represents the movement of the object in the X direction.
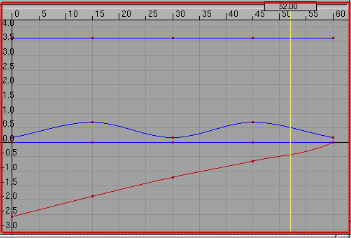
The parameter and the diagonal line are highlighted.
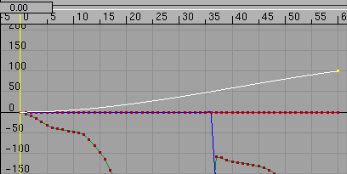
The X Translation line is the only non-horizontal line because the sphere is animated only in the X-axis direction. The curve is a straight line because the sphere moves at a constant rate of speed.
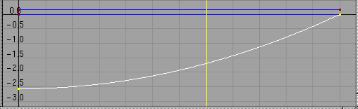
The diagonal line becomes curved, so the sphere will begin moving very slowly and gradually increase its speed.
How to review your animation.
While the playback is in progress, the current time changes accordingly. The current time is displayed in the current application
window, as well as in theAnimation > Show > Toggle Time Slider and Animation > Editors > Action Window. When the animation stops, the current time is the last frame that was viewed during the playback.

or

Turn your timeslider on by selecting Animation > Show > Toggle Time Slider.
I want to stop the playback?
Click the Stop button in the Time Slider to stop the animation.

I want to rewind the playback?

Click the Rewind button on the Time Slider to play the animation backward slowly.
Or use the scrub bar method of dragging the time bar back in the time slider.

I want to fast forward the playback?

Click the Fast Forward button on the Time Slider to play the animation forward.
Or use the scrub bar method of dragging the time bar forward in the time slider.

I want to slow down the speed of the playback of the animation?
Enter the number of frames per second in the FPS text box.

I want to optimize playback?
Activate the perspective view only and position the model before selecting playback.
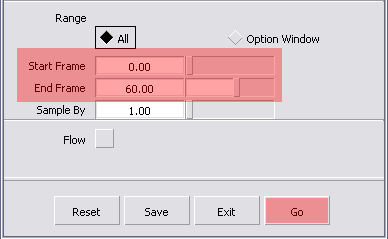
I want to play a range of frames
Click the pop-up menu to the left of the timeline and cboose Start/End.
Enter the start and end frame numbers in the text boces to the left of the timeline.
I want to play only every second frame, every third frame, and so on.
Enter the frame step in the by text box.
For example, to play every other third frame, set the by text box to 3.
View individual frames of animation
Learn how to set view frames to walk through a list of key times and see what the key steps look like.
Use View frame to view any number of frames. When viewing more than one frame, there is a short pause between each frame that is displayed.
, Animation > Keyframe > Auto Keyframe , or Animation > Editors > Action Window, or Animation > Tools > Set Motion
 .
.
 or click its icon. The system prompts you to type the numbers of one or more frames to view (separate a sequence of frame
numbers by spaces). The animated items are evaluated and displayed at the frames you specified.
or click its icon. The system prompts you to type the numbers of one or more frames to view (separate a sequence of frame
numbers by spaces). The animated items are evaluated and displayed at the frames you specified.
The current time is updated to the last frame that was viewed and is displayed in the current application window, as well
as in the Time slider (Animation > Show > Toggle Time Slider) and the Action Window (Animation > Editors > Action Window).
Although this function does not have an option box, it uses the Objects, Parameters, and Hierarchy options from Animation Options in the Playback Options window. (ChooseAnimation > Editors > Playback Options and click the arrow beside Animation Options to display that section of the window.)
Any optimization settings (for example, lights or cameras) specified inAnimation > Editors > Playback Options are ignored.
In Windows, use Animation > Show > FCheck to do the following:
Choose Animation > Show > FCheck to start this utility. For further information on its use, choose an item from the Help menu on the FCheck window bar.
How to set keysframes automatically.
Auto keyframe automatically sets keyframes in channels for animation parameters that have changed value since the last time a keyframe was set.
to create channels for the object.
Keyframes are set for the animation parameters of the object that have been changed by the Transform. For example, if the object was only transformed usingTransform > Rotate , keyframes are created for the rotate parameters, but not the translate or scale parameters.
This function operates on a per-channel basis, and not on the picklist or hierarchy. This means that you can transform an object, pick another object, transform that object, and repeat this process for as many objects, shaders or any other animatable objects as you like. When Auto keyframe is invoked, it looks at all channels that have changed, regardless of which object is currently picked, and sets keyframes for those channels.
If the current time changes (for instance, if you choose Animation > Show > View Frame, Animation > Show > Playback, or change the current time in the Action Window or Time slider), and the channel is evaluated, then a keyframe is not created for that channel the next time you invoke Auto keyframe.
This function does not have its own option box; it uses the Frame and In and Out Tangent Type option values from the Set Keyframe Options window.
To change the values to use with Auto keyframe, choose Animation > Keyframe > Set Keyframe❒ to open the Set Keyframes Options window, then change the Frame and In and Out Tangent Type options as needed.
Create different segments of your animation
How to use Animation > Tools > Set Motion to create several different segments of an animation.
For example, you can do the following:
How to playback faster when previewing an animation of shaders and lights.
When you use the Play Blast window, the first time each frame in the animation is viewed in the playback, the animation is computed and displayed in a Play Blast window, and the image that is displayed in the window is retained in memory.
On the second and subsequent times that a frame of animation is viewed, the frame is viewed simply by displaying the image that is stored in memory for the current frame. This is generally much faster than an ordinary playback, where all the animation has to be recomputed for each frame.
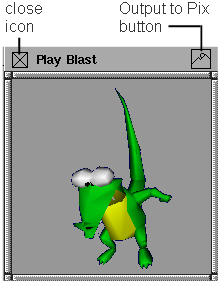
To invoke the Play Blast window, ensure that the Show playblast option is ON.While a playback is in progress in the Play Blast window, you can pause it by pressing the stop icon in the Time Slider. This icon changes to three vertical bars, indicating that you are in pause mode.
While the playback is in pause mode, you can use any of the buttons on the time slider to change the current time. As long as you are in pause mode, the new frame is displayed using the images stored in memory. If the stop icon is pressed a second time, the Play Blast is completely stopped, and the Play Blast images are removed from memory. (If you want to view another frame or start another playback, the Play Blast images must be re-computed for that new frame.)

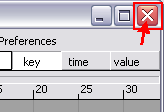
The playblast window has two icons on its title bar. On the left is the standard close icon, which you can use to close the playblast window and stop playback. On the right is the Output to Pix icon which you can use to turn .pix file output on and off.
The camera view is the same view as the current application window. For example, to do a Play Blast preview of the perspective window, click in the perspective window to make it current, and then invoke the playback. The aspect ratio of the current window is maintained in the Play Blast window. This means that if your current window is long and narrow, the image in the Play Blast window is long and narrow.
When playblasting an animation, the Playblast window that is displayed does not respond to mouse events.
How to edit animation curves and smooth out the motion or apply abrupt changes at each point in your animation to emphase the movement of your model.
.
There is now a second curve that is not horizontal. This wavy curve represents the sphere's translation in the Z-axis direction.
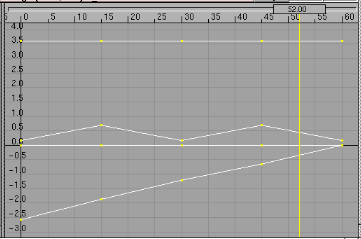
Selected keyframes are highlighted in yellow.

The smooth curves are now jagged lines. This will make the object's motion abruptly change at each point.
 .
.
 in the Action Window.
 up to move the keyframe from its current position.
To add keyframes to your animation
By adding more keyframes you will gain detailed control over the movement of the model.
to move the object to a new location.
to create a keyframe for the object at its current position. Then type a time and press Enter to set the keyframe to frame that time.
How to copy animation channels for other animations.
Use Animation > Keyframe > Copy Keyframe to copy a range of keyframes from an animated object, and place them on the keyframe clipboard for pasting somewhere else.
When you are working with animated sequences, it is often necessary to copy a sequence from one object to another, or to repeat a sequence. Copy keyframes and Paste keyframes provide a simple way to do this.
Copy keyframes lets you select an object and specify a range of keyframes from the object’s animations to copy. The selected keyframes are then copied to a keyframe clipboard, which lets you mirror or paste the keyframes onto another object (or even back onto itself).
To copy keyframes into your animation
.
This operation overwrites any other keyframes that may already have been placed on the keyframe clipboard.
The system prompts:
Enter the frame range to copy (start, end):
30 60
 .
.
How to remove a range of keyframes from a selected object.
When you are working with animated sequences, it is often necessary to change the order in which events occur or to remove sequences altogether. Cutting or copying keyframes, and then pasting them, provides a simple way to do this.
Cut keyframes lets you select an object (or group of objects) and remove a range of keyframes from their animations. You can also specify whether the remaining animation is to be compressed (pulled back in time) or to be left alone. Additionally, if only a single object is selected, the keyframes that are removed are copied to a keyframe clipboard, which lets you paste those keyframes onto another object (or even back onto itself).
To cut keyframes from your animation
 .
.
The system prompts:
Enter the frame range to cut (start, end):
30 60
to paste the animation somewhere else.
How to specify the sequence of keyframes to be repeated a number of times.
Use Animation > Keyframe > Paste Keyframe to paste a range of copied keyframes from the clipboard (using either Cut keyframes or Copy keyframes) onto an object. The keyframes can be pasted into different animatable channels and on objects other than the source.
When you are working with animated sequences, it is often useful to be able to copy a sequence from one object to another, or to repeat a sequence. Cutting or copying keyframes, and then pasting them, provides a simple way to do this.
Animation > Keyframe > Paste Keyframe lets you specify the sequence to be repeated any number of times. You can also specify what should be done to any existing
animation. (For example, you can write the new sequence over an existing sequence or insert it into an existing sequence.)
To paste keyframes in your animation
or Copy.
See Cut keyframes and Copy keyframes.
.
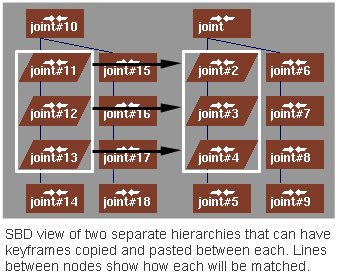
You can copy a range of keyframes from one hierarchical object to another, even if the two objects do not share the exact same topology. The ordering of nodes in the SBD window is used to match up nodes from the source object with those of the destination object(s). Only nodes that have the same relative SBD position and node type are matched.
Enter the frame range to paste (start, [repeats], [gap], [end]):
If Range fit is set to None and an ending frame is specified, Scale paste is performed.
Paste the animation by typing the values prompted for. The following examples illustrate various situations.
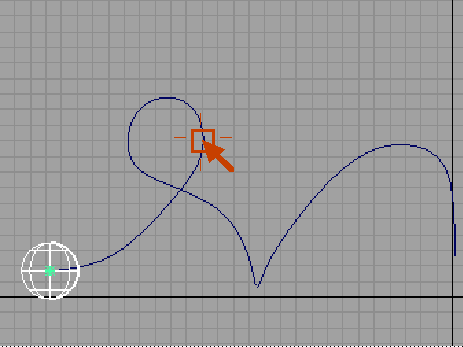
To create a motion path animation
 . Draw a curve to be used as your motion path.
 and name it MyMotionpath.
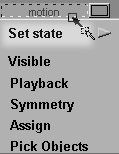
This layer should contain the object you want to animate and the curve you want to use as the motionpath.
 and click the object you wish to animate.
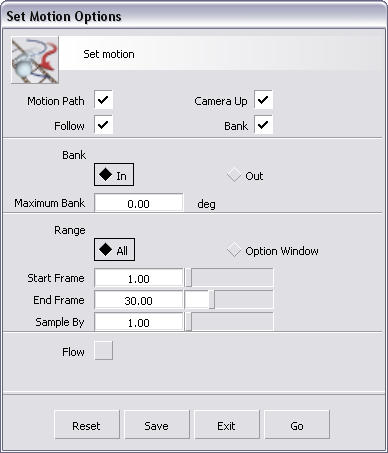
❒) to open the Set Motions Option box.
and click the object you wish to animate.
❒) to open the Set Motions Option box.
The Set Motion Options box is opened.
I want to change the speed of an object traveling on a motion path?
Use Animation > Editors > Action Window to edit the timing curve on the motion path to adjust its speed.
Set up a camera to travel along a motion path
Allows you to animate the camera view of a scene along a path to effectively simulate a walkthrough of a scene.
 (If you want to specify options such as start and end frames, choose Autofly❒)
The following prompt is displayed:
Select the motion path for the camera EYE to follow
Once the camera eye motion path has been selected, the system prompts:
Select the motion path for the VIEW, or select the GO icon
If you click the Go icon instead, the system uses a camera view motion path that is straight ahead along the motion path chosen for the camera eye.
Select the motion path for the UP, or select the GO icon
To use a third curve for the camera up, click directly on the curve you want to assign as the camera up path.
If you click the Go icon instead, the system generates the camera up motion path. The camera is oriented in the up direction, and banks around curves according to the current Maximum Bank degree values set in the Autofly Options box.
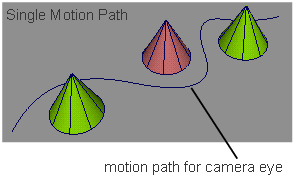
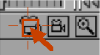
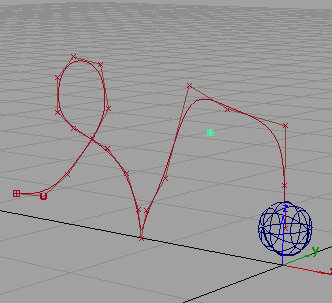
In the following diagram, only one motion path is used. The camera view is always directly in front of the camera eye as the camera travels along the motion path. The camera view loses sight of the objects as it weaves between them.
 .
.
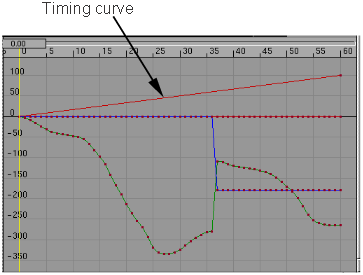
When you animate an object along a motion path, Alias creates a keyframe at each frame of the animation. (Remember, a keyframe is indicated by a red dot.)
There is one diagonal line that has only two keyframes. This is known as the timing curve, and it represents the constant speed of the object along the curve.
To edit an animation along a motion path curve, you usually edit the motion path curve (in the view window) or the timing curve. You don't usually edit the animation curves because they are so complex.
The diagonal timing line is now curved. This will make the object begin moving very slowly and gradually increase its speed.
I want to edit the motion path
 to deselect all objects
and click the motion path curve to select it.
to deselect all objects
and click the motion path curve to select it. 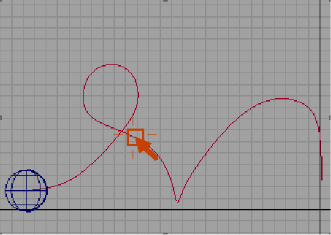
 ❒) to open the Object Display Control window.
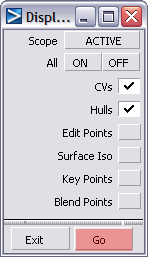
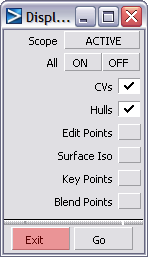
The hulls and the CVs of the motion path curve become visible.
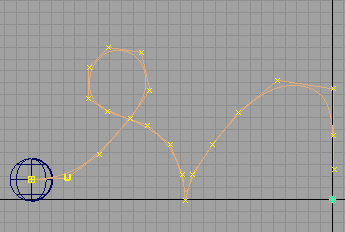
 and click one of the motion path curve's CVs to select it.
  and drag the up to move the CV up.
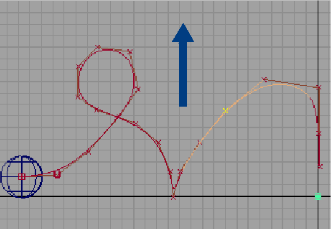
The CV is moved up and the shape of the motion path curve is changed.
Animate a camera on a motion path
How to set a camera in your animated scene.
Use the Camera icon to select the views’s camera. You can animate the view of the scene by creating keyframes for the view's camera. You can also animate a camera using motion paths.
To add a camera view to a motion path
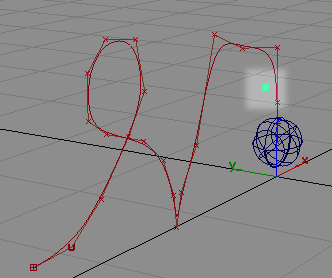
In the view window title bar, drag the tumble, dolly and track icons to move the camera so that you have a better view of the motion path curve and sphere.
A green dot, indicating the camera's pivot point, appears in the view.
 ).
).
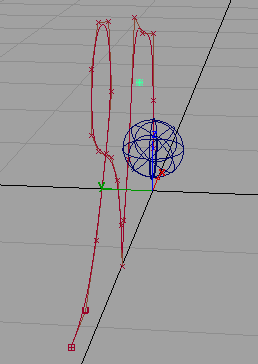
Edit a motion path in the Action Window
Edit timing curves from within the Action Window to change your animation.
.
When you animate an object along a motion path, Alias creates a keyframe at each frame of the animation. (Remember, a keyframe is indicated by a red dot.)
There is one diagonal line that has only two keyframes. This is known as the timing curve, and it represents the constant speed of the object along the curve.
To edit an animation along a motion path curve, you usually edit the motion path curve (in the view window) or the timing curve. You don't usually edit the animation curves because they are so complex.
The diagonal timing line is now curved. This will make the object begin moving very slowly and gradually increase its speed.
Delete the animation for the object
Delete animated channels from an object.
 .
.


 and
and  (Windows) or
  (Mac) keys, and drag the
  to track, the
  to tumble, the