Controls animation during playback to optimize playback performance.
See View individual frames of animation.
For example, you can choose to play back only the active items, not display CVs or lights during a playback, or to play back rendered images.
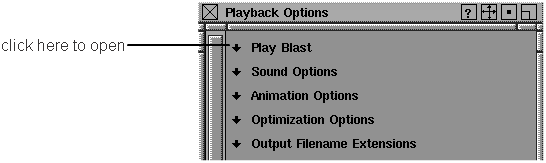
The Playback Options window contains several parameter sections to let you view your animation in different ways.
To open a section, click the black down arrow to the left of the heading.
For more information about play blast, see Use the Play Blast window.
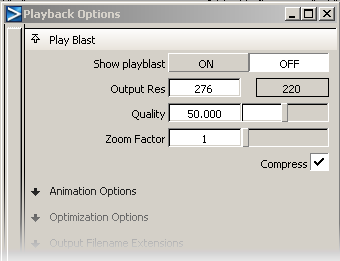
The default for Zoom Factor is 1. If you change it to a large number, the Play Blast window becomes that many times larger than the specified resolution by repeating pixels from the original resolution. For example, if the Zoom Factor is 2, each pixel from the original image is repeated twice (in each direction) to create a larger image.
Determines how the Play Blast images are stored in memory. If the Compress option is toggled ON (indicated by a check mark), the images in memory are compressed. As a general rule, if a large number of frames are being played back, it is a good idea to use this option.

Click to the right of the heading to display the Objects menu.
ALL – Every animated object is animated during a playback.
ACTIVE – Only picked objects are animated during a playback. A DAG node, CV, or camera can be picked using the Pick menu items. A shader, texture, or environment map is active if it is picked in the Multi-lister.
ACTIVE SETS – Only the items in the selected sets in the Set Lister are animated during a playback. Choose Animation > Editors > Set Lister to display the Set Lister.
Click to the right of the heading to display the Parameters menu.
ALL – All channels of objects are animated during a playback.
GLOBAL/LOCAL – Only channels whose parameters are turned on in the GLOBAL or LOCAL parameter control windows are animated during a playback.
To turn animation parameters on or off, use Animation > Editors > Param Control .
.
This menu is only available when either ACTIVE or ACTIVE SETS is chosen from the Objects menu.
None – Keyframes are set only for the selected objects.
Above – Keyframes are set for the selected objects and all objects in the hierarchies above them.
Below – Keyframes are set for the selected objects and all objects in the hierarchies below them.
If Hierarchy is set to Below, and if there is geometry somewhere below a picked DAG node, keyframes are set for all the DAG nodes below the picked DAG node, but not for any of the CVs. To set keyframes for CVs, select the CVs of the geometry you want to animate and set keyframes for them separately.
Both – Includes both Above and Below.
Click to the right of the heading to display the Repeat menu.
ONCE– The range of animation plays back once, then stops.
OSCILLATE– The animation alternates between playing in a forward and reverse direction until you stop the animation.
LOOP– The animation plays over and over in the same direction (in whichever direction the playback was initiated).
If set to ON, playback only displays the frames in the pose animation sequence. To create a pose animation sequence, see Animation > Tools > Pose Animation .
.
If set to ON, then the next time a playback is invoked, the animation will be saved to .pix files in the .pix directory of your current project.
You can quickly preview these images from Animation > Show > FCheck .
.
During a Play Blast, you can turn image output on and off by clicking the Output Image button on the Play Blast window’s titlebar.
The camera view that is used for the images is the same view as the current application window. To specify the window to be used for creating image files, click in it before starting a playback.
The image files created are snapshots of the screen. For best results, make sure no other windows are covering the current application window.
After you have entered the name of a file, the playback starts. The first time through the playback, an image file is saved for each frame. After the playback has run once through all the animation in the given range, the Output Image option automatically turns OFF, and playback continues without saving image files.
If Optimization is OFF, the playback is not optimized. In this case, the Optimization Options heading is not displayed since it does not apply.
If Optimization is ON, any playback (invoked from the control panel, from Animation > Show > Playback , or from the Time Slider) uses optimization options to increase the speed of the playback. Expand the Optimization Options section to set these options.
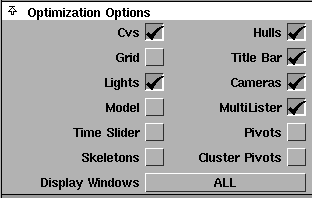
If the Optimization option in the Animation Options window is set to ON, all animation playbacks are optimized using the following optimization options.
If a check mark is displayed next to an option it means that an item is optimized (not displayed) during a playback.
If checked, no geometry is displayed during playback.
This is useful if a window is in toggle shade mode (see WindowDisplay > Hardware Shade ).
).
If checked, the time slider and frame counter in the Alias window will not be updated during playback, but will update once playback is over. This optimization alone can double the speed of many Play Blasts, but has minimal effect on most normal playbacks. Note that the frame marker can still be dragged and all of the frame control buttons still operate normally.
If checked, cluster pivots are not rendered during playback.
WindowDisplay > Toggles > Pivots  overrides the pivot settings in the Playback Options Optimization window. If you have selected WindowDisplay > Toggles > Pivots, no pivots will be rendered during playback even if you uncheck Pivots or Cluster Pivots in the Playback Options Optimization window.
Specifies which windows should remain open during playback. (The more windows that are open, the slower the playback.)
Click to the right of the heading to display the Display Windows menu.
After the playback is finished, all windows that were closed during the playback are reopened.
The Output Filename Extensions options are used when the Output Image option is set to ON in the Animation Options window or when you are rendering an animation sequence with Animation turned ON in Render > Globals .
.
The names of the image files that will be saved consist of a base name, which the system prompts you for, a period (“.”), and then a numbered extension indicating the place in the sequence of image files that this file represents (for example: filename.1, filename.2, filename.3, and so on.) This number, does not necessarily correspond to the frame number. It is computed using the three options in this window.
For example, assume:


