Animates a camera view of a scene along a path to effectively simulate a walkthrough of a scene.
Indicates whether the camera tilts into the curve or away from the center of the curvature while traveling along the motion path. The Auto Bank option has no effect if the Maximum Bank value is set to 0 degrees.
Indicates the maximum number of degrees the camera banks at the maximum curvature of the eye motion path.
Indicate the numbers of the first and last frames of the animation, and the frame increment respectively.
If toggled ON (indicated by a check mark), the system creates an SDL file to record the animation for rendering. In this case, you are prompted to supply an SDL file name in which to store the animation.
Although the animation is written to the SDL file, rendering of the animation is not automatic. To render the animation, you need to use the command-line renderer. For further details, see the description of renderer/raytracer/powercaster/powertracer, documented in the Utilities section of the technical documents.
Animating a camera view along a path
Animation > Tools > Autofly lets you animate the camera view of a scene along a path to effectively simulate a walkthrough of a scene.

When animating the camera, think of the it as three components: camera eye, camera view, and camera up vector.
The camera eye can be considered the camera unit itself, which travels along the motion path to which it is assigned. The motion path determines the position of the camera at any given time in relation to the scene. For example, the design of the motion path lets you move the camera closer to or further away from an object in the scene. To visualize, think of yourself walking along with a camera taking pictures: the route you follow would be the motion path.
The camera view can be considered the focus point of the camera— where the camera is looking at any given time. If the camera view is not assigned to a motion path of its own, then the view is always directly in front of the camera. Think of yourself walking through a scene without ever pivoting your head, your view is always directly ahead of your body. By assigning the view to a motion path of its own, you can change the view point of the camera at any time in relation to the camera position.
The camera up vector can be considered the current angle of the camera at any given time in relation to the camera eye. The camera up vector is the direction from the camera’s eye to the camera’s up. If the camera’s up is not assigned a motion path of its own, the camera remains parallel to the path that the eye has been assigned to at all times. By assigning the camera up to an independent motion path, the camera can be pivoted to any angle up to 360 degrees. This can be likened to a camera on a tripod except that the tripod could pivot a full 360 degrees.
At least one curve is needed to use Autofly. If only one curve is used, it must be the motion path for the camera eye. The camera view then remains directly in front of the camera throughout the animation.This might be exactly what you want. If not, and you want to control the camera view throughout the animation, you need at least two motion path curves.
The following prompt is displayed:
Select the motion path for the camera EYE to follow
Once the camera eye motion path has been selected, the system prompts:
Select the motion path for the VIEW, or select the GO icon
If you click the Go icon instead, the system uses a camera view motion path that is straight ahead along the motion path chosen for the camera eye.
Select the motion path for the UP, or select the GO icon
To use a third curve for the camera up, click directly on the curve you want to assign as the camera up path.
If you click the Go icon instead, the system generates the camera up motion path. The camera is oriented in the up direction, and banks around curves according to the current Maximum Bank degree values set in the Autofly Options box.
 key.
key.
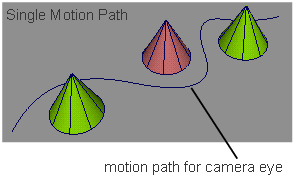
In the following diagram, only one motion path is used. The camera view is always directly in front of the camera eye as the camera travels along the motion path. The camera view loses sight of the objects as it weaves between them.
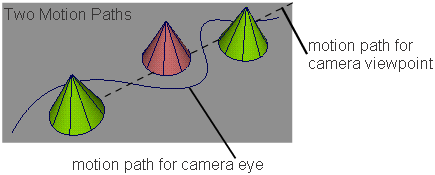
In the next diagram, a second curve has been assigned as the motion path for the camera view. In this case, regardless of the camera position on the eye motion path, the camera’s view is always directed to the cones as it weaves between them.