Reference > Menus > File menu > 
File > Print Setup


Controls the look and layout of printouts.

Print Setup window for Plot mode

The content of the Print Setup window varies with the Mode setting in the File > Print option window. If Mode is set to Plot Print, the following options are shown:

Output tab

Printer

The printer to output to. This pop-up menu shows all the printers available to your local system.

On Windows, this is all the printers in your Printers folder (Start > Settings > Printers).

Output Style

The page description language used by your printer.

If you are printing to a PostScript printer, choose PostScript.

If you are printing to an HP/GL printer, choose one of the HP/GL options. If your printer supports color, choose HP/GL2. Otherwise, check your printer manual to find out which protocol your printer uses.

To output sketching curves to an Adobe Illustrator format file, choose Illustrator. Note that only sketch “shapes” are output to Illustrator: no NURBS curves or surfaces will be output.

Output to

Output to a printer, or redirect the output to a file.

Appearance

Print in Color or Black and White.

Print Range

Choose which pages of all the possible pages to print (for layouts that spread over multiple pages).

All – Prints all pages.

Page placement – Allows you to choose which part of the drawing will appear on the page by dragging a representation of the page around the print preview with the . This only works when Viewing type is Scale.

Range – Choose a start and end page to print.

Selection – Print only the pages currently selected in the print preview window (File > Print).

Number of Copies

The number of copies to print to the printer. Not available when output is directed to a file.

Paper tab

Paper Type

The type of paper used by your printer.

For printers fed by a continuous roll of paper, set the paper type to Rollfeed. For “normal” printers fed by a tray with sheets of paper, set the paper type to Pre-cut.

Standard

Controls which international paper-size naming standard is used to choose a paper size.

Size

The paper size to output to.

Orientation

Portrait (top of the output is at the top of the page) or Landscape (top of the output is at the right edge of the page).

Margins

The amount of space between the edge of the printer’s printable area and the output.

Info tab

Draw Titlebox

Whether to show the information box on the output.

Information fields

The information that will appear in the information box.

Drawing Scale

This value is automatically calculated based on the current settings in the Viewing tab. You cannot edit it directly.

Units

This value is taken from the units used in your model (Preferences > Construction Options). You cannot edit it directly.

Titlebox Font Size

The font size of the text in the information box.

Viewing tab

Objects

Output only picked (Active) or All objects in the model.

Viewing Type

Scale – Manually control the Layout Style and Scale.

Scale To Fit – Automatically scale to accommodate a manually controlled Layout Style.

Screen – Match the layout and scale to the program’s view windows.

Screen scale – Match the layout of the program’s view windows with manual control over Scale in orthographic views.

Layout Style

The layout of orthographic and perspective windows in the output.

Scale Type

Controls how you specify the scaling factor.

Ratio – Enter the ratio between the output and the model, separated by a colon (:).

Percent – Enter the percentage of the model’s size to output.

Scale

The scaling ratio or percentage (as specified in Scale Type).

Sync Viewing Axis

Locks the axes of the orthographic views together, so moving one view automatically moves the other views.

Match Paper Border

Automatically fit the views to fill the available area on the page.

Image

Controls what color space is displayed in the print preview.

The colors in most images are specified using RGB values. The RGB color space cannot be completely reproduced on a CMYK printer. This option lets you preview what the images will look like when printed on a CMYK printer.

Drawing tab

Draw Grid

Shows the grid in the output.

Draw Rulers

Shows unit rulers along the edges of the views.

Crop Marks

Shows crop marks around the edges of the output to allow for easier registration.

Draw Border

Shows borders around the views.

Border Thickness

The width of the lines used to create the borders.

Grid Thickness

The width of the lines used to draw the grid.

Ruler Font Properties

Overrides the default font size for ruler text.

Ruler Font Size

The font size of ruler text labels.

Edit Layer Print Attributes

Click to show a dialog box allowing you to set print attributes by layer.

Line Thickness

The width of the lines used to draw the model.

Locator Color

The color used for drawing locators, on color printers.

Filled Arrow

Fills arrowheads with color.

Arrow Width

The width of arrowheads in the output.

Arrow Length

The length of arrowheads in the output.

Font Properties

Overrides the default font size for locator text.

Font Size

The font size of locator text labels.

Hidden Line Tab

The hidden line algorithm uses a tessellation in its processing. You can specify to use the existing tessellation (like in the NURBS to Mesh tool), or uncheck that option and use your preferred tessellation settings.

If you have surfaces behind other surfaces that you want to be plotted (for example, dials behind a transparent plastic shield), make the transparent surface’s wireframe invisible before choosing Print; because hidden line plotting doesn’t recognize shader transparency.

Print Setup window for Canvas and Window modes

If Mode is set to Print Canvas, or Print Window in the File > Print option window, the following options are shown in the Print Setup window:

Print Setup...

Opens the Print window where you can choose a printer, set the printer properties, number of copies, and so on.

Page Setup

Opens the Page Setup window where you can choose the paper size, orientation, and the printer tray.

Orientation

Choose Portrait or Landscape. You can also set this value from the Page Setup window (see above).

Fit to Page

Check this box if you want the image to be automatically sized to fit on the paper. If it is unchecked, the following options appear.

Height/Width

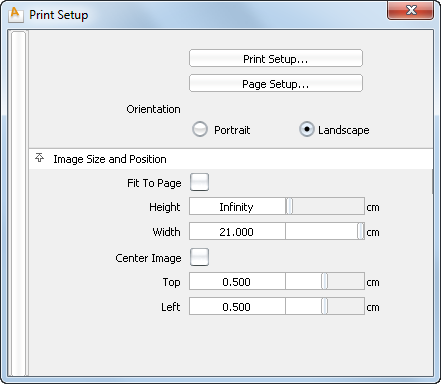
Specify the height and width of the image (in either centimeters or inches, depending on the units set in Preferences > Construction Options).

Center Image

Check this box if you want the image to be automatically centered on the paper. If it is unchecked, the following options appear.

Top/Left

Specify the top and left margins (in either centimeters or inches, depending on the units set in Preferences > Construction Options).

See Also