Every CATRig has one CATParent. The CATParent, which is the triangle+arrow symbol seen under each rig as it is created, can be considered the character node of the rig.
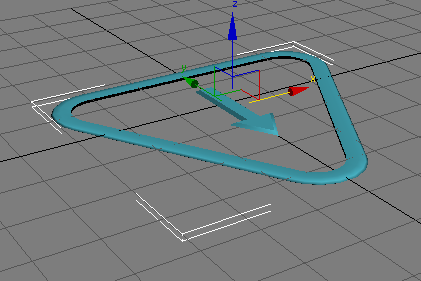
CATParent with no rig
All of the elements of the rig are associated with the CATParent. It holds basic information about the whole rig, including its name, size and other basic data.
It also holds the Rig Preset Manager, which allows you to load and save CATRig presets.
The rig is not linked to the CATParent but can be transformed by it when in Setup mode. The rig inherits scale transforms from the CATParent in both Setup and Animation modes.
 Create panel and click
  (Helpers).
 (Save Preset Rig).

Shows and lets you edit the name CAT uses to prefix all bones in the CATRig. See Using CAT's Naming System.
The scaling ratio for the CATRig. All size parameters on the CATRig that define such things as bone length width and height are in CATUnits. See Understanding CATUnits.
Choose the method CAT uses for displaying the layers and keyframes on this CATRig in Track View. See Track Display Modes.
Choose the axis (X or Z) that the CATRig uses as the length axis. See Understanding the Bone Length Axis.
Toggles the Motion Extraction Node.
The CATRig Load Save rollout displays a list of existing CATRig presets and provides controls for working with presets.

 Open Preset Rig Save Preset Rig
Saves the selected CATRig to a preset file. If you use the default location (see preceding), the preset then appears on the list, making it easy to add to your scenes.
The button label, function, and availability depend on the context.
If no pelvis exists in the rig, the button label is Create Pelvis, and clicking it adds a pelvis that you can use as the basis for a custom rig.
If the rig contains a pelvis and was loaded from or saved as an RG3 preset, the Reload button label appears, and clicking it loads the current preset file.
Use this to restore an RG3 rig to its as-saved state after editing. Reload works only with rigs in the RG3 format.
Allows you to add objects in the scene to the rig at the CATParent level. For details, see To add rigging objects:.
For a good example of how to use Add Rigging, see the Marama preset included with CAT. Add the Marama preset, then go to the Modify panel and click Add Rigging. The Extra Rig Nodes dialog that opens lists the various included skin-mesh objects as well as the additional MaramaFace facial rig.
When on and you load a scene, the scene file retains the original character, but CAT automatically replaces the character with updated data (saved in the preset). CAT automatically applies the original character's animation to the new character. The more similar the characters, the better the transferred animation.
Game developers often need to create one node to sit at the root of a character's CATRig. Uses for this node include:
To simplify the workspace, CAT displays only the controllers and keyframes for the active layer by default. As you are working on a layer, it is easier to understand the work you are doing if you can see the keyframes for the active layer only.
By default, CAT uses the X axis as the length axis for all bones. This means that if you select a bone and activate Move transform mode and set the coordinate system to Local, the axis designated as the length axis is aligned with the length of the bone.


 Modify panel