 Command entry:
 Material Editor
  Standard material
 Basic Parameters rollout for the Anisotropic, Blinn, Metal, Multi-Layer, Oren-Nayar-Blinn, or Phong shader
  First group in the rollout (unlabeled)
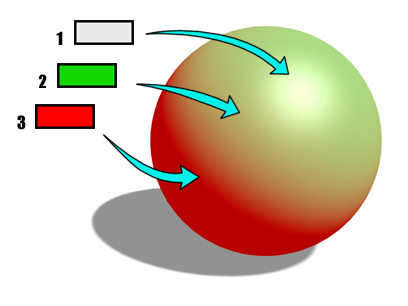
Color controls set the colors for different color components. You can set the color by clicking the color swatch to display the Color Selector.

1. Specular color
2. Diffuse color
3. Ambient color
Copying and Locking Color Components
For convenience in changing color components, the Material Editor lets you copy one color component to another by dragging, and to lock two color components together with the lock buttons to the left of the Ambient and Diffuse, and Diffuse and Specular color swatches.
When you drag and drop a color swatch, the Copy or Swap Colors dialog asks if you want to copy the color or swap the two colors.
In general, materials with two identical color components do not look realistic, and except for materials that are close to solid black, you should avoid using copied or locked color components in materials you use in a scene. Color copying and locking are best used as conveniences when you design a new basic material.
The Material Editor displays a Color Selector.
As you change color values, the color component also changes in the sample slot.
To copy one color component to another:
A Copy or Swap Colors dialog is displayed.
 “wire” button between Ambient and Diffuse or between Diffuse and Specular.
The Material Editor displays an alert that asks whether you want to lock the two color components.
The color above replaces the color below. In other words, Ambient replaces Diffuse and Diffuse replaces Specular.
If two colors are locked, and you lock the other two, all three component colors are replaced by the active color.
While two colors are locked, adjustments to one color component affect the other as well.

Controls the ambient color. The ambient color is the color in shadow (indirect light).
 The lock button to the right of the Ambient and Diffuse settings, when on (the default), forces them to use the same map.
Usually it makes sense to use the same map for the ambient and diffuse components. To use different maps, turn off the lock button. A map shortcut button for Ambient appears.
Turn off the  lock button and click the map button to assign an Ambient Color map. This button is a shortcut: You can also assign an Ambient Color map on the Maps rollout.
Controls the diffuse color. The diffuse color is the color in direct light.
Click the map button to assign a Diffuse Color map. This button is a shortcut: You can also assign a Diffuse Color map on the Maps rollout.
Controls the specular color. The specular color is the color of the highlight on a shiny object. You can control the size and shape of highlights in the Specular Highlights group, described below.
Click the map button to assign a Specular Color map. This button is a shortcut: You can also assign a Specular Color map on the Maps rollout.