State Sets provides a mechanism for maintaining and managing different states of the scene you're working on.
A typical use for State Sets is as a render-pass-management system. You can also use the feature to maintain different user interface setups and views of your scene and quickly switch among them. You access this feature from the State Sets dialog, which provides a hierarchical view and special controls.
State Sets are basically objects that record changes to your scene. The basic workflow is as follows:
The State Sets dialog opens showing a State Sets item at the top of the Tree View, with an empty State01 item underneath it. The overall State Sets item is also known as the master state.
 to add a new state.
 ) next to the state name to start recording changes.
The state now lists the changes it detected. You can adjust these by expanding the entry and changing its child values.
To toggle between the original scene and a state, click the state's arrow button. Or switch among different states by clicking the corresponding arrow button. Only one state can be active at a time, as indicated by the black arrow. If all arrows are gray, no state is active and the original scene is present.
The master state item, State Sets, is a root node that contains all of your scene states. You can use it to perform global
operations such as rendering all states at the same time (right-click State Sets  Render All States) or adding new states.
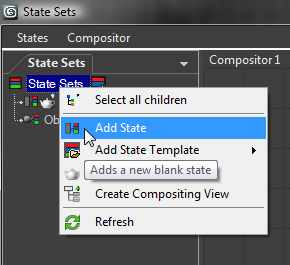
To add a new state, do one of the following:
Each item at the first level below the master state is called a child state. These are individual objects that you work with when tracking changes in your scene.
As described earlier in this topic, you record changes into a child state using the circular button to the right of the state name and you toggle the state by clicking its arrow button.
After you record changes, the state contains nested child items. To see these changes, Expand the child state item and adjust them to modify the state.
You can nest states, subjecting the child states to the parent's settings. For example, consider a scene where you have hidden an object in one state and changed render resolution in another state. If you nest the first state within the second, the second state will do both: hide the object and change the render resolution.
To nest states within another:
States are always applied in the order they appear in the dialog list, from top to bottom. This means that if you have three states doing three different things when the state is applied the first sub-state will be applied first, then second, and then the third. This order is always followed.
With the Compositor schematic editor in State Sets, you can manipulate and composite the output of render passes. This is accomplished with texture map-manipulation and specially designed tools.
This topic lists all scene properties that are tracked by the State Sets feature. You can use this to determine whether certain aspects of your scene can be recorded and used with State Sets.


 ) to show that recording is active.