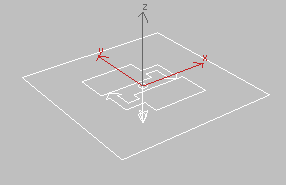
The Particle Flow source is the viewport icon for each flow, and also serves as the default emitter. By default, it appears as a rectangle with a central logo (see illustration), but you can change its shape and appearance using the controls described in this topic.

When you select a source icon in the viewport, the Particle Flow emitter-level rollouts appear on the Modify panel. Alternatively, click the title bar of a global event in Particle View to highlight it, and to access the emitter-level rollouts from the parameters panel on the right side of the Particle View dialog. Use these controls for setting global attributes, such as icon properties and the maximum amount of particles in the flow.
The particle source icon is roughly equivalent to the corresponding global event in Particle View. They have the same name, but selecting one does not select the other. If you delete a particle source icon from the scene, Particle Flow converts the global event to an isolated local event in Particle View, retaining its operators with their settings intact. Any other events in the system remain in Particle View, along with their wiring. However, if you delete a global event, Particle Flow also removes any local events used exclusively by that system, as well as the corresponding particle source icon. To retain the local events, first delete the wire from the global event, and then delete the global event.
If you clone a particle source in a viewport with Shift+transform or Edit menu  Clone, an equal number of copies of the global event appear in Particle View, each wired to the original birth event. The Clone Options dialog offers only the Copy option. However, if you clone a global event in Particle View, the Clone Options
dialog also lets you create instances of the cloned operators and tests. It's not possible to create instances of global and
local events, so these options are unavailable in the Clone Options dialog, as a reminder. Also, global events cloned in Particle
View are not automatically wired to the original birth event.
In the modifier stack, expanding the hierarchy of a Particle Flow source object provides access to two sub-object levels: Particle and Event. For further information, see Selection rollout.

Use these controls to turn the particle system on and off, and to open Particle View.
 parameters panel.
Click to open the Particle View dialog.

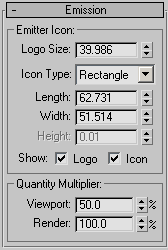
Sets the physical characteristics of the emitter (particle source) icon, and the percentage of particles produced in the viewports and when rendering.
Sets the size of the Particle Flow logo, which appears at the center of the source icon, as well as the arrow that indicates the default direction of particle motion.
By default, the logo size is proportional to that of the source icon; with this control, you can make it larger or smaller.
This setting affects only the viewport display of the logo; changing it has no effect on the particle system.
Choose the basic geometry of the source icon: Rectangle, Box, Circle, or Sphere. Default=Rectangle.
This choice matters only if you use the source icon as the particle emitter. The available size settings depend on which icon type you choose, and, again, are important only if you use the source icon as an emitter.
The default icon type is Rectangle. If you add a particle system, and then change the icon type to Box, the icon continues to resemble a rectangle. To make it look like a box, increase the Height setting.
These settings determine the percentage of the total number of particles in each flow that are actually produced in the viewports and at render time. They don't affect the percentage of particles that are visible; those are determined by the Display operator and Render operator. You can use them to quickly decrease or increase the number of particles consistently throughout all events in the particle system. The maximum setting, 10,000%, lets you multiply the number of particles generated by the flow by 100.
The total number of particles is determined by the combined effects of the following operators and tests: Birth, Birth Script, Delete, Collision Spawn, and Spawn. Scripted operators and tests can also affect this number.

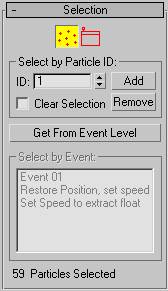
Use these controls for selecting particles on a per-particle or event basis. Selection of particles at the Event level is for debugging and tracking purposes. Particles selected at the Particle level can be acted upon by the Delete operator, the Group Selection operator, and the Split Selected test. You cannot directly manipulate selected particles with standard 3ds Max tools such as Move and Rotate.
 parameters panel.
 Particle
 Event
EventLets you select particles by event. At this level, you can select all particles in one or more events by highlighting the event(s) in the Select By Event list, or in the viewports with standard selection methods. To convert a selection from the Event level to the Particle level for use with the Delete operator or Split Selected test, use Get From Event Level.
Selected particles appear in the viewports in red (if not geometry), in the form designated by the Display operator  Selected setting.
Each particle has a unique ID number, starting with 1 for the first particle and counting up. Use these controls to select and deselect particles by their ID numbers. Available only at the Particle selection level.

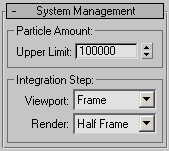
Use these settings to limit the number of particles in the system, and to specify the frequency of updating the system.
At each integration step, Particle Flow updates the particle system, applying each active action to particles in its event. A smaller integration step can improve accuracy, at the cost of calculation time. These settings let you apply different integration steps to the particle animation in the viewports and at render time.
In most cases, the default Integration Step settings work fine. One instance in which increasing the integration-step frequency might help is when fast-moving particles that should collide with a deflector penetrate it instead.

This rollout lets you apply a script to the particle system at each integration step, as well as after the last integration step of each frame you view. Use an Every Step Update script to set up history-dependent properties, and a Final Step Update script to set up history-independent properties.
The Every Step Update script is evaluated at the end of each integration step, after all actions in the particle system are evaluated, and all particles are finally in their respective events. When, for example, you are setting up Material ID according to a particle index, it is important to be sure that particles are not about to jump to another event.
When you set up history-dependent properties, such as speed, it is important to do that at every integration step, because otherwise the final position would be quite different.
Turn on to cause a script in memory to be executed at each integration step. You can modify this script by clicking the Edit button, or load and use a script file with the remaining controls in this group.
The default script modifies particle speed and direction, causing particles to follow a wavy path.
Click this button to open a text-editor window with the current script.
When Use Script File is off, this is the default Every Step Update script (3dsmax\scripts\particleflow\example-everystepupdate.ms). When Use Script File is on, this is the loaded script, if you've loaded one. If you haven't, clicking Edit displays the Open dialog.
The Final Step Update script is executed after the last integration step has been completed for each frame that you view (or render). For example, if you play the animation in the viewport with Real Time turned off, Particle Flow runs this script at each frame, immediately before the particle system is rendered to the viewport. However, if you simply jump to a different frame, the script is run once only, so if the script assumes a certain history, you might get unexpected results.
For this reason, it's best to use the Final Step Update script to modify history-independent properties. For example, if no operators in the system depend on the material indices, you could use it to modify the material index. In this case there's no need to set those indices in every intermediate integration step. Also, you can set up a position channel in the Final Step Update script if you know the analytical expression for the position.
Turn on to cause a script in memory to be executed after the final integration step. You can modify this script by clicking the Edit button, or load and use a script file with the remaining controls in this group.
The default script modifies particle speed and direction, causing particles to follow a bulb-shaped path.
Click this button to open a text-editor window with the current script.
When Use Script File is off, this is the default Final Step Update script (3dsmax\scripts\particleflow\example-finalstepupdate.ms). When Use Script File is on, this is the loaded script, if you've loaded one. If you haven't, clicking Edit displays the Open dialog.