Command entry:
Rendering menu

Raytracer settings (visible only when the Default Scanline renderer is active)
Render Setup dialog
Raytracer panel
Raytracer Global Parameters rollout
Global Raytrace Engine Options group
Acceleration Controls button
Command entry: 
Render Setup dialog
Raytracer panel (visible only when the Default Scanline renderer is active)
Raytracer Global Parameters rollout
Global Raytrace Engine Options group
Acceleration Controls button
The controls on this dialog let you override the default acceleration values and specify your own requirements. Typically
you don't need to use them, but if you are familiar with the requirements of your scene, they can help you optimize raytrace
rendering for your specific needs and time constraints.
Raytracing subdivides the scene, organizing it into a tree for raytrace purposes. A node in this tree is known as a "voxel."
Voxel trees are dynamic, and you can't explicitly specify the structure of the tree. (If you set Max. Divisions to 2, the
tree is an octree, which is possibly a more familiar data structure.)
TipIf your scene is particularly unbalanced (for example, it has a giant planet object and a cluster of small spacecraft objects)
keep the Balance setting low.
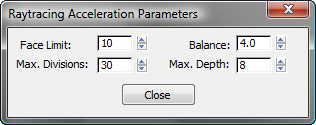
Interface
- Face Limit
-
Sets the maximum number of faces allowed in a lattice voxel before it is subdivided. Default=10.
- Balance
-
Determines the sensitivity of the subdivision algorithm. Increasing this value uses more memory but can increase performance.
Default=4.0.
- Max. Divisions
-
Sets the initial lattice dimension. For example, 4 is a 4 x 4 x 4 lattice. Default=30.
- Max. Depth
-
Sets the maximum number of lattice subdivisions. Default=8.