The Matte/Shadow/Reflection material, part of the Production Shaders library, is used to create “matte objects”; that is, objects that represent real-world objects in a photograph used as the scene background (also known as the plate). The material provides a wealth of options for combining a photographic background with the 3D scene, including support for bump maps, ambient occlusion, and indirect illumination.
In all these cases the material is applied to a matte object that represents an object in the background plate, and the 3D object uses a traditional material.
For additional information, see Help menu  Additional Help mr Production Shader Library Matte/Shadow Objects and CameraMaps, as well as the Tech Note (following).
The Matte/Shadow/Reflection shader works by doing a form of differential shading. In other words, it determines the amount of light a point would receive if it were not in shadow, compares it to the amount of light the point actually receives, and shades it by the relative difference.
This means that any point that is fully lit, unshadowed by any object, returns the same color it already had, completely disregarding the actual intensity of that light. If half of the incoming light is blocked, the point will be shaded at 50 percent intensity, regardless of the full-intensity amount in an absolute sense.
An important feature of the Matte/Shadow/Reflection material is that it is non-self-shadowing, non-self-occluding, non-self- reflecting, and does not cast indirect light onto itself. Because it is designed to act as a stand-in for objects present in a photographic plate, which already contains self-shadowing, self-reflection, and so on, the material automatically excludes these effects. However, it is still able to cast shadows on other objects, receive shadows from other objects, reflect other objects, and so on, without creating unwanted double shadows or double reflections for such effects already present in the plate.
This multi-part procedure provides step-by-step instructions for a simple case of combining a 3D object with a photograph using the Matte/Shadow/Reflection material, the Environment/Background Camera Map shader, and the Environment Probe/Chrome Ball shader.


Ideally, these should be HDR photos, but non-HDR images can also work well.
Part 1: Set up the matte object, then test the shadows:
Set up the viewport:
Match Rendering Output is chosen.
Choose an environment:
Maps mental ray group, choose Environment/Background Switcher.
Set up the background and environment reflections:

From the pop-up menu, choose mental ray Environment/Background Camera Map.
 View panel, drag a wire from the Environment/Reflections socket of the Environment/Background Switcher node. Use the pop-up
menu to choose mental ray Environment Probe/Chrome Ball.
View panel, drag a wire from the Environment/Reflections socket of the Environment/Background Switcher node. Use the pop-up
menu to choose mental ray Environment Probe/Chrome Ball. 
If the two photos have different exposures, use the Multiplier setting for either or both maps to match them.
Next, you’ll make a rudimentary model that represents objects already present in the background. At the very least you need a simple plane for the "ground" to place things on.
Set up the matte object and a shadow-casting object:
Add a Skylight:
Standard Lights Skylight and then click in the Perspective viewport to add a Skylight to the scene.
This retrieves the appropriate ambient color from the chrome ball photo.
Set up the Matte/Shadow/Reflection material:
This places the same background map that is used in the environment switcher into the background map in the material as an instance.

In the Slate Material Editor, you can see the same map wired to both components.
 Apply the new Matte/Shadow/Reflection material to the ground plane.
This completes the basic setup. If you render now, you should see the teapot superimposed over the background image. The teapot should have a soft shadow underneath, which comes from ambient occlusion.

Part 2: Marrying 3D with a photo:
Now you’ll tune the lighting in the scene. Generally you need at least one key light to cast a directional shadow.
 Radius setting, on the Shape/Area Shadows rollout.
The scene is now set up, although further tuning might be necessary.

Part 3: Prepare for compositing:
So far the rendered 3D content has been added on top of the background directly in the renderer. Generally, you want to do this in an external compositing program, as follows:

In this case, you use the button with its Cut option so you can paste the map in a different location.
Camera Mapped Background map, apply a new Environment/Background Switcher shader.
The scene now contains two Switcher nodes: One used in the environment (switching between transparent black and the chrome ball) and one in the material (switching between transparent black and the camera map).
If you render now, the resulting image still properly contains all the reflections, light, and so on, from the background, but not the background itself. Shadows exist in the alpha channel, so the image is suitable for compositing directly on top of the background image.

The foregoing procedure does not cover gamma.
If you use a gamma-correct workflow, which yields a superior result, with literal mental ray textures (that is, you use the big Browse button to refer directly to a bitmap file, rather than inserting a Bitmap map), you must set the gamma of this bitmap explicitly in the appropriate Reverse Gamma Correction parameters.
Matte/Shadow/Reflection Parameters rollout

Sets the color or map for the matte material. To use the scene background, click the map button, browse from the scene, and choose the Environment map. This button is a shortcut: You can also assign a Background map on the Maps rollout.
The opacity of the material. Default=1.0.
Click the map button to assign an Opacity map. This button is a shortcut: You can also assign an Opacity map on the Maps rollout.
Click the button to assign a Bump map. This button is a shortcut: You can also assign a Bump map on the Maps rollout.

The amount of environmental light in the scene, which in a practical sense is how dark the shadows are. Default=0.2.
The Matte/Shadow/Reflection material does not use Skylights to generate shadows; any such shadows must come from the ambient occlusion feature. So when the shader is used together with a Skylight, this value should be similar to the level of light the Skylight provides.
The units value for this setting depends on the lighting unit. If you use the mr Photographic Exposure Control, and set Physical Scale to Physical Units (cd/m 2 ), this value will be in physical values, and might need to be in the hundreds (or thousands for an outdoor shot lit by mental ray Sun & Sky). However, if you don’t use the exposure control, or set it Physical Scale to Unitless, this parameter is in a "traditional" unit space where 0 is black and 1 is white.
Setting a color or map here tints the shadows. For accurate shadow tint, use a neutral color.
Click the map button to assign an Ambient Color map. This button is a shortcut: You can also assign an Ambient Color map on the Maps rollout.
When on, you can use the Add/Replace/Delete buttons to edit the list, specifying lights that are to cast shadows on the surface. For the lights list to be in effect, Receive Shadows must also be on.
When off, and Receive Shadows is on, all lights in the scene cast shadows on the surface.

Reflections are tinted this color. For accurate reflections, use a neutral color.
Click the map button to assign a Reflection map. This button is a shortcut: You can also assign a Reflection map on the Maps rollout.
The subtractive color for reflections. This amount is removed from the plate before reflections are added. If black, nothing is removed, and reflections are added purely additively on top of the plate. If 50% gray, the plate pixels are attenuated to 50% of their intensity, and the reflections are added on top of that, and so on.
Use this setting if the plate contains an area with many reflections that need to be removed before the new, synthetic reflection is added.
The glossiness of reflections. Default=1.0.
Click the map button to assign a Glossiness map. This button is a shortcut: You can also assign a Glossiness map on the Maps rollout.

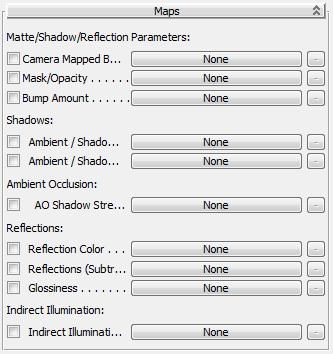
This rollout lets you assign a map or shader to many of the Matte/Shadow/Reflection parameters. You can also assign maps and shaders on the rollout where the parameter first appears: The principal value of this rollout is that it also lets you toggle a parameter's shader, using the check box, without removing the map.
 The button to the right of each main shader button is for shaders that can return multiple parameters. If a shader that returns
multiple parameters is assigned to the component, the button's tooltip shows the parameter name.
The button to the right of each main shader button is for shaders that can return multiple parameters. If a shader that returns
multiple parameters is assigned to the component, the button's tooltip shows the parameter name.


 maximize the viewport (
