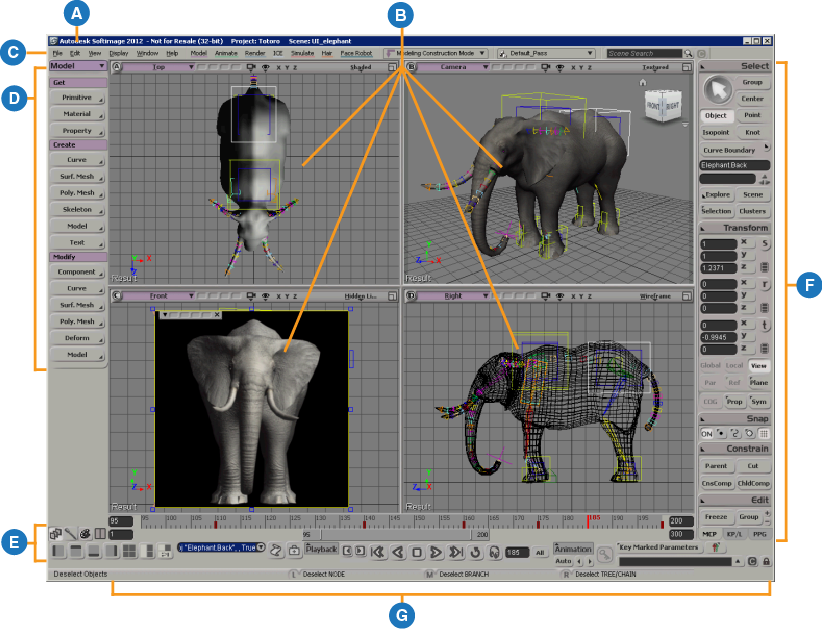
This section provides an introduction to the main Softimage interface.
The Softimage interface is composed of several toolbars and panels surrounding the viewports that display the elements in your scene.

| A |
Title bar Displays the version of Softimage and other information depending on your license type, as well as the name of the open project and scene. |
| B |
Viewports Lets you view the contents of your scene in different ways. You can resize, hide, and mute viewports in any combination. See Viewports and Working with Views Docked in the Viewports for details. |
| C |
Main menu bar See Main Menu Bar for details. |
| D |
Main Toolbar Contains commands and tools for different aspects of 3D work. Press 1 for the Model toolbar, 2 for Animate, 3 for Render, 4 for ICE, Ctrl+4 for Simulate, and Ctrl+2 for Hair. You can also access these controls from the main menu bar. See Toolbars for details. |
| E |
Icons Switch between toolbar and other panels, or choose viewport presets. See Icons for details. |
| F |
Main command panel (MCP) Contains frequently used commands grouped by category. Switch between the MCP, KP/L, and PPG panels using the tabs at lower right. See Main Command Panel for details. |
| G |
Lower interface controls The controls at the bottom of the interface include a command box, script editor icon, the mouse/status line, the timeline, the playback panel, and the animation panel. See Lower Interface Controls for details. |
 Layouts menu, or create your own layouts as described in the Customizing Softimage guide.
The main menu bar is the horizontal bar at the top of the Softimage interface. It displays menus containing commands for general operations such as managing files, editing, setting preferences, opening tools and editors in floating views, displaying elements, and accessing the documentation.

| A |
The standard menus provide general commands for working in Softimage. |
| B |
The toolbar menus are the same as the toolbars on the left side of the interface. Each of these toolbars (and each of their menus) can be torn off from the main menu bar and kept in a handy floating window for the current Softimage session (see Tearing Off Menus). |
| C |
The FaceRobot menu allows you to easily rig and animate faces. See Face Robot. |
| D |
The construction mode selector allows you to select the context (mode) for adding operators to the geometry stack for modeling operations, animation, or shape animation. See Construction Modes and Regions for more information. |
| E |
The render pass list lets you select the current render pass for the scene. This is the same as is available on the Render toolbar, just in an accessible spot when you have other toolbars active. See Passes & Partitions for more information. |
| F |
The Quick Filter box is useful for quickly finding objects in the scene by name. See The Quick Filter Box. |
The toolbar panel on the left side of the interface displays one of five default toolbars at a time: Model, Animate, Render, Simulate, and Hair. Each of these toolbars contains menus of the commands most commonly used for tasks in their area. These toolbars are also displayed on the main menu bar.
To open a menu of commands, click on a menu button on the toolbar. Each menu and submenu on a toolbar can be torn off and kept in a handy floating window for the current Softimage session (see Tearing Off Menus).
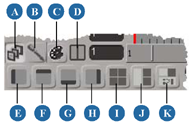
At the bottom of the toolbar panel, there are a number of icons that let you switch between the toolbar and other panels, as well as load different viewport presets.

The controls in this area give you information, such as what each mouse button does or the last command that you used. From here, you can also open the script editor for working with scripts. There is also animation information and tools, from the timeline and playback controls to the Animation panel.

| A |
Timeline and time range Displays the current moment of the animation in time, range of frames, and lets you move between frames. You can also view and edit keys here. See Playing Animations or Simulations and Editing Keys in the Timeline. |
| B |
Command box Displays the last executed command. You can type a new command and press Enter to execute it, or click the arrow button to select a recent command and optionally modify it before pressing Enter. |
| C |
Script editor button Displays an editor that lets you create, save, and modify scripts. See Script Development [SDK Guide]. |
| D |
Scene debugger button |
| E |
Playback panel Lets you control animated scenes through a series of playback controls. See Playing Animations or Simulations. |
| F |
Animation panel Provides access to a number of animation controls that let you mark parameters, set keyframes, retime animation, and more. See The Animation Panel. |
| G |
Mouse/status line Displays the current functions of your three mouse buttons as well as status and error messages when applicable. |
The main command panel on the right side of the interface contains all the commands and tools you will use most frequently while working in your scene. Commands and tools that have a similar purpose are grouped into panels.

| A |
Select panel Select elements in your scene through menu commands, selection icons, filter buttons, and text boxes. See Selecting [Scene Elements]. |
| B |
Transform panel Scale, rotate, and translate elements in your scene through commands, transform tools, and text boxes. See Transformations [Working in 3D Space]. |
| C |
Snap panel Set the type of grid or object snap to use for modeling and positioning. See Snapping [Working in 3D Space]. |
| D |
Constrain panel Set up a number of different types of constraints between objects. See Animating with Constraints [Animation]. |
| E |
Edit panel Edit objects, including duplicate, clone, instantiate, group, freeze, and delete. See 3D Objects, Components and Clusters, and Properties [Scene Elements]; Models and Displaying Scene Information [Data Exchange]; and Operator Stack [Data Exchange]. |
| F |
Switches to the MCP (displayed). |
| G |
Switches to the keying panel. See The Keying (KP/L) Panel [Animation]. |
| H |
Switches to the PPG panel. When this panel is displayed, property pages open here instead of in floating windows (unless the property editor displayed here is locked). |
You can collapse a panel by right-clicking on its label. Right-click on the label a second time to expand a collapsed panel. This can be useful when working at small screen resolutions.
As well, each menu and submenu on the main command panel can be torn off and kept in a handy floating window for the current Softimage session (see Tearing Off Menus).
In addition to the viewports, there are many other tools and editors that are displayed in separate windows that float and can be moved around. As well, you can tear off menus and have them appear in floating windows. You can open these windows from the View menu on the main menu bar.
For more information about opening views in floating windows, see Working with Floating Views.
Using the commands in the View Optional Panels menu on the main menu bar, you can choose to display or hide any panel that is optional in the current layout. In the default
layout, this includes the main command panel (MCP), the timeline, time range slider, and the toolbar on the left side of the
interface.
Select or deselect the panel name from the View  Optional Panels menu. A check mark appears beside the name of a panel that is displayed.
For example in the default layout, if you want to display the time range slider, select it from this menu; or if you want to hide the playback panel, deselect it from this menu.
Choose View  Optional Panels
  Show All or Hide All. This displays or hides all the panels listed in the Optional Panels menu.
For example, you can hide all panels to have the viewports take up the full screen for maximum viewing pleasure, then use keyboard shortcuts and tear-off menus in floating windows to choose commands and perform operations.
The View  Toolbars menu on the main menu bar contains various customizable toolbars and shelves.
A custom toolbar is a floating toolbar that can contain buttons for menus and commands as well as property and material presets. You can click a preset button to apply it to selected objects, or drag and drop the preset button onto unselected objects.
A shelf is similar to a toolbar, but it can have multiple tabs that can contain toolbars, list the contents of folders on disk, or list other scene elements like clips. When a folder tab in a shelf contains content like materials, shaders, and other presets, you can drag and drop a thumbnail or file name onto objects and views in your scene.
Shelves display image sequences as if they are folders, just like in the Softimage file browser. You can double-click the folder icon to display the image files individually, then press Backspace to return to the "parent" view.
When a shelf displays the contents of a folder, you can also move or copy a file to that folder by dragging it from a browser dropping it onto a folder icon or the background of the shelf. On Windows systems, you can also drag from a folder window or the Windows Explorer. If you are dragging between locations on the same drive, the file is moved, and if you are dragging between locations on different drives, the file is copied. Press and hold Ctrl while dragging to copy files on the same drive.
If a tab in a shelf displays a directory, you can go to the parent directory by pressing Backspace while the mouse pointer is over the shelf.
You can create your own shelves and toolbars as described in Toolbars and Shelves [Customizing Softimage].
 Except where otherwise noted, this work is licensed under a Creative Commons Attribution-NonCommercial-ShareAlike 3.0 Unported License